| This is a child page. You can use Parent in the quick nav bar at the top or the bottom of the page to navigate directly back to the parent of this page. Some child pages are more than one level deep, and in that case will require more than one Parent click to reach the outermost document level. |
§ 16.90 - Raytrace
| Quick Reference to Scripting Command |
| a=RAYTRACE(ANTIALIAS, recursion levels, "tracepath","tracefile") |
| Items in CAPS are 0/1 or ranges with more options than just 0/1. Ranges other than 0/1 are indicated by brackets, such as [0-2]. |
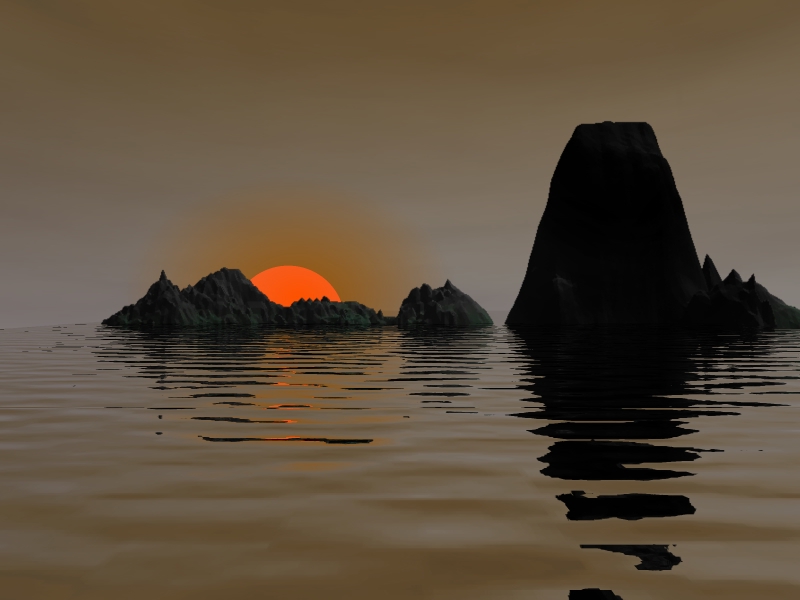
The Ray Trace operation provides a means to define some otherwise almost impossible to create effects at superior levels of quality.
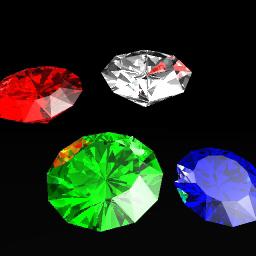
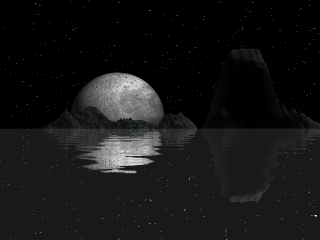
You can map images onto spheres, create realistic looking water (and many other substances!), and much, much more with just a few lines of our easy to learn ray tracing language. You can also, with additional effort, define very complex objects indeed, such as the faceted, refractive gems we provide as one example of some fairly interesting objects.
We've provided control of many useful characteristics — reflectivity, refraction, transparency, roughness, and much more. You can "bump map" surfaces for a compelling look when you need an organic effect — waves are a good example of that. You can use image maps to give character to objects, and you can bump map those as well. If you use images that have active alpha channels in them, you'll be able to control the transparency of an object with the image map itself, which can lead to some amazing results.
In short, this is a very capable tool. While you can certainly use it for such relatively mundane tasks as wrapping an image onto a sphere in high quality, as the images on this page amply demonstrate, that's just the tip of the iceberg!
Ray tracing is an art; the more you use it, the better at it you'll get. If you're new to the idea, then take your time, look at the examples we've provided, and be prepared to spend many hours experimenting. Your investment in time will be well rewarded.
F/x's ray tracing operation uses concepts that are common throughout the ray tracing community, so things you learn here will also apply to other programs in various ways.
For those of you new to Ray Tracing, we suggest you refer to our Ray Tracing Tutorial, where we provide an overview and some examples to get you started.
§ 16.90.1 - Ray Trace Controls
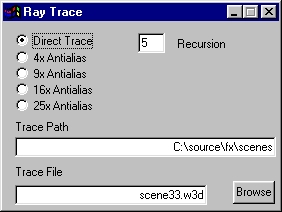
§ 16.90.1.1 - Anitaliasing
This set of radio buttons allows you to control the quality of the ray tracing operation. ![]() Direct Trace is fastest, and
Direct Trace is fastest, and ![]() 25x Antialias provides the highest quality. It is best to design in
25x Antialias provides the highest quality. It is best to design in ![]() Direct Trace , then set the desired final quality for your final render. Image improvement beyond
Direct Trace , then set the desired final quality for your final render. Image improvement beyond ![]() 4x Antialias is progressively more subtle; don't assume you need a high degree of antialiasing for every image — it simply isn't true.
4x Antialias is progressively more subtle; don't assume you need a high degree of antialiasing for every image — it simply isn't true.
§ 16.90.1.2 - Trace File
This selects the Trace File that controls the scene to be traced. The trace file contains a script that describes the objects in the scene, the lighting for the scene, and any animated parameters for the scene. Trace files are written using SceneScript; see below for details.
This may be edited manually or by using Browse.
§ 16.90.1.3 - Trace Path
This selects the directory where the trace file exists on your computer.
This may be edited manually or by using Browse.
Both the path and filename are saved when dragged into the TimeLine, this means that separate "SceneScript" files can be chosen for different frames in the TimeLine.
§ 16.90.1.4 - Recursion
This controls how many times a light ray bounces from surface to surface. More levels results in increasing realism in the scene, particularly where transparent and refractive objects are encountered. Fewer levels result in higher speed. So, like the Anitialiasing setting, design with a low setting, and use a high setting for final quality work.
§ 16.90.2 - Ray Trace Language: "SceneScript"
When F/x ray traces a scene, it uses a "scene file" which describes the content to it, so it knows what and where to create objects, lights and empty space.
These scene files use a straightforward language called SceneScript that allows you to do anything from a very simple job to some enormously complex ones. What you create, of course, is up to you!
Most importantly, SceneScript is designed to be human-readable. While automated generation of SceneScript files was certainly part of the design goal, SceneScript files were also, in keeping with the design philosophy of all of F/x's other various control files, designed to be directly editable by you.
Here's how scene files work. SceneScript files are processed first line first, last line last. For the most part, any setting or value you create remains set until set otherwise. So if you do this:
Then the effective color is 1,0,1, which is magenta, rather than 1,1,1, which is white. There is only one effective color at any one point in the SceneScript language stream.
This allows you to set up common elements of a scene, or part of a scene, first, and then they will be inherited just that way until you specifically change them.
This behavior also allows you to use a group of settings (called a "trait") that are almost what you want, and then over-ride the elements that don't suit the needs of the moment. For instance, if you built a trait for water, you might set the color to blue as part of the trait. But perhaps today you're doing green water... so you use the trait normally, then right after applying it, you set the color to green, something like this:
SceneScript follows a very flexible format. Items inside angle brackets (< and >) are considered items to be interpreted. Anything outside these brackets is completely ignored. That allows you to place commentary anywhere in any SceneScript file.
Any amount of whitespace (blank lines, tabs, spaces) can appear anywhere outside of a language element, and they can appear within language elements wherever a space is shown in the language reference. For instance, the following two lines are both valid:
If a language element is not understood, it will be ignored.
When a language element requires more than one parameter, any that are left out are either set to zero (if they are numbers) or set to an empty string if they are text items. Generally, you should try to provide all parameters to keep from causing confusion.
SceneScript also has extensive, very easily managed provisions for animation of objects. Using the <keys> language element, you can replace any numeric parameter with a variable that is adjusted on a per frame basis for the length of the animation. These are literally "keyframed" values. They may be single static values, linearly interpolated values specified for 2 or more frames, or even values that are interpolated using smooth splines! You can also use the <keys> statement to specify a single unchanging value to be used in place of any numeric parameter; this allows you to place objects along a baseline for example, and change that baseline later.
§ 16.90.3 - SceneScript Language Index
§ 16.90.4 - Expressions
Anywhere in a SceneScript file, an algebraic expression may be used where EXP is called for. Expressions may be simply a number or a variable name...
3.225
yrotation
Or they may be a compound mathematics expression, denoted by an initial exclamation point:
!2+2
Compound expressions may contain one or more numbers and/or one or more variables (see the <keys> language element for more on variables) and one or more instances of certain mathematical functions.
Variables must be defined prior to use; otherwise, they evaluate to zero. Expressions may not contain any whitespace at all, no exceptions whatesoever; in other words, this is legal...
!sin(3+sqrt(rad(2.5)))
...but none of the following are legal:
!sin( 3+sqrt(rad(2.5)))
!sin(3 +sqrt(rad(2.5)))
!sin(3+ sqrt(rad(2.5)))
!sin(3+sqrt( rad(2.5)))
!sin(3+sqrt(rad(2.5 )))
!sin(3+sqrt(rad(2.5) ))
!sin(3 + sqrt( rad( 2.5 ) ) )
Compound expressions are evaluated in this order:
Parenthesis, variables and functions.
Unary + and - signs
Powers: (symbol: ^)
Times, division, and modulus (*, / and %, respectively)
Addition and subtraction
Here are some examples, using the Y value of translate command and two example variables defined using the <keys> language element:
Aside from these arbitrary examples, let's go through one where the need for a compound expression is clear.
Imagine you have a cylinder that you want to be part of a model of a space station. You're going to use this in four places; as four "spokes" that lead to the rim of the station. Accordingly, you need to rotate instances of the cylinder into the correct positions for the four spokes. So far, so good — that's easily done with the <rotate> language element.
You could render a single frame with appropriate set of 90 degree values, and it would look fine.
Now consider the idea of animating the station. We want to make it spin around the same axis that the cylinders are defined around. But you already are using the <rotate> element to control the cylinders - so you can't use it again to rotate them from there.
Here's the solution (and it's easy):
Instead of this, which specifies a single non-moving rotation of 90 degrees for a cylinder:
Use this...
...which gives you the constant 90 degree offset you need, and adds the animated rotation value to that. The cylinder is initially oriented by the 90 degree term, and rotated appropriately by the variable yrot. Nice, eh?
Available functions for use in compound expressions include:
| Function | Details |
|---|---|
| abs(expression) | Absolute Value |
| acos(expression) | Arc-Cosine |
| asin(expression) | Arc-Sine |
| atan(expression) | Arc-Tangent |
| ceil(expression) | Ceiling (nearest whole number > expression) |
| cframe(0) | Returns current frame as number 1 to tframes() |
| cos(expression) | Cosine |
| cosh(expression) | Hyperbolic Cosine |
| deg(expression) | Converts radians to degrees |
| exp(expression) | Exponential |
| floor(expression) | Floor (nearest whole number < expression) |
| hyp(expression,expression) | Hypotenuse of X, Y |
| linv(expression) | Takes frame number as parameter, returns linear value 0 to (tframes(0)) as 0-1 |
| log(expression) | Natural Log |
| log10(expression) | Log, base 10 |
| loopv(expression) | Takes frame number as parameter, returns linear value 0 to (tframes(0)+1) as 0-1 |
| rad(expression) | Converts degrees to radians |
| sin(expression) | Sine |
| sinh(expression) | Hyperbolic Sine |
| sqrt(expression) | Square Root |
| tan(expression) | Tangent |
| tanh(expression) | Hyperbolic Tangent |
| tframes(0) | Returns total number of frames in the sequence |
Note that all transcendental functions expect arguments in radians
, Previous Page . Next Page t TOC i Index o Operators g Glossary
Copyright © 1992-2007 Black Belt Systems ALL RIGHTS RESERVED Under the Pan-American Conventions
WinImages F/x Manual Version 7, Revision 6, Level A
![]()