§ 8 - Application Menus
§ 8.1 - iToolBox Menu
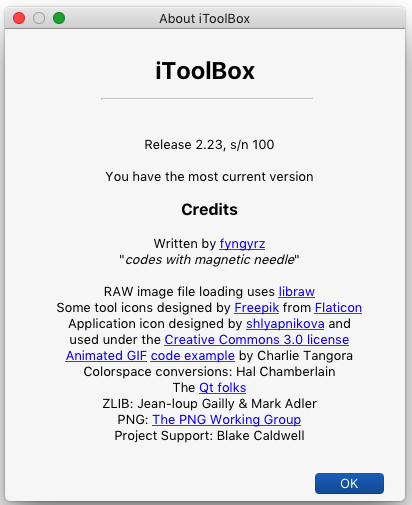
§ 8.1.1 - About Menu Item
The iToolBox/About iToolBox menu item displays the application's credits. It also gives you information about the version of iToolBox you are currently using, iToolBox's serial number, and if a network connection was available at application startup, iToolBox enquires of fyngyrz.com what the latest version available is, and if your version is not as recent, then the About dialog displays that for you as well along with a link via which you can download the latest release.
In addition, for your convenience, a download link is provided so you can immediately download the latest version.
- The version number of the copy you are running
- The serial number (automatically generated) of the copy you are running
- The version and type of the operating system you are running iToolBox under
- ...and nothing else.
The information returned by fyngyrz.com to iToolBox includes:
- The version number of the latest available download (displayed in the About dialog if your version is not as recent)
- The serial number of the copy you are using, either as sent by your copy, or generated for it if new
- ...and nothing else.
The information received from fyngyrz.com by iToolBox when it asks for the latest version number is sanitized so that only characters that are one of the digits 0-9, a period (.), a vertical bar (|) or a question mark (?) are retrieved from the download. The received data is also limited in ultimate length to just a few characters. These steps are taken in order to prevent anyone from intercepting and maliciously altering the requested data content in any way that would cause you problems.
The information sent to fyngyrz.com by iToolBox is similarly sanitized on receipt to prevent problems on this end.
This version retrieval is only done at iToolBox startup, not when you open the About dialog. So if a new version is posted while you're using iToolBox, the application won't be aware of the new version until the next time you start it.
§ 8.1.2 - Preferences... Menu Item
The iToolBox/Preferences... ⌘, command, or its keyboard equivalent, ⌘+,, opens the Preferences dialog.
§ 8.2 - File Menu
§ 8.2.1 - New Image Menu Item
The File/New Image ⌘N command, or its keyboard equivalent, control+n, opens the New Image dialog.
§ 8.2.2 - New Text Menu Item
The File/New Text command, or either of its two keyboard equivalents, t and F9, or the text areatool, opens the Text dialog.
§ 8.2.3 - New Pcb Menu Item
The File/New PCB command opens the New PCB dialog. This operation will set up a layered image containing the required layers in the proper layer modes to allow you to create a printed circuit board.
Enter the desired maximum width and height for the printed circuit board, choose which layers you want generated, and press OK.
§ 8.2.4 - Load Recent Path Submenu
As you work, you will typically save and load various different images. The File/Load Recent Path ▶ submenu will accumulate the most recent 16 paths you have loaded and/or saved images using. Selecting one from the submenu will open the file dialog at that path location (as long as the path is still valid.) The most recently used paths will always be towards the top of the submenu.
§ 8.2.5 - Load Image Menu Item
The File/Load Image ⌘O command, or its keyboard equivalent, control+l (that's a lower-case "L"), opens the File dialog.
The list of types that iToolBox can load is located here.
§ 8.2.6 - Load Favorite Image Submenu
This submenu allows you keep up to ten images at your immediate fingertips; here's how it works:
- Load an image from the filesystem
- Press shift+f or select Commands/Assign as Favorite
- Assign the image to one of the slots
That's it. You can now load that image at any time using either this submenu, or the key combinations ⌥+number key (1, 2, 3... 9, 0.)
§ 8.2.7 - Load Recent Image Submenu
As you work, you will typically save and load various different images. The File/Load Recent Image ▶ submenu will accumulate the most recent 16 images you have worked with. Selecting one from the submenu will reload it (as long as that image is still in the same filesystem location.) The most recently saved and loaded images will always be towards the top of the submenu.
§ 8.2.7.1 - Clear Recent Files Menu Item
There may be times when you wish to remove the entries in the File/Load Recent Image ▶ submenu. The File/Load Recent Image/Clear Recent Files menu item will do that for you.
§ 8.2.8 - Load Next Image
File/Load Next Image (also available via pressing F13) will attempt to load the next sequential image. For this to work, you must have previously loaded an image with a number at the end of the filename and before the image file-type extension, and the image must exist and be loadable.
If the image does exist and can be loaded, it will be placed into the File/Load Recent Image submenu, and be remembered as the last loaded image, so you can do this repeatedly and it will load each sequentially numbered image in order.
If the image cannot be loaded, then the new name will not be placed into the File/Load Recent Image submenu and the last loaded image name and path will remain the last one that was successfully loaded.
§ 8.2.9 - Load P-shape
§ 8.2.9.0.1 - Clear Recent Paths Submenu Item
There may be times when you wish to remove the entries in the File/Load Recent Path ▶ submenu. The File/Load Recent Path/Clear Recent Paths menu item will do that for you.
§ 8.2.10 - Retrieve Ray Trace
The OS X (MacOS) version of iToolBox produces requested ray traces (for example, via the Spherize operator) in the background. When a ray trace is ready, this menu item becomes available.
§ 8.2.11 - Save Image Menu Item
File/Save Image ⌘S opens the dialog to save action images, both atomic and layered. You can also use s to trigger this form of save. Saves done this way on layered images require that the .elx format be used; you cannot save a single layer of a layered image using this command. Use S (shift+s) or File/Save Image (Atomic) ⇧⌘S if you need to do that (described next.)
§ 8.2.12 - Save Image (atomic) Menu Item
File/Save Image (Atomic) ⇧⌘S opens the dialog to save the action image. You can also use S (shift+s) to trigger this form of save. Saves done this way will allow you to save any action image as an atomic (single) image even if the image is an individual layer of a layered image.
§ 8.2.13 - Save Recent Path Submenu
File/Save Recent Path will save the current atomic or layered image, opening the File dialog at the path specified in the submenu item.
§ 8.2.14 - Save Recent Path (atomic) Submenu
File/Save Recent Path (Atomic) will save the current atomic image, master image, or layer of a layered image, opening the File dialog at the path specified in the submenu item.
§ 8.2.15 - Export A:B GIF Animation
To create an A:B GIF animation, you set up two images. One is assigned as the origin image, and the other will be the action image. These two images must have identical horizontal and vertical resolution. Then select File/Export A:B GIF Animation , choose a filesystem location and filename using the File dialog, and finally set the inter-frame delay and looping count (zero is infinite.)
Generally, these GIF animations look better without dither, as this adds motion to the pixels that is otherwise not present in the actual images. If in doubt, generate an animation both ways and compare the two in a web browser.
If you use the Color Reduction operator to select the palette and reduce the color count to 256 or less for both your images, the resulting animation can be tweaked to be considerably higher quality based on your chosen settings.
If you don't do this, then the animation generator will pick the palette for you using its own choices, which may not (probably will not) be as good as those you could make yourself.
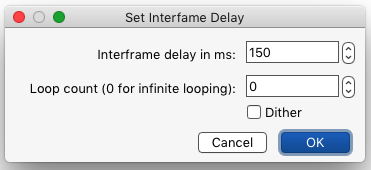
The resulting GIF animation will cycle between the two images at the rate specified, for as many times as specified, or forever, if the looping count was zero.
§ 8.2.16 - Save P-shape
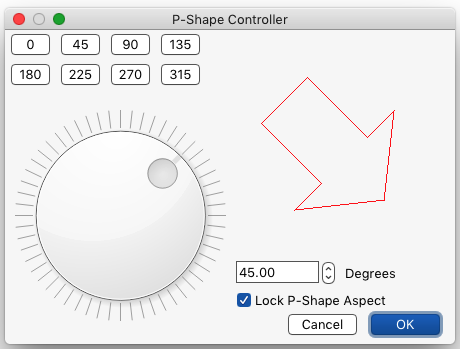
§ 8.2.17 - P-shape Controller
If a p-shape has been loaded, this opens a dialog that allows you to rotate the currently loaded p-shape to any angle, and/or lock its aspect ratio to 1:1 which will ensure that the p-shape will not be distorted.
§ 8.2.18 - Export Gerber Files
Opens the Gerber Export dialog, allowing you to produce Gerber file CAM files that can be sued to manufacture printed circuit boards.
§ 8.2.19 - Print
Select File/Print to print the action image.
Select File/Help to get a short listing of things you can do, as well as a link to the online documentation.
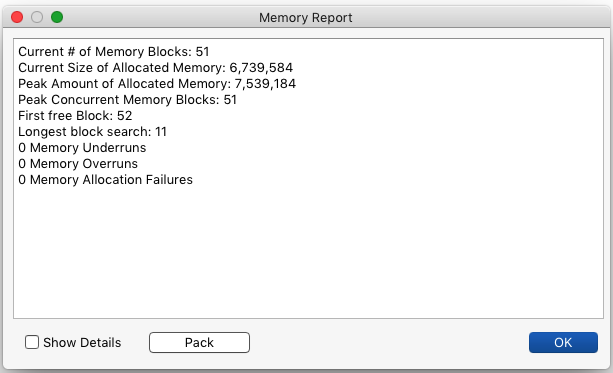
§ 8.2.20 - Memory Report
File/Memory Report provides a view into the application's internal memory management of image and image-related storage. iToolBox uses memory greedily in order to facilitate higher-speed image processing, and it may be useful to some users to be aware of how much of their RAM is in use at any one time. In addition, the custom memory monitoring system watches for errors where application code writes memory in error, and reports if that happens. If this tool indicates memory over- or under-runs, please report them.
Pack will re-organize the internal image memory to be more compact. This can save a little time in some iToolBox operations when additional memory needs to be obtained, but is not a critical task to perform.
§ 8.3 - Edit Menu
§ 8.3.1 - Copy (to Clipboard) Menu Item
When ✓ Modal is checked in the Areatools. the Edit/Copy ⌘C command (or its keyboard equivalent control+c when pressed in the Operators dialog, any image view, or the Areatools) places a 24-bit representation of the current action image into the clipboard for use by other software that understands 24-bit .png image data.
When ✓ Modal is unchecked, the selected portion of the image is copied to the clipboard, regardless of the current area selection state. You can change this behavior by un-checking ✓ Non-Modal copy = simple in the Preferences dialog.
§ 8.3.2 - Paste (from Clipboard) Menu Item
The Edit/Paste ⌘V command, or its keyboard equivalents, ⌘+v or control+v, creates a new image from image information stored in the clipboard by other software. iToolBox can resolve both pasted filesystem filenames (unless they are network URLs such as http or https) and properly formatted image data. 24-bit clipboard image data is transformed into 48-bit image data as required.
§ 8.3.3 - Undo Menu Item
Edit/Undo ⌘Z allows you to roll back the most recent change(s) made to an image; it affects the current action image. You can also cause an Undo to take place with u.
§ 8.3.4 - Redo Menu Item
Edit/Redo ⇧⌘Z allows you to roll back the most recent undo(s) made to an image; it affects the current action image. You can also cause a Redo to take place with r.
§ 8.3.5 - Set Undo Levels
Edit/Set Undo Levels allows you to control how many levels of undo iToolBox will use. You may choose from one to 50. Be aware that each undo level consumes as much memory as the actual image.
§ 8.3.6 - Clear All Undos and Redos Menu Item
Edit/Clear All Undos and Redos recovers memory that is not needed when the undo system is holding on to changes you have no need to recover. Because the undo system can consume very large amounts of memory, this tool can help you keep your usage in check without having to actually close iToolBox.
§ 8.3.7 - Key Assignment Menu Item
This menu item opens the Keystroke Assignment dialog.
§ 8.4 - Selections Menu
§ 8.4.1 - Delete Selections Menu Item
If operating in ✓ Modal (non-modal) mode, this item will clear the current selection.
§ 8.4.2 - Apply Again
If operating in ✓ Modal mode, this item will apply the most recent area selection to the current action image and execute the current operator.
§ 8.4.3 - Antialias Menu Item
Selections/Antialias turns the area selection antialias feature on or off for the currently selected too. Each tool has its own memory of this setting. This can also be controlled via the Preferences dialog.
§ 8.4.4 - Blend Mode Submenu
The Blend Modes provide a variety of ways that the results from most operators can be applied to the images you work with. Matte is the default mode when iToolBox starts, and the one you're most likely to be using most of the time; but the others are also worth exploring.
§ 8.4.4.1 - Matte Blend Mode
Applies new pixels just as they are.
§ 8.4.4.2 - Add Blend Mode
Applies new pixels by adding them to the active image.
§ 8.4.4.3 - Subtract Blend Mode
Applies new pixels by subtracting them from the active image.
§ 8.4.4.4 - Add Grey Blend Mode
Applies new pixels by treating them as negative the lower they are relative to 32768, and positive the higher the are relative to 32768, and adding them from the active image.
§ 8.4.4.5 - Subtract Grey Blend Mode
Applies new pixels by treating them as negative the lower they are relative to 32768, and positive the higher the are relative to 32768, and subtracting them from the active image.
§ 8.4.4.6 - Multiply Blend Mode
Applies new pixels by multiplying them against the active image. Unless the result is entirely white, this will darken the image.
§ 8.4.4.7 - Divide Blend Mode
Applies new pixels by dividing them by the active image. Unless the result is entirely white, this will lighten the image.
§ 8.4.4.8 - Dissolve Blend Mode
Applies new pixels by placing them in the active image normally, except where the area selection is soft; there, it will randomly place them, or not, based on how soft the area selection is there.
§ 8.4.4.9 - Soft Dissolve Blend Mode
Applies new pixels by placing them in the active image normally, except where the area selection is soft; there, it will randomly place them, or not, with a softness chosen according to the selection mask, based on how soft the area selection is there.
§ 8.4.4.10 - Foreground Color Blend Mode
Applies new pixels using the foreground color.
§ 8.4.4.11 - Background Color Blend Mode
Applies new pixels using the background color.
§ 8.4.5 - Blend Shape Dialog Menu Item
Selections/Blend opens the Blending dialog.
§ 8.4.6 - Cycle Selection Color Menu Item
Selections/Next Selection Color rotates the selection color in the ✓ Modal (non-model) selection mode. This can make it easier to see selections.
§ 8.4.7 - Convert [type Region] to P-shape
Selections/Convert [type region] to p-shape is available after any area selection is made except for the wand. Once this is used, that recent area selection will be available for re-use with the p-shape areatool or saving using File/Save P-Shape
§ 8.4.8 - Snap
§ 8.4.8.1 - Snap Grid
Selections/Snap Grid turns snapping on and off. One of the snap options in the Snap dialog must also be on for snapping to function. The [S] indicator in the Areatools displays the current state of the snapping toggle.
§ 8.4.8.2 - Display Snap Grid
Selections/Display Snap Grid switches the display of snap lines on and off, as does control+d. To turn the actual snapping itself on and off, open the Snap dialog with Selections/Snap Dialog or D (shift+d)
§ 8.4.8.3 - Autohide Snap Grid
Selections/Autohide Snap Grid , when checked, causes the snap grip to disappear when it is not active. If not checked, the snap grid is displayed in its inactive colors as set in the Snap dialog.
Selections/Open Snap Dialog opens the Snap dialog.
§ 8.5 - Operators Menu
This menu provides an organized, way to select operators.
You can edit the ten script macros using the Operators/Edit Macros command (or, image context, the keyboard command shift+⌥+m), and launch any one of the ten macros via the Operators/Macros ▶
If, when in the edit window for the Macros and ✓ Modal is checked, you click an Execute button or press the associated number key, the macro will be applied to the entire image, as there is no area selection in context.
If you are working with ✓ Modal unchecked, you can make your area selection and then execute the macro and it will be applied to the selected area.
Macros can also be launched using ⌘+⌥+(top row number key) key combinations.
| See also: | Quick Operators dialog |
§ 8.6 - Commands Menu
§ 8.6.1 - Assign as Favorite
This is the menu access to the shift+f command. Any image that has been loaded from the filesystem can be assigned as a favorite. Images assigned as favorites can be loaded using the File/Load Favorite Image ▶ command.
§ 8.6.2 - Clone Menu Item
Commands/Clone will create a new image that is an exact duplicate of the current action image.
§ 8.6.3 - Clone to View Size Menu Item
Commands/Clone to View Size will create a new image based upon the current action image, but at the size of the current action image's view by duplicating the action image's pixels as needed. The action image is not altered.
§ 8.6.4 - Clone Scaled to View Size Menu Item
Commands/Clone Scaled to View Size will create a new image based upon the current action image, but scaled (resampled) to the size of the current action image's view. The action image is not altered.
§ 8.6.5 - Enlarge / Reduce Menu Item
Commands/Enlarge / Reduce allows you to create a new image based upon the action image at a different specific resolution. The action image is not altered. See the Enlarge / Reduce dialog for details.
§ 8.6.6 - Extend Menu Item
See the Extend Image dialog for details.
§ 8.6.7 - Quarter Turn Cw Menu Item
Commands/Quarter Turn CW alters the action image in-place by rotating it clockwise one quarter turn.
§ 8.6.8 - Restore Crop to Origin Menu Item
Commands/Restore Crop to Origin will, if the action image was cropped from another image, and the image it was cropped from remains loaded after the crop took place, restore the contents of the cropped image to the original location in the image it was cropped from.
§ 8.6.9 - Revert
Commands/Revert reverts an atomic image to its initially loaded state. See the revert keystroke for details (shift+⌥+r)
§ 8.6.10 - Key Command Palette Menu Item
Commands/Key Command Palette opens the Command dialog.
§ 8.7 - Views Menu
§ 8.7.1 - View Size Submenu
Views/View Size ▶ provides a range of resizing options for the image view.
Views/View Size/Embiggen — also E (shift+e) — attempts to enlarge an image view so that it is as large as possible while still fitting within the available display area.
§ 8.7.2 - Zoom Reset Menu Item
Views/Zoom Reset sets the view to be able to fully contain the image.
§ 8.7.3 - Zoom in Menu Item
Views/Zoom In increases the magnification of the view.
§ 8.7.4 - Zoom Out Menu Item
Views/Zoom Out reduces the magnification of the view.
§ 8.7.5 - Set Zoom Step Size
Opens a dialog where you can set the number of steps between a two times change in the zoom level.
§ 8.7.6 - Grid Menu Item
Views/Grid turns the pixel grid on and off. The pixel grid is only visible if the image view is large enough to show both the grid and the image pixels.
§ 8.7.7 - Grid Color Menu Item
Views/Grid Color changes the color of the grid surrounding the pixels. The effect of this is only visible if the image view is large enough to show both the grid and the image pixels.
§ 8.7.8 - Juxtapose Menu Item
Views/Juxtapose stacks all the loaded images one on top of another, aligned at the top left. This allows you to easily compare multiple versions of an image using n and N (shift+n), or Images/Next Image and Images/Previous Image .
§ 8.7.9 - Cascade Menu Item
Views/Cascade stacks all the loaded images in a cascade growing towards the bottom right in such a way that you can read the title bars of all the images, presuming there is enough room to stack them all this way.
§ 8.7.10 - Tile Menu Item
Views/Tile tiles the views across the available display space if they will fit. You can also trigger this command with ⌥+j.
§ 8.7.11 - Reset Menu Item
Views/Reset causes the next opened view to start at the initial view position.
§ 8.7.12 - Open Another View Menu Item
Views/Open Another View opens an additional view on the action image. This view can be zoomed and shifted separately from the original view (or other views... you can have as many views on the same image as you want.) Editing any portion of the image in any view affects the image the same way.
§ 8.7.13 - Y-axis Lock Menu Item
Views/Y-Axis Lock controls whether the image views retain the exact aspect ratio of the loaded image. With lock off, you can size a view any way you like. With it on, the view must be sized from the right edge, and the view will always be the same aspect ratio as the image itself.
§ 8.7.14 - Alter Aspect on Y Menu Item
Views/Alter Aspect on Y steps the image view through a series of common aspect ratios intended to correct incorrectly captured images; the Y-axis is the priority here.
§ 8.7.15 - Alter Aspect on X Menu Item
Views/Alter Aspect on X steps the image view through a series of common aspect ratios intended to correct incorrectly captured images; the X-axis is the priority here.
§ 8.7.16 - Alter Aspect on Y by 2 Menu Item
Views/Alter Aspect on Y by 2 steps the image view through a series of common aspect ratios intended to correct incorrectly captured images at twice the resolution so as to prevent loss of image data if the image is rescaled using Commands/Clone Scaled to View Size after the view's aspect change; the Y-axis is the priority here.
§ 8.7.17 - Alter Aspect on X by 2 Menu Item
Views/Alter Aspect on X by 2 steps the image view through a series of common aspect ratios intended to correct incorrectly captured images at twice the resolution so as to prevent loss of image data if the image is rescaled using Commands/Clone Scaled to View Size after the view's aspect change; the X-axis is the priority here.
§ 8.8 - Images Menu
§ 8.8.1 - Close All Menu Item
The Images/Close All ⌘W command begins a process of closing all open images. Obeys the Preferences dialog setting for confirmation requests on images that have been changed since they were loaded or created.
§ 8.8.2 - Next Image Menu Item
Images/Next Image selects the next image as the action image and brings it to the front; "next" in this context means one that was loaded or created after the current action image.
§ 8.8.3 - Previous Image Menu Item
Images/Previous Image selects the previous image as the action image and brings it to the front; "previous" in this context means one that was loaded or created before the current action image.
§ 8.8.4 - Assign as Brush Menu Item
Images/Assign as Brush selects an image as the brush for use by the Brushstroke operator.
§ 8.8.5 - Assign as Origin Menu Item
Images/Assign as Origin sets an image to be the origin image for use by operators such as Merge operator and commands such as File/Export A:B GIF Animation
§ 8.8.6 - Inspect Menu Item
Images/Inspect opens the Image information dialog on the action image.
§ 8.8.7 - Measure Menu Item
Images/Measure opens the Measure dialog on the action image.
§ 8.8.8 - Rename Menu Item
Images/Rename provides a means to rename the action image.
§ 8.8.9 - Layers: Promote or Open
Images/Layers: Promote or Open either promotes a flat, atomic image into a layered image with the current action image as the first layer, or opens the layers dialog if the action image was already a layer or a master.
§ 8.8.10 - Individual Image Menu Items
Each open image gets one listing in the Images menu. Selecting the menu item will bring all open views on that image to the front.
, Previous Page . Next Page
t TOC i Index k Keyboard o Operators g Glossary c Changes
![]()
on February 27th, 2026 at 17:38 MT
| Please consider supporting my iToolBox development efforts with a small PayPal donation. |