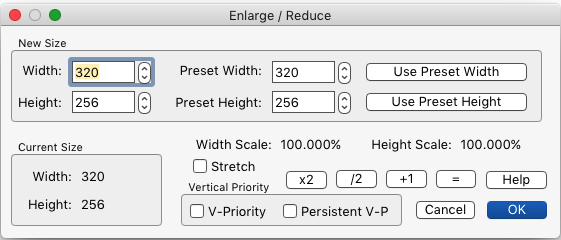
§ 21 - Enlarge / Reduce Dialog
e or the Commands/Enlarge / Reduce menu item open a dialog that provides a means to create a new image, scaled (or not) from the image you're working with.
If the image you're enlarging or reducing has EXIF information, that information will be copied to the newly resized image.
If ✓ Vertical Priority in unchecked (the default), then when you enter the Width, the Height is set proportionally to the original image's height. If ✓ Vertical Priority is checked, then when you enter the Height, then the Width is set proportionally to the original image's width.
If you want to distort the aspect, then you just enter the width you want first, then alter the height. You'll probably want to check ✓ Stretch as well. If you don't, the new image will be the new size you specified, but the source image's content will be fitted inside it in an aspect-correct manner.
x2 doubles the new size.
+1 adds the current size to the new size.
/2 halves the new size. If the resulting size is exactly half of the original image along both the horizontal and vertical extents, a bilinear reduction is performed. If you're going to be reducing equal to, or more than 2:1, it is suggested that you use /2 on each resulting image until you're less than half way to your final target size, and then do the final reduction. This will result in an image that contains the best approximation of the original image content.
= resets the new size to the current size.
You can use these four buttons in various combinations to get magnification multiples.
For instance, to get a 5x magnification, you could press =, x2, x2, and finally +1.
That sequence gets you the original size (x1), double that (x2), double that (x4), plus the original size (x4+x1, or x5)
✓ V-Priority, when checked, causes changes to the height to adjust the width. If ✓ V-Priority is unchecked, then changes to the width adjust the height. In either case, the change occurs when you press the tab key; and you may then adjust the other dimension as desired without affecting the setting you just changed.
✓ Persistent V-P, when checked, causes the dialog to remember the state of the ✓ V-Priority setting. If this is not checked, then when the dialog opens, ✓ V-Priority will always be deselected.
Preset Width is a value that is applied to Width, along with ✓ Vertical Priority unchecked (horizontal priority), when Use Preset Width is clicked.
Preset Height is a value that is applied to Height, along with ✓ Vertical Priority checked (vertical priority), when Use Preset Height is clicked.
The Help button opens this section of the documentation.
, Previous Page . Next Page
t TOC i Index k Keyboard o Operators g Glossary c Changes
| Please consider supporting my iToolBox development efforts with a small PayPal donation. |
