§ 16 - New Image Dialog
Creates a new, blank image.
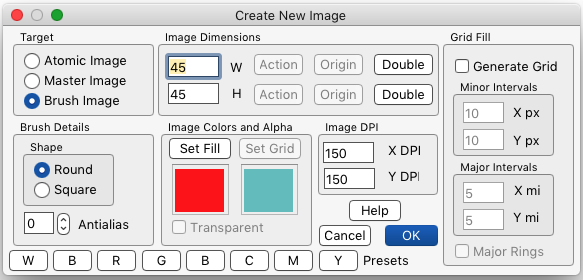
You can create an image as a flat, atomic image, or you can create a master image, ready to have layers attached to it. You can also create an image as a brush, either square or round.
The W setting is the width of the new image in pixels.
The H setting is the height of the new image in pixels.
The Action buttons set the width and/or height from the action image, if an image is loaded.
The Origin buttons set the width and/or height from the origin image, if one has been assigned.
The Double buttons double the width and height values.
In the Image DPI controls, X DPI sets the horizontal dots-per-inch of the image, and Y DPI sets the vertical dots-per-inch of the image.
Under Image Colors and Alpha, Set Fill sets the color of the image and Set Grid sets the color of the image grid lines, if ✓ Grid is checked.
The buttons W, B, R, G, B, C, M and Y rare "quick color set" buttons. Respectively, they set the new image fill color white, black, red, green, blue, cyan (aqua), magenta (purple) and yellow.
If selected, ✓ Grid causes a configurable grid to be generated. Under Grid Fill, Minor Intervals, X px sets the number of pixels per horizontal grid line, and Y px sets the number of pixels between vertical grid lines, and under Major Intervals, X mi sets the number of minor grid lines between Major horizontal divisions, while Y mi sets the number of minor gridlines between Major vertical divisions. ✓ Rings, when checked, generates rings or ellipses on the graph at spacings controlled by the Major grid intervals.
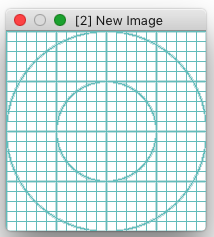
Both grid and rings generated to a 200x200 new image
Minor Intervals: 10 (pixels per grid line)
Major Intervals: 5 (minor intervals per grid line)
For non-brush images, you can select ✓ 0-Alpha and the image will be created with the chosen color and grid, if desired, but with full transparency.
You can, of course, create any brush you like by loading or creating a new image and then doing... things... with its pixels, then just assigning it as the Brush.
The new image dialog blocks; that is, you have to close it before you can do anything with the rest of the application.
When you create a new image, consider the role you're going to use it in.
For instance, if it is destined to be a layer in add mode, then you would probably want the image to be black, because adding black results in no change. So, for instance, you could place a bright spot in the image and only that would show up as added to the layered image.
You can change the color later easily using the color fill operator, so this isn't critical by any means, but it can save a little time and effort.
, Previous Page . Next Page
t TOC i Index k Keyboard o Operators g Glossary c Changes
![]()
on February 27th, 2026 at 17:38 MT
| Please consider supporting my iToolBox development efforts with a small PayPal donation. |