§ 9 - The Keyboard
§ 9.1 - Keystrokes in the Action Image Window
The keyboard can often be used in this application instead of button presses or menu commands to efficiently perform various functions.
§ 9.1.1 - Help Window
? will open the help window.
§ 9.1.2 - Cancel Area Selection in Progress
Use esc to cancel an area selection in progress.
§ 9.1.3 - Panning the Image Window
Within the context of the action image window (the active image), pressing the cursor keys (←, →, ↑ and ↓), optionally along with shift or opt/alt will alter the position of the image in the window.
If you have a scrollwheel on your mouse (or your trackpad can generate similar input), then you can pan the image with the scrollwheel. If you're using an actual scrollwheel, pressing shift will change the axis being panned.
Some people expect vertical panning to work in one direction related to the scrollwheel roll, others expect another. You can change the direction of scrolling by changing the state of the ✓ Invert Y axis Scrolling checkbox in the Preferences dialog.
§ 9.1.4 - Area Tool Selection
- F1 - entire image
- F2 - rectangle
- F3 - numeric rectangle
- F4 - ellipse
- F5 - polygon
- F6 - spline
- F7 - p-shape
- F8 - pencil
- F9 - text
- F10 - wand
- F11 - Redo
- F12 - magnify
- shift+F1 - preview eyepoint
- shift+F2 - eyedropper
- shift+F3 - complement
- shift+F4 - open figure
- shift+F5 - fill
§ 9.1.5 - View Window Sizes
In addition, keep in mind that the size of the view is independent of the zoom setting for the view. For example, if you are zoomed at 2x in a 2:1 view, and you request a 1:1 view size, you'll get a 1:1 view that is still zoomed at 2x.
The current zoom levels of an image are displayed in the Areatools titlebar.
- 1 - 1:1 Image view
- 2 - 2:1 Image view
- 3 - 3:1 Image view
- 4 - 4:1 Image view
- 5 - 5:1 Image view
- 6 - 6:1 Image view
- 7 - 7:1 Image view
- 8 - 8:1 Image view
- 9 - 9:1 Image view
- 0 - 10:1 Image view
- shift+1 - .75:1 Image view
- shift+2 - .50:1 Image view
- shift+3 - .25:1 Image view
- shift+4 - .10:1 Image view
§ 9.1.6 - Load Favorite Image
Pressing and holding ⌥ and then additionally pressing any numeric key (1...0) in the top row (not the keypad) will load the favorite image in the matching File/Load Favorite Image ▶ slot, if there is one.
§ 9.1.7 - Load Next Image
Pressing F13 (also available via File/Load Next Image ) will attempt to load the next sequential image. For this to work, you must have previously loaded an image with a number at the end of the filename and before the image file-type extension, and the image must exist and be loadable.
If the image does exist and can be loaded, it will be placed into the File/Load Recent Image submenu, and be remembered as the last loaded image, so you can do this repeatedly and it will load each sequentially numbered image in order.
If the image cannot be loaded, then the new name will not be placed into the File/Load Recent Image submenu and the last loaded image name and path will remain the last one that was successfully loaded.
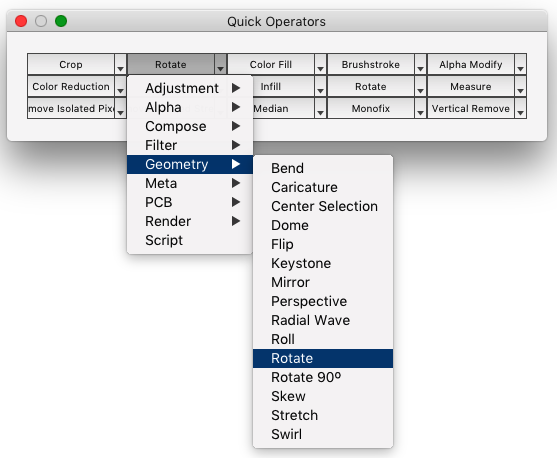
§ 9.1.8 - Quick Operators Dialog Access
f14 or the Q button on the Operators dialog will open (or close, if already open), the Quick Operators dialog. This dialog contains fifteen buttons that are menu-configurable by clicking on the "▾" at the right side of each button. This provides a means to directly select any of up to fiftten user-chosen operators with one mouse click.
Clicking on the left button section (not the "▾") will directly select the operator assigned to that button.
§ 9.1.9 - Color Image Variance Measurement
Pressing F16 will generate an RGB variance metric to the Areatools status bar. 0.0 is no variance, 1.0 is maximum variance.
§ 9.1.10 - Monochrome Image Variance Measurement
Pressing F17 will generate a monochrome variance metric (using only the green channel) to the Areatools status bar. 0.0 is no variance, 1.0 is maximum variance.
§ 9.1.11 - Export Gerber Files
F18 opens the Gerber Export dialog, used with printed circuit board CAM file creation. Can also be opened with File/Export Gerber Files
§ 9.1.12 - Select All and Operate (modal)
In ✓ Modal selection mode, RETURN (shift+return) selects the entire action image and runs the current operator on it. It does not change the currently selected areatool, it's just a quick keyboard-based way to perform operations on the entire image. It is often convenient to use in conjunction with hotkeys.
§ 9.1.13 - Operate on Current Selection (non-modal)
In ✓ Modal (non-modal) selection mode, Return applies the current selection to the action image and runs the current operator on it.
§ 9.1.14 - Operate (1-shot "Apply Again")
In ✓ Modal mode, Return or Selections/Apply Again re-selects the most recent area tool selection that was made on the action image and runs the current operator on it. It does not change the currently selected areatool, it's just a quick keyboard-based way to perform Redo operations on the action image. It is often convenient to use in conjunction with hotkeys.
§ 9.1.15 - Antialiasing Toggle for Current Area Tool
a turns anti-aliasing on and off. You can also do this from the Preferences dialog, and you can also set the amount and radius of the antialiasing.
§ 9.1.16 - Assigning an Image as the Brush
b assigns the active image as the brush for Brush Stroke operations.
You can also create a new brush using the New Image operation, accessed from the File/New Image ⌘N menu or with control+n.
§ 9.1.17 - Area Blending
B (shift+b) opens the Blending dialog. This provides a means for you to make soft area selections. There are choices for flat, sine and conical blending curves. Control of the blend floor is also available, as is a multiplier factor that makes the curves steeper.
§ 9.1.18 - Clone Image
c creates a new copy (not just another view) of the action image.
EXIF data is copied to the new image, if present.
§ 9.1.19 - Clone Image at View Size (no scaling)
(shift+⌥+c) creates a new copy (not just another view) of the action image that is the same size as the view — not the image — it was created from. This is a quick visual way to create a duplicate image at a new size that is not scaled (instead, pixels are simply duplicated as required.)
EXIF data is copied to the new image, if present.
§ 9.1.20 - Clone Image at View Size (scaled)
(shift+c) creates a new copy (not just another view) of the action image that is the same size as the view — not the image — it was created from. This is a quick visual way to create a scaled image. You can also create a precisely scaled copy of an image with the Enlarge / Reduce dialog.
Normally, the view aspect ratio is locked; so when you resize a view, it's always the same shape as the image it represents. In most cases, this is what you want. But there may be times you want to resize an image in such a way that the new size is a different aspect than the original. For instance, a widescreen image may have been packed into a 4:3 (normal video) aspect, and so it looks distorted. In such a case, you can unlock the aspect control mechanism using y to allow free resizing of the image with the mouse, and then you can use C (shift+c) to clone the aspect-adjusted image. When you're done, pressing y again will re-lock the view's aspect ratio control mechanism.
EXIF data is copied to the new image, if present.
§ 9.1.21 - Copy Image to Clipboard
Under OS X (MacOS), both control+c and ⌘+c will copy the action image to the clipboard. There are some options you can choose as to how this works; see the explanation under the Edit/Copy menu item.
§ 9.1.22 - Delete (clear) the Current Mask (for Non-modal Selections)
d deletes the current mask when ✓ Modal in the Areatools is not checked.
§ 9.1.23 - Snap Dialog
D (shift+d) opens the Snap dialog.
§ 9.1.24 - Toggle Snap Display
control+d toggles the display of the snap lines on and off. To actually turn snap itself on or off, open the Snap dialog with Selections/Snap Dialog or D (shift+d).
§ 9.1.25 - Toggle Snapping
⌥+d turns snapping on and off. One or both of the snap options in the Snap dialog also has to be on for snapping to operate. The [S/s] indicator in the Areatools displays the current state of the snapping toggle.
§ 9.1.26 - Enlarge / Reduce Image to Duplicate
e allows you to create a new image based upon the action image at a different specific resolution. The action image is not altered. See the Enlarge / Reduce dialog for details.
§ 9.1.27 - Embiggen View
E (shift+e) attempts to set the current view size to as large as possible while still fitting within the available display area.
§ 9.1.28 - Restoring an Image to Its Original Clipped-from Location
f (fudge it) restores a clipped image back into the image it was clipped from. You can use this two ways. First, you can clip out a region, edit the original, decide you don't like the results, then hit f (with the clip as the active image, not the original) and the clip will go back over the changes you made.
Another way to use f is to clip out a region, then edit the clipped region, thus avoiding any edits to the original. If you like what you've accomplished, you just press f and it'll be put back, in its current state, right where it was taken from.
§ 9.1.29 - Assign Image File as Favorite
Pressing shift+f will open the assign favorite image dialog if the current action image was loaded from the filesystem:
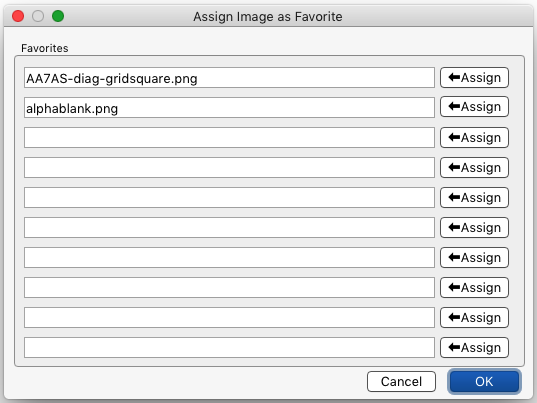
Once an image file has been assigned as a favorite, it will remain available in the File/Load Favorite Image ▶ submenu. This is true even if that image is removed from the filesystem. Of course, if the file is no longer present, trying to load it via File/Load Favorite Image ▶ will not work.
§ 9.1.30 - Placing a Viewable Grid Around Each Pixel
g turns the pixel grid on and off. This type of grid is most useful when you are zoomed in, where colors don't visibly vary much from one another, and you need a precise selection among the individual pixels.
§ 9.1.31 - Changing the Grid Color
G (shift+g) alternates the pixel grid color between black and white.
§ 9.1.32 - Operator Hotkeys
h is a "prefix" key that, when entered and then followed within one second by a hotkey that is set in an operator's hotkey widget, will select that operator in the Operators dialog.
h is reserved; you can't use it as an operator hotkey. In addition, each operator must be set to either no hotkey, or a unique hotkey. You are prevented from setting duplicate hotkeys.
Hotkeys are created (set) by using the Set button in the Operators dialog.
You can remove an existing hotkey by clicking Set and then leaving the hotkey entry widget blank when you click OK.
§ 9.1.33 - Reset the Next Created Image Window Home Position
H (shift+h) will cause the next created image window to be placed at the home position assigned in the Preferences dialog.
§ 9.1.34 - Opening the Image Information Window
i will open the image information window. Among other things, this window collects all the meta information about the image in one place so you can examine it. This is a very good thing to do before you save a file that is going anywhere but on your own computer (and even then...)
Keep in mind that timestamps, GPS data, and the image itself represent a lot of information that can be mined by others; others who may not be your friends. Those things in combination can add up to a very precise collection of information usable by others.
It's easy to forget about your own security, to simply assume that information you put out will not come back to bite you. But sometimes it can. So be careful.
§ 9.1.35 - Juxtaposing Images for Image-to-image Comparisons
j, juxtapose, can be used with n (next) and N (previous) to compare images if you have them set to the same size and magnification.
J (shift+j), tilewindows down and right in an orderly manner, starting at saved first window position.
⌥+j, tile windows.
§ 9.1.36 - Opening the Keyboard Command Palette
k opens the keyboard command palette. This palette contains buttons for every keystroke operation except the sizing commands 1 though 4, the function key commands to select an area tool, ←, →, ↑, ↓ and esc.

§ 9.1.37 - Work with/as a Layered Image
l (that's a lower-case L, not a one) opens the Layers dialog. If you press l on an atomic, non-layered image, it will be converted to a layered image. If you press l with any layer or the master image active, the Layers dialog opens preset to that layered image.
§ 9.1.38 - Controlling the Rulers
m opens the Measure dialog which provides control of the ruler display. You can choose between inches, centimeters, and pixels; control opacity and font size; which, if any, rulers are visible, and which image windows the rulers appear in (just the active window, or all of them.)
Ruler positions are maintained on a per-window basis, not a per-image basis; this allows you to put rulers in different places on different views of an image.
When the Measure dialog is active, the ←, →, ↑, ↓ and home keys control the ruler positions.
§ 9.1.39 - Toggle Modal State of Area Selections
control+m toggles the state of area selection modality. If the state is modal, the state becomes non-modal. If the state is non-modal, it becomes modal. The current state is indicated by the ✓ Modal checkbox in the Areatools dialog.
§ 9.1.40 - Toggle Mask With Target Alpha
M (shift+m) will toggle the state of the ✓ M/Alpha setting. The state is indicated in the status area of the Areatools.
§ 9.1.41 - Reset Blend Mode to Matte
⌥+m resets the Blend Mode to Matte.
§ 9.1.42 - Opening the Macro Window
shift+⌥+m will open the macro window. More information on the macros is found here.
§ 9.1.43 - Launching Macros
You can launch any one of the ten macros via the Operators/Macros ▶ submenu, or in image context, using control+⌥+[top row number key]
§ 9.1.44 - Next and Previous Image
n and N (shift+n) activate the next and previous window, respectively.
§ 9.1.45 - Set Origin Image
o sets the currently active window as the origin image, which is the image that is used as the source for the Merge operator.
§ 9.1.46 - Operate (for Non-modal Selections)
When ✓ Modal selection is turned off in the area toolbox, no operations on the image will occur until you press Apply in the area toolbox or you press O (shift+o) with the action image active. Instead, making a selection only displays the selection on the image.
Making another selection and having shift pressed when you finish it adds to the current selection.
Making another selection and having opt/alt pressed when you finish it subtracts from the current selection.
The current selection can be deleted with d.
u will undo a change to a selection, and r will redo that change.
Nothing will actually be done to the image itself until you click Apply or press O (shift+o).
In this way, you can create complex area selections before you commit to any particular operation.
§ 9.1.47 - Print the Action Image
p prints the currently active, or action, image.
§ 9.1.48 - Open the P-shape Controller
P (shift+p) opens the p-shape controller.
§ 9.1.49 - Quarter Turn the Action Image
q rotates the action image 90° clockwise.
§ 9.1.50 - Redo (reverse an Undo)
r executes the redo function. After you undo an operation with u, you can redo it with r.
§ 9.1.51 - Rename an Image
R (shift+r) opens the image rename dialog.
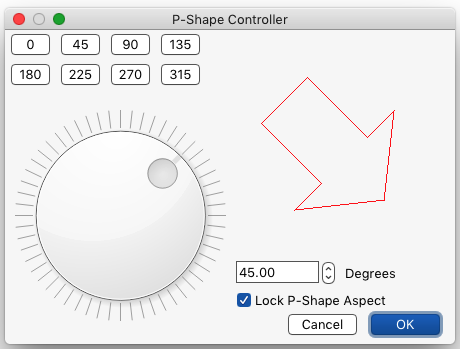
§ 9.1.52 - Rotate a P-shape
If a p-shape has been loaded, ⌥+r opens a dialog that allows you to rotate the currently loaded p-shape to any angle, and/or lock its aspect ratio to 1:1 which will ensure that the p-shape will not be distorted.
§ 9.1.53 - Revert to Initially Loaded Condition
You can revert any atomic image you loaded from the filesystem by pressing shift+⌥+r or Commands/Revert
Before the image is reverted to its initially-loaded state, an undo is taken; so you can undo the reversion if you need to. This can be used to quickly compare against the original after a series of changes. Just follow the revert with an undo ( u or Edit/Undo )
- Has had its size changed with the Extend Image dialog
- Was not originally loaded from the filesystem
- Has had the original image deleted from the filesystem
- Is a layer or a master image (is not an atomic image)
§ 9.1.54 - Save an Image
s and S (shift+s) Saves the image.
Using s: If the image is a component of a layered image, or in other words a layer or a master type image, the entire layered image will automatically be saved in .elx layered format.
Use the .elx extension for extended layer files. When working with layered images, if you want to save just the active image layer or master as a flat (atomic) image in .jpg, .png or .ato file format, use S (shift+s) instead of s.
If the image is not a layered image component, you use the filename extensions .ato, .png and .jpg (or .jpeg) to choose how you want the image saved. Note that only .png and .ato save transparency information for atomic images, and .ato saves 48-bit data. The .png format saves 24-bit data with transparency, and .jpg saves less than than 24-bit and does not save transparency. Jst sy n t lssy cmprssn.
The save format is selected by the extension you provide if the image is not a layered image:
| .ato | 48-bit RGB + 16-bit transparency + copyright + annotation + notations iToolBox custom format - it is suggested that you always use this format for flat (atomic) images that you intend to do more work on, ever. (image format is documented here) |
| .png | 24-bit RGB + 8-bit transparency common image format |
| .rgba | 24-bit RGB + 8-bit transparency simple uncompressed open image format (image format is documented here) |
| .jpg .jpeg | Less than 24-bit RGB format, lossy, common image format |
If the image is a component of a layered image (a layer or a master) and you use s to command a save, the entire layered image will be saved in the .elx format, and you must use the .elx extension on the file.
The full list of savable file types is located here.
§ 9.1.55 - Picking up the Hover Color
⌥+s will pick up the hover color (the color under the mouse pointer in the currently active image) and set the Sample operator minimum, maximum and average colors to that value.
If the current operator is the Color Fill operator, the fill color will be set to the hover color as well.
§ 9.1.56 - Text Generation
t commands the Text dialog to open. This generates text into a new image.
You would typically then use the Merge operator or the Place operator to compose the result.
It is best to generate the text large if you are going to use it large; this produces the highest quality anti-aliasing. Experiment with smaller text placements. You can also use the Text tool in the area toolbox to do this. When typing in the text entry box, if you press tab, this will immediately close the dialog and generate the text. If you press esc, this will immediately close the dialog and cancel text generation. The text generation dialog blocks; that is, you have to close it before you can do anything further with the rest of the application.
§ 9.1.57 - Undo Changes
u, undo, will remove the previous operation and place it into the redo list. Note that if you then perform another operation, the redo list is cleared. Also, if you use the Extend Image dialog to alter the image dimensions, the undo and redo lists are both cleared. The system limit for undos is set to ten.
§ 9.1.58 - Open Another View on an Image
v allows you to open additional views on an image. You can work in any open view on an image; and you can maintain the individual views at different pan and zoom levels.
§ 9.1.59 - Paste the Clipboard Into a New Image
Under OS X (MacOS), ⌘+v will paste the clipboard contents into a new image if:
- The clipboard contains a filename for which you have the appropriate access permission(s), or...
- The clipboard contains a correctly encoded image.
§ 9.1.60 - Change Color of Non-modal Selections
w and W (shift+w) allow you to choose which of eleven different color choices is to be used for the display of area selections when operating in in non-modal area selection mode.
§ 9.1.61 - Extend Image Dimensions
x and Commands/Extend allow you to increase the dimensions of an existing image on any combinations of its sides. See the Extend Image dialog for details.
§ 9.1.62 - Lock / Unlock Y-axis
y allows you to unlock the y-axis of the image view so you can size view of the image with the mouse in a natural aspect-incorrect manner. This is handy for setting up visual resizing of images that are squeezed horizontally or vertically (have a distorted Aspect Ratio.) Pressing y a second time turns y-axis locking back on; the effect is immediately apparent as soon as you resize the view. The state is indicated in the status area of the Areatools.
§ 9.1.62.1 - Addressing Common Aspect Ratio Problems
Y (shift+y) unlocks the y-axis, then resizes the view to as near to 1:1 as it can get, and then resizes the view on the x-axis to a series of preset common Aspect Ratios which are indicated in the Areatools status line.
opt/alt+y unlocks the y-axis, then resizes the view to as near to 1:1 as it can get, and then resizes the view on the y-axis to a series of preset common Aspect Ratios which are indicated in the Areatools status line.
opt/alt+Y (shift+y) unlocks the y-axis, then resizes the view to as near to 2:1 as it can get, and then resizes the view on the x-axis to a series of preset common Aspect Ratios which are indicated in the Areatools status line.
control+opt/alt+Y (shift+y) unlocks the y-axis, then resizes the view to as near to 2:1 as it can get, and then resizes the view on the y-axis to a series of preset common Aspect Ratios which are indicated in the Areatools status line.
§ 9.1.63 - Zooming in and Out
z, Z (shift+z), control+z, and opt-alt+z allow you to change the zoom level on an image view.
You can also use the magnify (F10) tool in the Areatools to zoom in and out with left- and right-clicks.
The current zoom levels of an image are displayed in the Areatools titlebar.
- z — zoom in one level
- Z (shift+z) — zoom out one level
- ⌥+z — set to 100% zoom
- control+z — one-time use of magnify tool
§ 9.2 - Keystrokes in the Operator Dialog
Details on this may be found on the Operators dialog page.
§ 9.3 - Keystrokes in the Layer Dialog
←, →, ↑, ↓ and home, when pressed in the Layers dialog, move the selected layer (or layers, if ✓ lockstep is checked) relative to the master image. Other keystrokes are indicated with bold, underlined letters on the command buttons. See the Layers dialog for more information.
§ 9.4 - Keystrokes in the Measure Dialog
←, →, ↑, ↓ and home, when pressed with the Measure dialog active, move the rulers. Other keystrokes are indicated with bold, underlined letters on the command buttons. See the Measure dialog for more information.
, Previous Page . Next Page
t TOC i Index k Keyboard o Operators g Glossary c Changes
![]()
on February 27th, 2026 at 17:38 MT
| Please consider supporting my iToolBox development efforts with a small PayPal donation. |