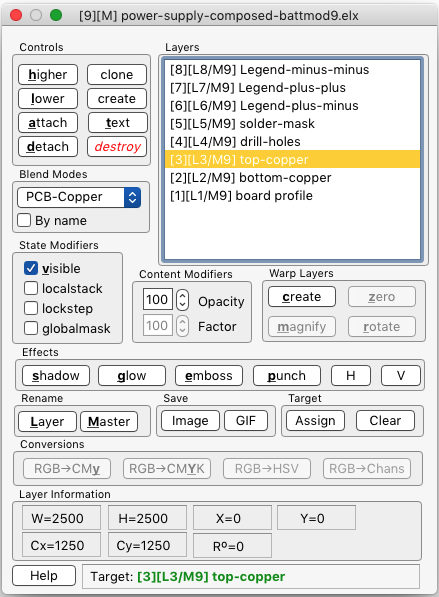
§ 19 - Layers Dialog — .elx Files
§ 19.1 - Interface
When the Layers dialog has the focus, you can press any key that has an underlined letter on a button, and it will function as if you had pressed the button. Observe capitalization; g is not the same command as G (shift+g), for instance. The former is "glow" and the latter is "GIF Animation".
When the Layers dialog has the focus, pressing ←, →, ↑, or ↓, optionally with shift and/or opt/alt, will move the currently selected layer (the one that is highlighted in the Layers list) in relation to the other layers in the image.
Home also has various layer positioning functions in combination with with shift and/or opt/alt you can use.
n will change the currently selected layer to the next layer mode in the mode list. When the last mode is reached, the next layer mode will be the first layer mode.
N (shift+n) will change the currently selected layer to the previous layer mode in the mode list. When the first layer mode is reached, the next layer mode will be the last layer mode.
f will bring the (or one of the) currently selected layer's view(s) to the front.
F (shift+f) will bring the (or one of the) currently selected layer's view(s) to the front and place it at the home position — the same display location the first image appears at.
⌥+f will bring (one of) the view(s) of the master image to the front.
⌥+F (shift+f) will bring (one of) the master view(s) to the front and place it at the home position — the same display location the first image appears at.
The Layers dialog offers the following controls:
higher move a layer up in the layer stack
lower move a layer lower in the layer stack
attach attach a flat, atomic image to this layered image as a layer
detach detach a layer and make it into a non-layered image
clone clone a layer
create create an empty layer
text Generate one or more text layers. When multiple layers are generated, they will initially be offset by the line height, starting at the top left of the master. All of the layers will be in ✓ lockstep, so you can select the lowest one and then move them as a group using the ←, →, ↑, or ↓ keys when the layer dialog is active, as it will be subsequent to the generation of (a) text layer(s.)
destroy will destroy the selected layer completely.
The Blend Modes ⇳ drop-down menu controls how layers combine with one another. More information on the 62 blend modes may be found here.
✓ By name controls sorting of the drop-down menu of layer blend modes
When ✓ visible is checked, the layer is combined into the master image. If ✓ visible is not checked, layer is ignored.
If you press shift while clicking ✓ visible then the state of the checkmark is applied to all layers.
If you press ⌥ while clicking ✓ visible then the other layers will be set to the opposite state; that is, if you're making the current layer visible, then all other layers will become invisible.
If you press both shift and ⌥ while clicking ✓ visible then all the other layers will be set to the opposite state except the bottom (base) layer.
✓ localstack allows building a sub-image from several layers
✓ lockstep the next layer moves when this layer moves
✓ globalmask if on, the layer masks outside its boundaries
Opacity: How much of a layer is applied.
Factor: Various adjustments to layer modes.
create create a new warp layer
zero zero out all warping information in a warp layer
magnify set up a warp layer to scale the content beneath
rotate set up a warp layer to rotate the content beneath
shadow create a shadow around the alpha mask of a layer.
glow create a glow around the lapha mask of a layer.
emboss create an embossed effect around the apha mask.
punch create a punched effect around the alpha mask.
H flips all image layers horizontally.
V flips all image layers vertically.
Rename Layer rename a single layer
Rename Master rename the master
Save Image save the layered image
Save GIF creates a GIF animation file. Requires all layers to be the same size; individual layer modes and settings are not relevant here.
Instead, the layered image is used as a collector and ordering tool for the frames of the animation. When generating a GIF animation, you will be prompted for the inter-frame delay time in milliseconds, a choice of dithering the colors or not, and if you want the animation to pong (bounce back and forth) when the loop count is zero. The master image is not included in the generated animation.
You can use the Color Reduction operator to select optimum colors for each frame; if you do not do this, the GIF colors will be selected for you, but they may not be quite as well chosen.
Animations are generated from the first layer (nearest the top) until the last layer, and all layers are included in the output animation. So if you don't want a layer in the output, use detach to remove it before clicking GIF Anim
Target Assign Assigns the most recently selected layer as the Target of any selections made on the master image. This allows you to use the composed layered image as your guide to area selections that only affect specific layers. The Target is not saved with the image; a newly loaded or created layered image has no assigned Target.
Target Clear removes the layer Target so that selections made on the master image have no effect on any layer.
Conversions RGB→CMy create color separation of normal layer to decomposed layers of Cyan, Magenta, and Yellow. The layer to be converted must be set to Normal layer mode first.
Conversions RGB→CMYK create color separation of normal layer to decomposed layers of Cyan, Magenta, Yellow and Black. The layer to be converted must be set to Normal layer mode first.
Conversions RGB→HSV create color separation of normal layer to decomposed layers of H, S, and V. The layer to be converted must be set to Normal layer mode first.
Conversions RGB→Chans create color separation of normal layer to decomposed layers of red, green, and blue. The layer to be converted must be set to Normal layer mode first.
Layer Information: Information about the current layer
The Target: [layer identifier] field at the bottom of the layer dialog calls out the layer that will be affected if you make your selection on the master image. You assign the target with the Target Assign button, described here.
In addition to the indicated keyboard shortcuts, you can press esc to close the layers dialog when it is the active window (has the mouse focus.)
§ 19.2 - What Are Layers?
To begin with, you can think of layers as perfectly transparent sheets of film, laid one on top of another in a stack. Of course, if all these layers are transparent, the whole stack is transparent. That's true here, also.
So, imagine a stack made of two sheets of transparent film.
If you place image information — think of it as paint — on the bottom sheet of film, you can see it through the top sheet (because the top sheet is still unpainted).
But if you now paint something small on the top sheet, you can see everything on the bottom sheet, except what the painting on the top sheet covers.
If you move the top sheet, the small painting on it appears to "move" over the bottom sheet.
If you don't like the results on the top sheet, you can throw it away without losing the painting on the bottom sheet — and likewise, if the bottom sheet is not pleasing, you can throw it out without losing the work on the top sheet.
This is the basis for layers in iToolBox. There are differences from the real-world stack of film sheets, but they are all in your favor.
Some of those advantages are:
- You can stack an unlimited number of sheets in your layered images and the stack remains completely transparent.
- You can work on every sheet, or layer, independently of the others
- Layers may be offset from one another, allowing you to "slide" layers around without limit.
- Layers can be different sizes from one another, yet you can still handle them without the stack becoming difficult to manage.
- "Overlay" (Normal) is not the only way that layers can be combined — there are multiple combination modes that give beautiful and interesting results you can't get with "real" film layers no matter what you do.
- Layers in most blend modes can re-position layers above with "lockstep."
- You can rearrange the order of the layers in the stack.
- You can save your layered images in the layered state, and come back to work with them later.
- You can save a resulting combination (flattened clone) image or any individual layer in any normal image format at any time without disturbing the layered image.
Overall, image layers are a powerful, flexible and easy to use means to build up complex images from simple components.
More formally, iToolBox layered images have the following useful characteristics:
- Layered images combine to form a "master view", which is not a layer.
- Images may have any number of layers, limited only by memory.
- The bottom image is the "base layer", and any image layer may be re-arranged at will.
- Various layer blending modes are available such as normal, multiply, add, warp, etc.
- Image layers may be moved to any degree, relative to the master display image.
- Image layers may apply only "local" effects, affecting only immediate neighbors
- Image layers may contain geometric adjustments and distortions of preceding layers
- Layered images may be saved in a lossless compressed file format that retains all information about the image.
- Images of any size may be attached as layers; they may be the same size, larger, or smaller than the master layer image. You can also non-destructively scale them using a warp layer.
- You can zoom in (or out) on any layer or the master independently of the rest of the image.
- You can open more than one view on any layer or the master — even at different magnifications.
When you have a layered image, or you want to convert a flat (atomic) image to a layered image, just press layer. You can also open the layers dialog on an already layered image by pressing layer to open the Layers dialog when one of its layers or the master is the currently active image.
Once the Layers dialog is open, you can manipulate the various layers, attach more image layers, detach them, move them around (use the cursor keys when the Layers dialog is active... the currently selected layer will move.) You can use shift, control and opt/alt to modify the ←, →, ↑, ↓ and home key movements.
When beginning work with an image that you want to work with in a layered environment, you need to make an initial choice about the size of the master image. You can do this with the File/New Image ⌘N function, or you can do it by simply promoting an atomic image into a layered one with l.
This doesn't affect what size layers you can use, but it does control the size of the final master image. You can also increase the size of the master at any time later using the Extend Image dialog. And of course you can crop out any portion of the master image or any layer for later use. Cropping from a warp layer will produce a transparent crop with a base color of white. Merging from a warp layer will do the same.
Layered images are created by promoting an atomic, or flat, image to a layered image. The promotion creates a master view of the same size as the image that was promoted, and a layer that contains the original image, set to normal mode. The result after the initial promotion, as viewed in the master image, is the same as the original atomic image.
You can either make a new image, or you can promote an image that already exists (one you loaded or have been working on already). When you do so, you are going to have the image contents (if any) as one of the layers, but it can be any layer, and you can also delete or simply detach it from the layered image later, should you decide that is what you want to do.
So to promote a normal atomic image to a layered image, just press l while the image view is active.
When you do this, the image is converted as we described above and the Layers dialog opens. The Layers dialog is the control center for layered images. It is here that you can rearrange image layers, change layer combination modes, move layers around, and more.
§ 19.3 - Tips for Working on Layers
If you want to create something with a specific size and/or position relationship to the master image, one approach you can take is to set the Target to the layer you want to alter, and then make the selection on the master image (which will do nothing to the master itself, as the master is not mutable). You can also just edit the specific layer's image if that seems more appropriate.
§ 19.4 - Anatomy of a Layered Image
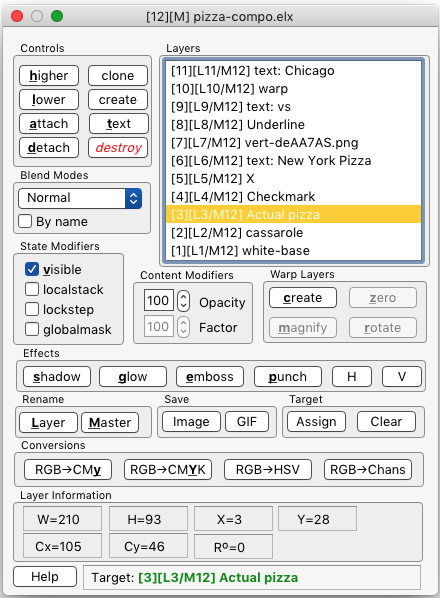
This is the layer dialog showing all
the image layers. Note the warp layer
has ✓ localstack, which causes
the warp to only affect the layer below it,
which contains the text "vs.", providing
italicization.
§ 19.5 - Special Roles for Layered Images
| See also: |
GIF Animations Image Barrels Printed circuit boards |
, Previous Page . Next Page
t TOC i Index k Keyboard o Operators g Glossary c Changes
![]()
on February 27th, 2026 at 17:38 MT
| Please consider supporting my iToolBox development efforts with a small PayPal donation. |