§ 7 - Area Tools Dialog
§ 7.1 - Modality
The Area Tools can be used in two ways: Modal and non-Modal. You choose which at any time by checking or unchecking the ✓ Modal control at the bottom of the Area Toolbox.
The default mode when iToolBox is first installed is non-Modal, as this is the selection paradigm most people are already familiar with.
§ 7.1.1 - Non-Modal (Modal Unchecked)
With ✓ Modal unchecked, you can create a selection, optionally modify it as you see necessary by adding or subtracting additional selections, then command the operation to take place by pressing the return key, or by (left-clicking) Apply in the area toolbox.
When operating in this manner, as an aid to visibility, you can use the whirl and W (shift+w)hirl keystroke commands to change the color of the area selection outline at any time, which can assist with selection visibility against image backgrounds.
§ 7.1.1.1 - Creating New Selections
You can create an entirely new selection using any of the areatools; don't press any keys while you're doing this.
§ 7.1.1.2 - Adding To Existing Selections
You can add to the current selection using any areatool by pressing shift when you complete the selection for the additional area.
§ 7.1.1.3 - Subtracting From Existing Selections
You can subtract from the current selection by pressing opt/alt when you you complete the selection for the area to be removed.
§ 7.1.1.4 - Deleting Existing Selections
You can clear the current selection with the delete keystroke.
"Complete the selection" in the above context means just prior to when you release the left mouse for a rectangle or an ellipse, or when you right-click to complete a polygonal, penciliar, or splinarific selection.
§ 7.1.1.5 - Undo and Redo of Changes to Selections
undo and redo will manage your changes to the area selection as well as changes to images.

§ 7.1.2 - Modal Selections
✓ Modal is a considerably faster way to work with images; changes are applied immediately when you select an area on any image view, and there are some area selection features that make this method of working fast, easy and accurate.
However, this efficiency comes at the cost of not being able to create complex area selections by combining multiple area selections. When you need to do that, non-modal selection, described previously, is the mode to use.
§ 7.2 - Mask With Alpha
When ✓ M/Alpha is checked, area selections will additionally mask the selections you make against the alpha channel of the action image.
When ✓ M/Alpha is unchecked, such area selections will create new, non-transparent alpha information in the action image from the area selection.
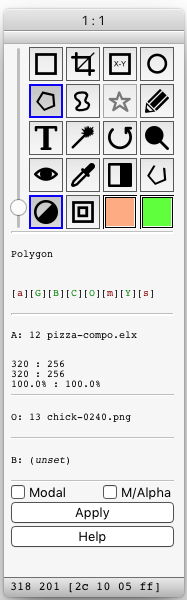
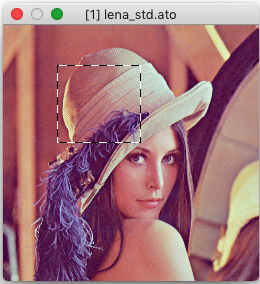
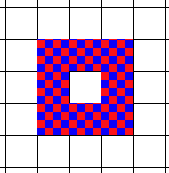
Here's an example of the difference using the Color Fill operator:
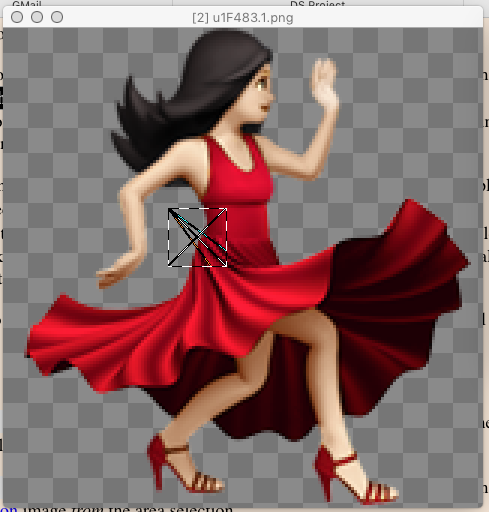
Original image with numeric rectangle area selection
The image has an alpha channel that provides a custom shape.
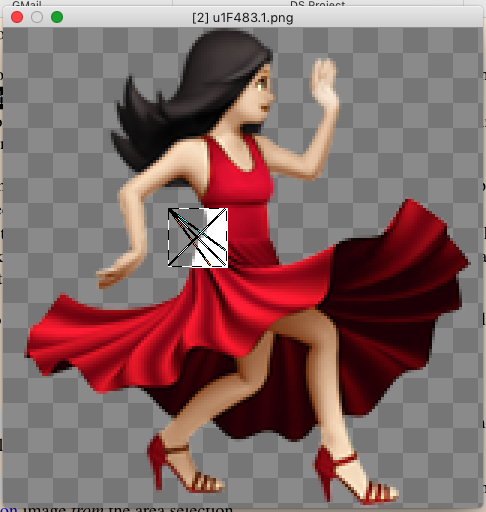
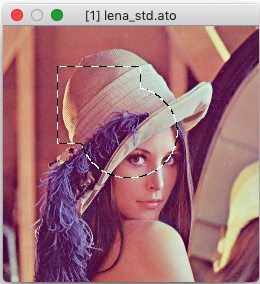
Color Fill operator applied with ✓ M/Alpha
Here, the selection is masked by the alpha channel information.
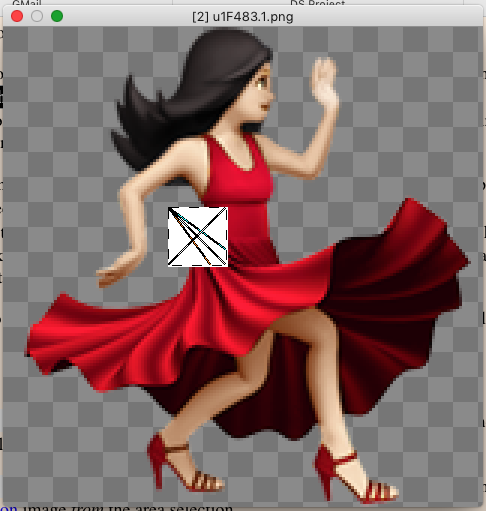
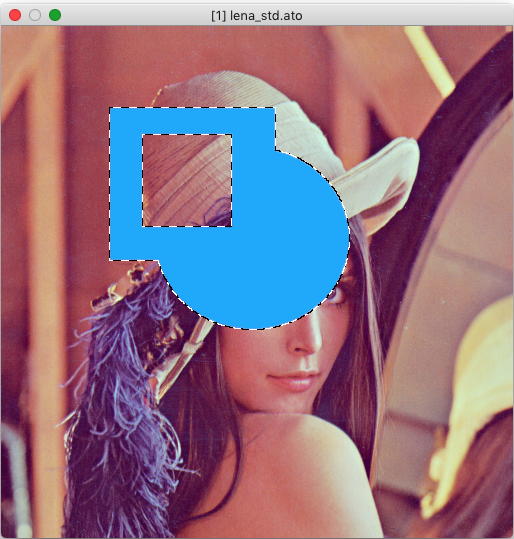
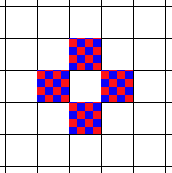
Color Fill operator applied with ✓ M/Alpha
Here, the alpha channel is ignored, and the entire selection takes effect.
§ 7.3 - Area Selects

§ 7.3.0.1 - Entire Image
Keyboard Command: F1
Click and release anywhere on the image. The operation is applied to the entire image. There is no antialias provided for entire image operations. This selection is always filled; it ignores the fill and open/close figure settings.

§ 7.3.0.2 - Rectangle
Keyboard Command: F2
Click and drag to size, release, will fill if fill is on. The operation is applied to the selected area. Obeys the rectangular antialiasing option set in the Preferences dialog or by a. The area selection will move if you press and hold the right mouse button as well as the left one. Holding ⌘ while sizing the rectangle will maintain a 1:1 aspect ratio.
Right-clicking on the rectangle tool will open a dialog with the aspect and guide settings.

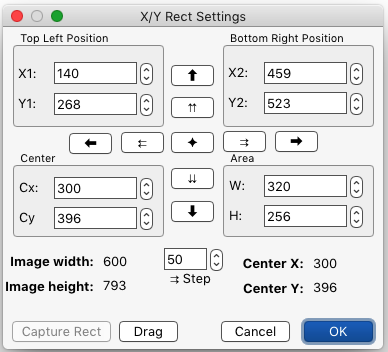
§ 7.3.0.3 - Numeric Rectangle
Keyboard Command: F3
Click anywhere on image, alter values and/or Drag and then drag the mouse. When satisfied with the numeric rectangle's size and position, select OK. This selection will fill if fill is on. The operation is applied to the selected area. Obeys the rectangular antialiasing option set in the Preferences dialog or by the a / antialias keystroke.
The arrow and star buttons allow you to flush the selection to an edge, or center it.
The double arrow buttons allow you to move the selection by the number of pixels set in the Step control.
If you have previously made a normal rectangular selection, then Capture Rect will set the Numeric Rectangle to the same area selection.

§ 7.3.0.4 - Ellipse
Keyboard Command: F4
Click and drag to size, release, will fill if fill is on. The operation is applied to the selected area. Obeys the elliptical antialiasing option set in the Preferences dialog or by the a / antialias keystroke. The area selection will release its anchor and slide around if you press and hold the right mouse button as well as the left one. Release the right mouse button to re-anchor it. Holding ⌘ while sizing the ellipse will maintain a 1:1 aspect ratio.
Right-clicking on the ellipse tool will open a dialog with the aspect and guide settings.

§ 7.3.0.5 - Polygon
Keyboard Command: F5
Points are placed with left-click. Polygon is closed, or ended if open figure is on, with a right-click.
Pressing shift while placing points allows dragging already placed polygon points.
Pressing opt/alt while placing points allows deleting already placed polygon points.
Pressing shift and opt/alt while placing points allows adding new polygon points after the nearest point.
Will close if open figure drawing is not on, otherwise will fill, if fill is on. Obeys the polygonal antialiasing option set in the Preferences dialog or by the a / antialias keystroke.

§ 7.3.0.6 - Spline
Keyboard Command: F6
Points are placed with left-click. Spline is closed, or ended if open figure is on, with a right-click.
Pressing shift while placing points allows dragging already placed spline points.
Pressing opt/alt while placing points allows deleting already placed spline points.
Pressing shift and opt/alt while placing points allows adding new spline points after the nearest point.
Will close if open figure drawing is not on, otherwise will fill, if fill is on. Obeys the spline antialiasing option set in the Preferences dialog or by the a / antialias keystroke.

§ 7.3.0.7 - P-shape
Keyboard Command: F7
P-Shapes are vector objects that you can save to, and load from, mass storage such as your computer's hard drive(s.)
You create P-Shapes by making a selection with any areatool except the wand in any image, then selecting File/Save P-Shape , which becomes available as soon as you have made such a selection.
When you save a P-Shape, it is immediately set up in the P-Shape tool, ready for use.
To select areas with a P-Shape any time after creating an area selection and using Selections/Convert [type region] to P-Shape , or loading one using File/Load P-Shape , select the P-Shape tool and drag the shape out. You can change the size and aspect with left-mouse drag, and you can move it around at the current size with left and right-mouse drag.
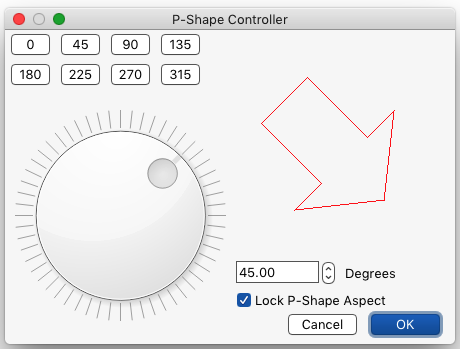
You can use the P-Shape Controller to set a specific rotation of the p-shape, and you can also lock the aspect ratio to 1:1 so that no matter how you size the p-shape, it will not be distorted.
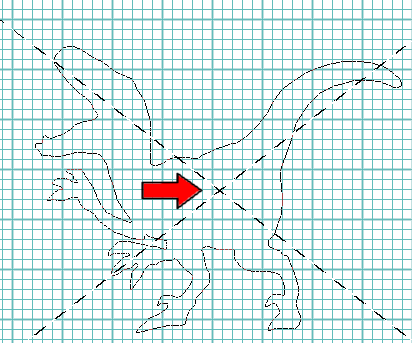
If you want the aspect ratio of the P-Shape to exactly match that of the original design when the aspect ratio has not been locked via the P-Shape Controller, simply ensure that your mouse is on the diagonal aspect line in the direction you are pulling out the shape, or see to it that the aspect guides form an "X" as you size the shape.
In addition, pressing control+shift while moving the mouse will rotate the P-Shape clockwise, pressing control+⌥ while moving the mouse will rotate the P-Shape counter-clockwise, and pressing control+shift+⌥ while moving the mouse will reset the P-Shape's rotation to its original orientation as loaded from storage.
Or, you can use ⌥-r from any image window, or File/P-Shape Controller to rotate a p-shape to an arbitrary angle:
P-Shapes work nicely with the Brush Stroke operator. Try it!

§ 7.3.0.8 - Pencil
Keyboard Command: F8
Click and then drag. Will close if open figure drawing is not on, otherwise will fill, if fill is on. Obeys the penciliar* antialiasing option set in the Preferences dialog or by the a / antialias keystroke.


§ 7.3.0.9 - Text
Keyboard Command: F9
This generates text into a new image via the Text dialog. You might then use the Merge operator or Place operator to compose the result. It is best to generate the text large if you are going to use it large; this produces the highest quality anti-aliasing. Experiment with smaller text placements. You can also use the t keyboard command in image context to do this. When typing in the text entry box, if you press the tab key, this will immediately close the dialog and generate the text. If you press the esc key, this will immediately close the dialog and cancel text generation. The text generation dialog blocks; that is, you have to close it before you can do anything with the rest of the application.

§ 7.3.0.10 - Magic Wand
Keyboard Command: F10
Click on the location that has the color you want to use to control the fill.
The wand's tolerance is set by the vertical slider at the left of the toolbox; this is what controls how "near" colors have to be to each other in order for the selection to extend itself. The tolerance value is displayed below the tool icons.
If the tolerance ![]() is set to 0, the wand will do a global pick. This wand mode will match the exact color you select anywhere on the image, regardless of if it is a neighbor to the picked color. This is a fast way to change every occurrence of an exact color in an image.
is set to 0, the wand will do a global pick. This wand mode will match the exact color you select anywhere on the image, regardless of if it is a neighbor to the picked color. This is a fast way to change every occurrence of an exact color in an image.
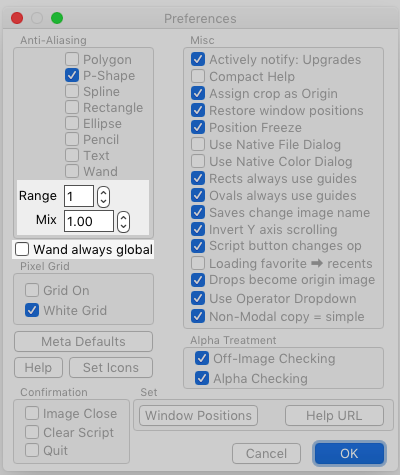
If what you want to do is is change every occurace of a color within a range, then check ✓ Global Pick in the Preferences dialog. Now the wand will globally pick all matching colors within the tolerance ![]() setting in the Areatools.
setting in the Areatools.
The wand obeys the wandular* antialiasing option set in the Preferences dialog or by the a / antialias keystroke. It also obeys the ✓ M/Alpha setting in the Areatools; it will not extend the fill anywhere the target image's transparency is zero when ✓ M/Alpha is checked.
The Preferences dialog options that affect the wand are highlighted in the image to the right.
When you release the mouse button, the area selection remains at the adjusted size, but the Tolerance
During such an adjustment, it is not possible to set tolerance

§ 7.3.0.11 - Redo
Keyboard Command: F11
The first is this area tool, which will re-select an area in an image.
The second is the redo function, which reverses undo operations.
It can be a little confusing, but inasmuch as the context in which one would want one or the other is quite different, it'll quickly become second nature.
If you have made an area selection previously, that area selection used again if the image you are using it in is the same size as the image that it was originally made in.
If the image you are applying redo to is not the same size in any dimension, the area selection from the previous selection in another image will be scaled to the current image's size and then applied; if the images are of significantly different sizes, the selection will be less true to the original.
If the images are not the same aspect ratio — for instance, one is square and one is tall & narrow, the aspect of the area selection will change as well.

§ 7.3.0.12 - Magnify
Keyboard Command: F12
Left-click without dragging will zoom. Right-click will unzoom, in both cases centering where you click the mouse. You can also zoom with zoom-in, Z (shift+z) Zoom-out, and opt/alt+zoom to 1:1 relative to the window size. If you drag out a rectangle with the magnify tool, that region will be zoomed to fit in the current view.
You can invoke the magnify tool for one-time use with control+z.
The current zoom levels of an image are displayed in the Areatools titlebar.
§ 7.4 - Selection Modifiers

§ 7.4.0.1 - Complement
Keyboard Command: shift+F3
The area you did not select is selected.

§ 7.4.0.2 - Open Figure
Keyboard Command: shift+F4
Affects polygon, pencil.
If the figure is open, the polygon and pencil area selections will never be filled, regardless of the setting of the fill button. One circumstance where you might want open figure off is when using the brushstroke operator.

§ 7.4.0.3 - Filled Figure
Keyboard Command: shift+F5
Affects polygon, pencil, rectangle, and ellipse.
You will generally want this on. Otherwise, the selection will only be the outline drawn with the area tool.

§ 7.4.0.4 - Outline Modifier
Keyboard Command: shift+F6
Affects all fill tools.
Options for the outline modifier can be set by (right-clicking) the outline modifier tool icon:
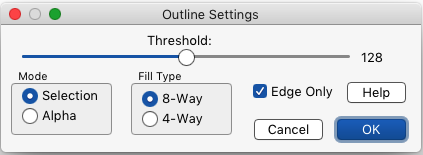
When this tool is in ![]() Selection Mode, and ✓ Edge Only is checked, the selection will be of the pixels immediately outside the selected region. If ✓ Edge Only is not checked, then the selection will also include the pixels immediately outside the selected region (another way to think about this is that the selection will be one pixel larger than it would normally be.)
Selection Mode, and ✓ Edge Only is checked, the selection will be of the pixels immediately outside the selected region. If ✓ Edge Only is not checked, then the selection will also include the pixels immediately outside the selected region (another way to think about this is that the selection will be one pixel larger than it would normally be.)
When set to ![]() 8-way Fill Type, pixels in all eight directions from the edge pixels will be considered outline pixels:
8-way Fill Type, pixels in all eight directions from the edge pixels will be considered outline pixels:
When set to ![]() 4-way Fill Type, only the four pixels to the right, left, top and bottom of edge pixels will be considered outline pixels:
4-way Fill Type, only the four pixels to the right, left, top and bottom of edge pixels will be considered outline pixels:
When this is on in ![]() Alpha Mode, a selection only occurs at the transition between transparent and non-transparent within the selected region. In this case, the level of transparency set in the options dialog is used as a trigger.
Alpha Mode, a selection only occurs at the transition between transparent and non-transparent within the selected region. In this case, the level of transparency set in the options dialog is used as a trigger.
§ 7.5 - Non-selects
§ 7.5.1 - Text Tool
Keyboard Command: F7

§ 7.5.2 - Eyedropper
Keyboard Command: shift+F2
One-shot activation of the Sample operator using the current area selection mode.

§ 7.5.3 - Preview Eyepoint
Keyboard Command: shift+F1
This is also changeable with ←, →, ↑, and ↓ in the operator window, and by clicking and dragging on the preview window. This changes where the operator window previews the operations when it is in 1x ⇳ or 2x ⇳ mode.
§ 7.5.4 - Magnify
Left-click to zoom in, right-click to zoom out.
§ 7.5.5 - Status Flag Area
Lets you know at a glance if grid, antialias, etc. are in effect:
- [A/a] indicator: Antialias for the current areatool ([-] for entire image) On/off
- [G/g] indicator: Grid On/off
- [W/B] indicator: White or Black grid color
- [C/c] indicator: Alpha Checking On/off
- [O/o] indicator: Outside-of-image checking On/off
- [M/n] indicator: M/Alpha On/off
- [Y/y] indicator: Aspect Locking On/off
- [S/s] indicator: Grid Snap On/off
§ 7.6 - Status Bar
The status bar displays various bits of information. When you hover over the active image, it reads out the x and y position of the cursor over the image, and the RGB values of the color of the image immediately under the cursor. You can capture this color using the capture keystroke command.
§ 7.7 - Customize the Tool Icons
If you'd like to customize one or more of the area toolbox icons, you can do that from the Preferences dialog.
§ 7.8 - Color Wells

§ 7.8.1 - Foreground Well
The color painted when the blend mode is set to Foreground. Click it to set its color, or it can be set indirectly via the Color Fill operator using →Foreground

§ 7.8.2 - Background Well
The color painted when the blend mode is set to Background. Click it to set its color, or it can be set indirectly via the Color Fill operator using →Background
, Previous Page . Next Page
t TOC i Index k Keyboard o Operators g Glossary c Changes
![]()
on February 27th, 2026 at 17:38 MT
| Please consider supporting my iToolBox development efforts with a small PayPal donation. |