§ 6 - Getting Started
§ 6.1 - First Steps
The first thing you should do after starting iToolBox is open the Preferences dialog using either ⌘+, or the iToolBox/Preferences... ⌘, menu item, and click Meta Defaults.
Once the Meta Defaults dialog is open, set the default author, annotation, and copyright strings. These will be automatically applied to all new images you create, and saved in file formats that support them such as the .ato, .elx and .png formats — of course you can change them for any image using the Author, annotation, and copyright operators, and you can change them globally in the Preferences dialog.
If you like, you can set your Home GPS co-ordinates in the Meta Defaults dialog as well. They will not be applied to any image unless you intentionally do so using the GPS operator, and they are only saved in .ato and .elx format images.
Another thing to consider at this point is whether you want JPEG image saves to pass along EXIF information originally associated with JPEG images. If you do, be sure to check the ✓ EXIF checkbox in the Preferences dialog. For some information on why this is something you should give careful consideration to rather than just go "of course I do", see the EXIF discussion page.
§ 6.2 - Some Tips
§ 6.2.1 - The Basics Are Very Easy
Here's how you generally use iToolBox:
-
Load an image with File/Load Image ⌘O or control+l
-
Repeat as desired:
- Choose a new Operator using any one of the five methods described here
- Adjust the Operator's settings if needed
- Choose a new Area Tool, or use the currently selected one
- Select an area on the image view using your mouse
- -click the Apply button in the Areatools, or press return
- Optionally use undo and redo to manage your changes
-
Repeat as desired:
- Save the result with File/Save Image ⌘S or s
| See also: | Common Tasks for a quick start |
§ 6.2.2 - Context Matters
OS X (MacOS) directs your keyboard and mouse input to the window that is in focus. The window that is in focus indicates this by showing you a visibly active window title bar, where other windows present a more subdued title bar:


You activate a particular window with a single on its title bar.
Here's what "context matters" means: When an image view is in focus, (that means that it is the active window, indicated by an active titlebar on the window) the cursor keys pan the image view. But when the Layers dialog is in focus, then the cursor keys adjust the position of the currently selected layer with regard to the master image. And again when the Operators dialog is in focus, the cursor keys pan the eyepoint of the preview window around. And yet again, when the Measure dialog is in focus, the cursor keys move the rulers around on the most recently active view. So make sure the window you mean to be in focus, is the one in focus, before you go hammering out keystroke commands on the keyboard.
§ 6.2.3 - Resizing Image Views
When you resize an image view, use a -and-drag, and do it from the right edge of the view. iToolBox uses a one-edge strategy for aspect-correct view sizing, and that's the right edge.
§ 6.2.4 - Key Commands Are Mnemonically Associated
Almost all letter-based keystroke commands are mnemonically associated: p for print, s for save, etc. This makes them much easier to learn if keyboard commands are your thing.
§ 6.2.5 - Hot Repositioning Is... Hot!
If you're making an elliptical or rectangular area selection: while you are pressing , if you also press the selection will un-anchor and you can slide it around. When the ellipse or rectangle is exactly where you want it, release the , and you're back to normal sizing. Release the , and the selection is made.
§ 6.2.6 - The Polygon Tool Offers Hot Point Editing
The polygon area placement also offers move, delete and add capabilities anywhere along the polygonal path. See the polygon tool explanation for how that works.
§ 6.2.7 - Custom or Standard File and Color Dialogs
You can choose between native and custom file and color setting dialogs in the application preferences (OS X (MacOS) users can use ⌘, to access) The custom File dialog is much faster than the native one under OS X (MacOS) and allows you to hand-enter a filename and/or path. The custom color dialog allows you to handle more colors than the native one under OS X (MacOS). The tradeoff is generally one of familiarity for function.
§ 6.2.8 - There Are Three Primary Image Types
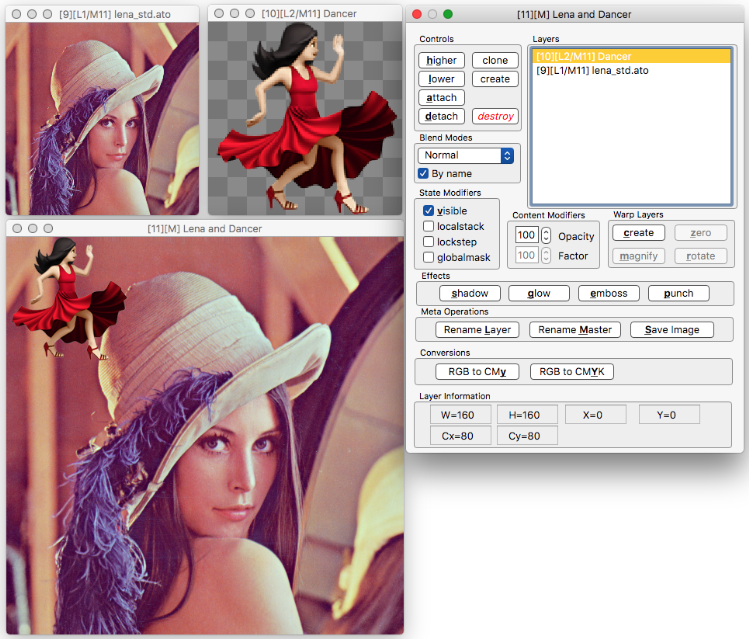
An atomic image is a single image with no layer content or membership. Layered images have multiple image layers that make them up; they are combined to create a master image:
- Atomic - the usual standalone image you just loaded from a .jpg, etc.
- Layer -- the layer(s) making up a layered image.
- Master - the result of all the combined layers in a layered image.
Layering offers an extraordinarily powerful way to manipulate and adjust your images. You can learn more about layered images beginning with the discussion of the Layers dialog.
, Previous Page . Next Page
t TOC i Index k Keyboard o Operators g Glossary c Changes
![]()
on February 27th, 2026 at 17:38 MT
| Please consider supporting my iToolBox development efforts with a small PayPal donation. |