Layers Dialog — .elx Files / Layer Blending Modes / Traditional Blend Modes
This manual was generated with wtfm
on February 27th, 2026 at 17:38 MT
wtfm uses aa_macro and SqLite
wtfm and aa_macro are coded in python 2.7
iToolBox 3.12
This Documentation and Associated Application Executables are Public Domain
§ 19.6.1.7 - Difference
This mode subtracts the content of the higher layer from the lower layers. Where the result would be negative, the result is less than 32768. For example, if channel value 6 is subtracted from channel value 4, the result will be channel value 32766.
Where the result would be positive, the result is more than 32768. For example, if channel value 4 is subtracted from channel value 6, the result will be channel value 32770.
Where the higher layer is partially transparent, the result is mixed with the lower layer composite in a manner proportional to the amount of transparency.
| See also: | Absolute Subtract blend mode Subtract blend mode |
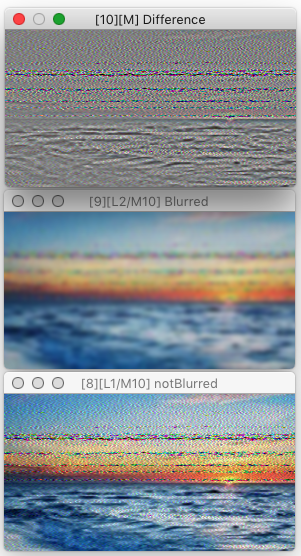
Here's an example of a quick repair I did on the "notBlurred" image above, that involved the Difference layer mode:
Here's what I did:
-
Created a texture of the general noise level as shown in the examples above:
- Duplicate the original image with c (you can also use Commands/Clone )
- Promoted the original to a Layered image with l (you can also use Images/Layers: Promote or Open )
- In the layer dialog, used attach to attach the duplicate layer, which puts it above the original by default
- Blurred the duplicate layer with the Gaussian Blur operator and the entire image tool
- Set the duplicate layer to Difference layer mode
-
Using the rectangle tool, used the Crop operator to clip out a horizontal band of about ten undamaged scan lines from the resulting master — here it is at 2x original size:

-
Performed actions (a...g) around the full horizontal extent of each damaged region:
- Chose Selections/Blend Mode/Matte
- Used the Vertical Remove operator with the rectangle tool to create smooth vertical colors
- Chose the Redo tool so that the vertically removed region would be the precise selection from now on
- Applied the Gaussian Blur operator to smooth that region further
- Set the cropped out texture to the origin image with o (you can also use Images/Assign as Origin )
- Chose Selections/Blend Mode/Add Grey
- Applied the Merge operator, still with the Redo tool active
Document Keyboard Navigation
, Previous Page . Next Page
t TOC i Index k Keyboard o Operators g Glossary c Changes
, Previous Page . Next Page
t TOC i Index k Keyboard o Operators g Glossary c Changes
![]()
on February 27th, 2026 at 17:38 MT
| Please consider supporting my iToolBox development efforts with a small PayPal donation. |