| This is a child page. You can use Parent in the quick nav bar at the top or the bottom of the page to navigate directly back to the parent of this page. Some child pages are more than one level deep, and in that case will require more than one Parent click to reach the outermost document level. |
§ 17.5.2 - Timeline Basics - Dialog Controls
§ 17.5.2.1 - Source and Brush Images
Source, or brush, images are mainly used for operations which combine two images. F/x allows you to specify multiple files as the source or brush image, or a video sequence as a stream of source or brush images. A single source image is represented by green outlined frame with no associated number. A single brush image is represented by a purple outlined frame with no associated number.
In either case, this frame will also have an arrow associated with it which shows how long the single frame is to be used. You can reposition the single frame on the same level of the TimeLine by grabbing the outlined key frame box, or by grabbing the end of the arrow. Once you have grabbed the box or arrow, you can resize the length by moving the mouse to the left or right. After you have specified the desired length for the source image, release the left mouse button. A sequence of source video frames (AVI, FLI/FLC or FLM files) will appear as a green Filmstrip, or purple if a stream of brush images, with numbers representing the frame number under each frame. This frame value is determined by the starting frame value and the increment value (these two values are described in greater detail in the Specify Source, Brush and Action Image documentation).
Remember, source frames will only be used if the operation requires a source, brush frames if the operation requires a brush, and neither if neither one is required. The source or brush images will remain valid until a new source or brush image is specified. This means that you can specify a sequence of source images in level one, and use them for a level three or level four operation.
You can automatically load a source image in the TimeLine by Ctrl+Clicking on the desired Source Image icon, likewise brush images.
§ 17.5.2.2 - Area Selections
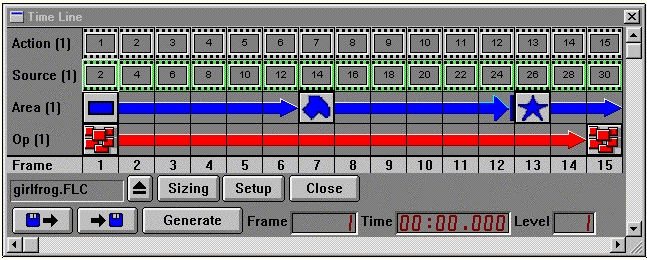
The area selections define where the specified operation will occur in the image or image sequence. The example TimeLine above has a total of three area selections. Each of these area selections has its own key frame represented by the area selection's icon. The first area selection is a Rectangle. You should notice that the Rectangle has an associated interpolation arrow to the next key frame. This means that over the first seven frames the rectangle will alter its shape to become the Polygon. The next area selection is a Polygon. Its arrow specified that there is to be no interpolation. The final area selection is an I-Shape, and it is set to interpolate back to the original area selection (the rectangle).
These area selections can be placed into the TimeLine in one of three ways. The first method is to use the Drag and Drop method to place the desired area selection into the TimeLine. The second method of area selection placement is to simply double click on an empty TimeLine cell. This will bring up the Add to TimeLine dialog which can be used to specify an area selection method. The final method is to add the new key frame by Control-Clicking on the area selection position where you would like the new key frame to appear. This will place the currently selected area mode into the TimeLine, load or front the appropriate action image, and allow you to make an area selection for that key frame. It is important to note that the area selection for any area selection key frame should be made prior to generation. The next paragraph describes how you can make area selections for these key frames. You should notice that when an area selection is place into the TimeLine that the associated arrow will always go to the last frame in the TimeLine, or will go until another key frame is reached. The number of frames that an area selection is used can be altered grabbing the area selection's icon, or by grabbing the end of the arrow and resizing the length. Placing one area selection icon on top of another will result in the loss of the bottom icon and all associated information.
The rectangle, and all other area selections, can be specified in one of two ways. The first way is to double click on the area selection key frame icon, and then select the Make the area selection now button. After selecting this button, F/x will bring the last current action image to the front so that you can select the desired area for application of the operation. You do not need to worry about using images that are in the sequence for selecting area because F/x will automatically scale any area selection to fit any size image that you specify. The second method of specifying an area selection for a key frame is to Control-Click on the desired area key frame icon. This will load or front the appropriate action image, and wait for you to make an area selection. This area selection is then stored into that key frame position. If you do not specify a area selection in one of those two ways, F/x will automatically use the last area selection that was made. F/x will use the Entire Image area selection if no area has be selected in this program session. You can access the area selection control dialogs by double clicking on the desired area selection frame, or by pressing the Enter key while the key frame is highlighted with the Current Key Frame marker (this is a white outline marker which shows the current TimeLine position).
§ 17.5.2.3 - Operations
The Operations line can contain any operation or operations that you would like to have occur on that level. F/x has no limit on the number of levels of operations, but TimeLine with a large number of levels can take large amounts of time to generate. We suggest that you use the Inhibit Display option in the TimeLine menu for TimeLine with a large number of levels. This option will prevent F/x from rendering each image, and will speed up the process. An operation can be specified using the two methods described in the previous topic. The manipulation of operations are very similar to area selections. The operation dialog can be accessed by double clicking on an operation icon, or by pressing Enter key while the operation is highlighted. This will bring up the operations dialog. This can be used to set the parameters for the current operation. This includes using presaved operation files, editing the operation's settings, or using the current operation settings.
Operations can also use interpolation to alter operation parameters over time. You can only interpolate between two operations that are the same. The example time line above does an interpolation between two Random Tile operation settings. However, it would not be possible to interpolate between a Merge and a Random Tile. The Operation dialog documentation explains this process in greater detail.
§ 17.5.2.4 - Action Images
Action Images are used for all F/x operations. F/x allows you to specify multiple files as the action image, or a video sequence as a stream of action images. A single action image is represented by gray outlined frame with no associated number. This frame will also have an arrow associated with it which shows how long the single frame is to be used. You can reposition the single frame on the same level of the TimeLine by grabbing the outlined key frame box, or by grabbing the end of the arrow. Once you have grabbed the box or arrow, you can resize the length by moving the mouse to the left or right. After you have specified the desired length for the source image, release the left mouse button. A sequence of video frames (AVI, FLI/FLC or FLM files) will appear as a gray Filmstrip with numbers representing the frame number under each frame. This frame value is determined by the starting frame value and the increment value. Remember, an action image (or image sequence) can be specified on any level in the TimeLine. This allows you to process multiple images with separate action images, and then use the result as a source or action image for another operation level. F/x will always save the last action image as the output image.
§ 17.5.2.5 - Load Timeline
This control will present you with a file dialog for loading previously saved TimeLine. The TimeLine file that is selected (a .TML file) will contain all of the operation area selection, and image information that was available when the file is saved. A TimeLine file contains all of the operation, area selection, and file information that has been place into the TimeLine. If you alter the TimeLine, and would like to save the changes, select the Save Timeline option.
§ 17.5.2.6 - Save Timeline
This control will save the current TimeLine and all of its components. This includes all operations, area selections, images, and related settings files. This is not the same as saving a project. Saving a project will only save the currently loaded image files into a project format. Saving a project will have no effect on the TimeLine, or any of its components. The TimeLine file will be saved with a .TML extension, and can be reloaded using the Load TimeLine option. Saving a TimeLine allows you to use a TimeLine multiple times without having to recreate the entire TimeLine.
The .TML files can be edited using a standard text editor. The .TML file will contain all of the area selection, operation, and action/source image information. You can edit these values, but illegal or ambiguous values can cause a sequence to not generate correctly. If you would like more information on editing these files please contact technical support.
§ 17.5.2.7 - Generate Sequence
This control, when pressed, will start the generation of the TimeLine using the specified operations, area selections, and image files. The file will only be saved if the Save Results option in the Sequence Controls dialog is selected. The TimeLine will be generated in the file format specified, and the results will also be displayed in the Filmstrip if it has been activated. You can pause the TimeLine generation by pressing the Pause button located at the end of the Status Bar. The generation can be restarted by pressing the pause button again. You can also cancel the TimeLine generation by selecting the Stop button which is also located at the end of the Status Bar.
§ 17.5.2.8 - Timeline Frame
The Frame value will display the currently highlighted frame number. This frame number corresponds to the current frame value. The current frame can be selected by moving the outline through the TimeLine with the arrow keys, or by clicking on the desired frame with the left mouse button. This will then alter the value that is displayed in the Frame area.
§ 17.5.2.9 - Time (MM:SS.)
The Time control displays the animation time for the current frame. This display is directly related to the setting of the Frame Rate option in the Time Line pull down menu. The Frame Rate dialog allows you to specify the playback speed or rate for the animation sequence you are generating (this only applies to AVI and FLI/FLC animation formats). You can specify the frame rate in one of three methods: milliseconds per frame, frames per second, and jiffies. Altering one of these values will automatically adjust the other two to the proper values. Once the frame rate has been set, the Time control will display the current frame's time position in the sequence. The time is displayed as follows: Minutes : Seconds . Milliseconds. As you move from frame to frame the time value will change to reflect the new current frame's time position.
§ 17.5.2.10 - Level
The Level area displays the TimeLine's current operation level. This level relates to when an operation is carried out or performed. The TimeLine can have multiple levels with a wide range of operations, area selections, and image files for each level. The levels start at the top of the TimeLine display with one, and increase sequentially downward. Each level is carried out in sequential order for each frame in the sequence. For example, a three level, ten frame TimeLine would be created as follows: Frame 1/Level 1, Frame 1/Level 2, Frame 1/Level 3 (The current action image is saved after this level), Frame2/Level 1, and so on until it reaches Frame 10/Level 3. It is important to remember that higher numbered levels will be placed on top of any previous level's changes. For example, you could cover a contrast adjustment made in level one with a color fill in level two.
§ 17.5.2.11 - Time Object
The Time Object displays the currently active object in the TimeLine. An object can be defined as any area selection, operation, or image file. This area of the TimeLine will display the name of the area selection method, the operation, or image file name that is currently highlighted. The highlight box is a simple white outline around the icon of the cell that was last clicked on. If there is not an area selection, operation, or image icon in a cell, then area will say that it is a continuation of the last object. In the dialog above a source image frame is the current object, and the Time Object display is showing the source image's file name. If you were to move the current frame right one cell, the time object display would show that this frame should re-load a file. If you were to double click on this cell, the Add to TimeLine dialog would appear. This allows you to add a new source or action image, operation or area selection to the current TimeLine level.
§ 17.5.2.12 - Erase Timeline
The Erase TimeLine control allows you to eject all of the objects that are currently in the TimeLine. F/x will ask you if you would like to save the changes that you have made to the TimeLine. or if you would like to eliminate the changes. You also have the option of canceling the erase without any alteration to the existing TimeLine. You can delete the currently highlighted object icon by pressing the Ctrl+Del keystroke, or you can erase an entire level by pressing Ctrl+d.
§ 17.5.2.13 - Sizing
The Sizing control allows you to alter the size of the individual TimeLine cells. The default resolution of each cell is 36x32. You can select to make each cell in the TimeLine a size between 24 and 64. The dialog that appears when this option is selected has several preset resolutions to chose from, or you can specify your own setting.
§ 17.5.2.14 - Setup
This selection will bring up the Sequence Controls dialog. The Sequence Controls dialog allows you to specify the number of frames in an animation/Filmstrip/TimeLine and the output file type and path. The top portion of the dialog deals with the length of the animation Filmstrip and TimeLine. The length can be set by altering the Total Frames control. The length must be at least two frames. You also have control over which frames are the start and end frames, and which frame is the current frame. The current frame is used for the Place Updates in Current Frame selection in the Filmstrip menu..
The bottom portion of the dialog allows you to Specify Output File name, extension, file type, and path. The file type specified in this panel is completely independent of the setting in the Save File As Type: option in the File / Save Image As dialog. The Save Result check box must be selected to save the frames as they are generated by the TimeLine.
The Sequence Controls dialog can also be accessed by Right Clicking on the TimeLine dialog away from any TimeLine objects (icons).
§ 17.5.2.15 - Close Timeline
The Close TimeLine button can be pressed to close the TimeLine window. The contents of the TimeLine will remain intact until the TimeLine is re-opened and edited, or the program is closed. We suggest the you leave the TimeLine closed if you are not generating a sequence of images. This will reduce the number of open window in the main program window.
, Previous Page . Next Page t TOC i Index o Operators g Glossary
Copyright © 1992-2007 Black Belt Systems ALL RIGHTS RESERVED Under the Pan-American Conventions
WinImages F/x Manual Version 7, Revision 6, Level A
![]()