| This is a child page. You can use Parent in the quick nav bar at the top or the bottom of the page to navigate directly back to the parent of this page. Some child pages are more than one level deep, and in that case will require more than one Parent click to reach the outermost document level. |
§ 17.5.3 - Timeline Basics - Tutorial
This tutorial is designed to show you how to place objects in a TimeLine. It will cover placing operations, area selections, and image files. More in depth tutorials for each type of TimeLine object are available in the next four sections.
-
If you have not already done so, start F/x by clicking on its icon, use the File Manager's Run command with the FX.EXE file selected. If F/x is already running, please close all existing images and TimeLines. Once the program is running, you may wish to open the F/x Help file to this section, and resize both the program and help file to fit on the same screen. This way you can perform the operations and view the tutorial at the same time. In some cases you may need to use Alt+Tab to flip between F/x and the F/x documentation.
-
This tutorial will demonstrate how to place objects in the TimeLine, and other TimeLine basics. We will be recreating the TimeLine example from above. The first thing that we will want to do is set the number of frames in the TimeLine. This can be done by adjusting the Sequence Controls... option in the Timeline menu. The Total Frames value specifies how many frames are in the TimeLine. For this example, let's set this to ten. After you have made this change, select Ok to confirm the change and exit the dialog. You will now want to open the TimeLine dialog. This can be done by selecting the Show Timeline option in the Timeline menu, or by pressing the TimeLine icon. The TimeLine will initially open with the current operation in the first level. You will want to delete this operation icon so that we can start with a fresh TimeLine. An operation is deleted by selecting the icon with a left mouse click, and then pressing the Del key on the keyboard to eliminate the operation icon. You can also press the Erase Timeline, located to the right of the TimeLine Object Display. This button will delete all icons (key frames) in the current TimeLine.
-
The first thing that we will specify is an operation. The operation depicted in the example TimeLine is Contrast. The Contrast icon is found in the Process group, or it can be accessed by selecting the Standard selection from the Operations pull down menu. Once the contrast icon is visible, you will be able to place it in the TimeLine. This is done by clicking and holding the left mouse button while over the contrast icon. You can now move the icon into the TimeLine. You should notice that the contrast icon changes into a "tool" icon that looks like this:
 This icon can then be placed into the TimeLine in any frame location. For this example, you will want to place the icon into frame one. After you have placed the icon, make sure that frame ten is visible on the time line. If it is not, use the scroll bar at the bottom to bring frame ten into view. Once frame ten is visible use the same method to place another contrast icon into frame ten of the TimeLine.
 Note:
Note:
We did not specify any settings for these operations. The operation icons have related settings which can be interpolated over time. For example, we could have specified for the contrast amount to steadily increase over the ten frames. This level of the TimeLine has been eliminated from this example to make it as simple as possible. The following documentation sections, and the Getting Started tutorial sections cover this aspect of the TimeLine in greater detail.
-
We will now place the area selections for the contrast operation. The first area selection is a Rectangle. You can use the same method for specifying area selection as was used for the operation specification. The Rectangle is placed by clicking and holding the left mouse button while over the Rectangle area selection icon.
The icon will immediately change into an area selection icon (
 ) until it is placed in the TimeLine. You will want to place the area selection icon over the contrast icon in the first frame of the TimeLine. The area selection will be placed above the operation, and the TimeLine should look like this:
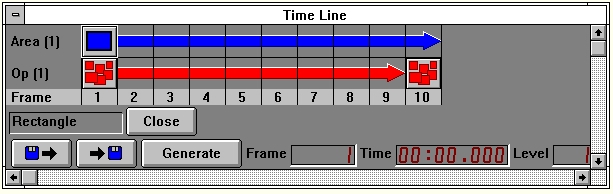
You should now place the remainder of the icons using the same procedure. You will place a Polygon in frame five, and an I-Shape in frame nine. We will now set the interpolation for these frames. Since the default is to have the area selection interpolate, the only area selection icon that will need to be changed is the Polygon area. You can access the interpolation control by double clicking on the Polygon icon. This will access the Area Selection dialog for the TimeLine. You will want to click on the interpolation check box to turn it off. After you have made this change, select OK button to confirm the selection and close the dialog. You should notice that the interpolation arrow has been turned off for the Polygon area selection. This means that the Polygon area selection will remain static over the sequence of frames. All of the other area selection have the interpolation "on" which means they will change from one area selection to another area selection over the sequence of frames.
-
The next step in specifying a TimeLine is the action image. An action image is any image that an operation is applied to. F/x allows you to specify a single image, a sequence of images, or an animation file. If no file is specified, F/x will automatically use the last active image as the action image for all of the frames. You can specify an action image for a frame by double clicking on the operation icon for that frame, or by double clicking on an empty or continuance frame. We will use the first method for this example. Double click on the first Contrast key frame. This will present you with the Operation dialog for the TimeLine. This dialog allows you to specify an operations settings, and any related action and source images. You should notice that the Specify Source Image option is unavailable for this operation. This button is only available for operations that require a source image file. Press Specify Action Image. This will access the action image dialog. This dialog can be used to specify a sequence of action images or a single action image file. Press Specify Image File, and use the file dialog to select the ladyfrog.avi animation located in the Images directory. After you have selected this file, press the Ok button to confirm the selection and exit the file requester. You should notice that the This is a video sequence check box is selected. This means that the video frame controls below the check box are active. For this animation sequence, we will not need to change any other settings. Select OK to confirm the file settings and exit the dialog.
-
The final step for creating the example TimeLine is to specify a sequence of source images. The Contrast operation does not require a source image, so the source image specification is intended to simply familiarize you with specifying source images. The Source image file can be specified or this level of the TimeLine by double clicking on any continuance frame on level one. This will present you with the Add to TimeLine dialog. Select the Source Image option. This will open the source image specification dialog. Follow the procedure in the previous step to specify the ladyfrog.avi image as the source image. After you have selected the file, set the Start Frame control to two, and the Frame Increment to two. This will place the sequence into the TimeLine beginning with frame two, and it will then use every other frame in the animation file. The final step is to resize the source image file so that it goes from frame one to frame ten. This can be done by clicking and holding the left mouse button while the cursor is over the first frame of the source image file (frame two in this case). You can then use the mouse to increase the source image animation length. After you have moved the cursor to the appropriate frame position, release the left mouse button.
That is all there is to creating a basic TimeLine. The tutorials in the following sections will address the issues of setting operation parameters and making area selections.
, Previous Page . Next Page t TOC i Index o Operators g Glossary
Copyright © 1992-2007 Black Belt Systems ALL RIGHTS RESERVED Under the Pan-American Conventions
WinImages F/x Manual Version 7, Revision 6, Level A
![]()