| This is a child page. You can use Parent in the quick nav bar at the top or the bottom of the page to navigate directly back to the parent of this page. Some child pages are more than one level deep, and in that case will require more than one Parent click to reach the outermost document level. |
§ 16.88 - Texture
| Quick Reference to Scripting Command |
| a=TEXTURE(type, SCROLL[0-4], ILLUMINATE, T-variance, detail, resolution, seed, depth, turb, CLASS[0-2], lo thresh, hi thresh, MAX DYNAMIC, INVERT, OVERWRITE) |
| Items in CAPS are 0/1 or ranges with more options than just 0/1. Ranges other than 0/1 are indicated by brackets, such as [0-2]. |
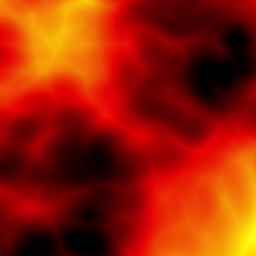 3D Noise, Custom Palette |
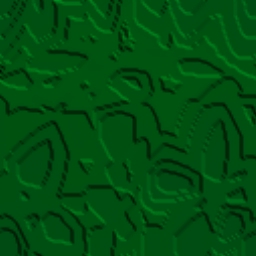 Cellular, Vegetation, Illuminated |
 3D Noise, Cloudfield, Inversion |
Texture produces texture images using a random seed, much like the new heightfield generator. This operator can produce a virtually unlimited variety of textures from simple controls. When used in the TimeLine, Texture is aware of what frame is being generated. The controls that govern the animation are cyclic. This operator is aware of its current frame in the timeline as well as the total number of frames in the timeline. If an animation changes too much per frame, increasing the total number of frames will make the transitions more smooth.
Some example animations can be seen here.
Here is what a texture is, in F/x's context. First, a "noise field" is created with ranges that vary randomly from 0 to 255. These values are assigned a color from a 256 color palette. Colors assigned to values from 0 to 127 are considered "low colors." Colors assigned to values from 180 to 255 are considered "high colors."
This operator can use Pixel Transfer Modes to generate output image and layer data. These modes add a great deal of flexibility to what you can do with this operator. Only operators that create new image or layer data use pixel transfer modes. Also, plugins may use them if the plugin designer takes care to use the plugin masked write services.
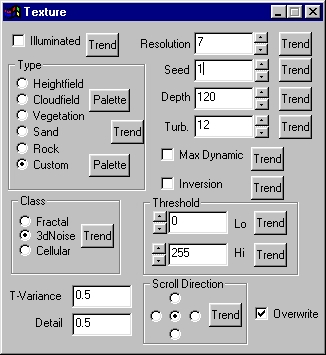
§ 16.88.1 - Texture Controls
§ 16.88.1.1 - Trends
Operator dialog controls that have a Trend button next to them offer animation functionality. Trend allows you to set that variable over a set of frames. Each frame of the animation can be thought of as a slice of time. The trends allow you to alter some, all, or none of the variables for a particular time slice. Variables that have multiple states can be set to any of a number of values in the trend. Variables that are either on or off can only have an on or off value in the trend. You will notice that the trend graphs have equidistantly spaced vertical lines. Each of these lines represents a frame in the animation. The number of frames can be altered using Sequence controls... in the TimeLine pull down menu. Animation lengths of 100 - 999 frames will be represented with a vertical bar being 10 frames, and animation length greater than 1000 frames will have a vertical bar for every 100 frames. Click here to view more information on Trends.
§ 16.88.1.2 - Illuminated
✓ Illuminated shines light on the texture. It treats the brightness of the image as height, giving a 3D look to the image.
§ 16.88.1.3 - Resolution
This controls the resolution of the texture that will be mixed into the image. This number will be the power of 2 describing the detail of the source texture. The values can range from 4 to 11.
Resolution controls a power of 2. Each step quadruples the size of the texture generated. Although the acceptable values for resolution have been limited to a rational range, you should be aware that a value of 11 will allocate a source texture that is 16 Megabytes!
The following table shows the various resource requirements to make a source texture for different settings:
| Setting | Resolution | Image Size |
|---|---|---|
| 4 | 16 x 16 | 1 K |
| 5 | 32 x 32 | 4 K |
| 6 | 64 x 64 | 16 K |
| 7 | 128 x 128 | 64 K |
| 8 | 256 x 256 | 256 K |
| 9 | 512 x 512 | 1 Mb |
| 10 | 1024 x 1024 | 4 Mb |
| 11 | 2048 x 2048 | 16 Mb |
§ 16.88.1.4 - Seed
This sets the random noise field to a known state. Textures can be reproduced as long as the value for seed remains the same. This control produces completely different images for every value, trending this control will not produce a steady animation.
§ 16.88.1.5 - Depth
This is the dynamic range of colors in the image.
§ 16.88.1.6 - Turb.
This determines the turbulence of the texture.
§ 16.88.1.7 - Type
-
 Heightfield: This produces a black and white heightfield that can be used to produce landscapes in the landscape operator.
 -
Cloudfield: This produces soft-edged cloud shapes, the palette defaults to a sky blue color scheme. Selecting Palette directly to its right will automatically select Cloudfield as the texture of choice. When this operator is dragged into the timeline, palettes will automatically trend to the next palette, if another exists in the TimeLine.
-
Vegetation: This produces an organic "flow" of varying greens. This gives an impression of moss covering or a view of vegetation from afar.
-
Sand: This acts in much the same matter as Vegetation , but the color scheme is brown.
-
Rock: This texture acts mainly like vegetation and sand but has the black and white color scheme of Heightfield . This texture looks like cut and polished stone.
-
Custom: This allows you to define your own palette. Selecting Palette directly to its right will automatically select Custom as the texture of choice.
When this operator is dragged into the TimeLine, palettes will automatically trend to the next palette, if another exists in the TimeLine.
§ 16.88.1.8 - Max Dynamic
✓ Max dynamic adjusts the depth so that it always reaches the minimum and maximum range for the colors.
§ 16.88.1.9 - Inversion
✓ Inversion sets low colors to high colors and vice versa. Ranges of large values are set to low colors, ranges of small values are set to high colors.
§ 16.88.1.10 - Threshold
This determines what range of values will be set to the highest or lowest color. This is particularly useful when creating clouds. Setting the low threshold to 128 will sharpen the edges of the clouds. This will also make most of the image blue, with the occasional patch of whites. These two effects work together to give a very convincing cloud effect.
§ 16.88.1.11 - Class
The class control governs how the texture's "noise field" is made, mathematically. To really grasp what each class of noise field produces, it's best to experiment with each one.
-
Fractal: This produces a fractal pattern for the texture.
-
3dNoise: This sets the texture's noise field to a pre-determined section of a 3-dimensional noise field.
Since this can be moved around the 3d field, 3dNoise has extra functionality in the TimeLine (more below).
-
Cellular: This produces a cellular pattern for the texture.
§ 16.88.1.12 - T-Variance
T-Variance is the rate at which the texture moves through the 3d noise field. The texture will always return to its original position in the noise field, putting the animation on a loop will give it a boiling effect.
This control works only with a ![]() 3dNoise texture, only when
3dNoise texture, only when ![]() 3dNoise is the selected class can you alter its contents.
3dNoise is the selected class can you alter its contents.
§ 16.88.1.13 - Detail
This control governs how much of the noise field is included in the texture. This can be thought of as "zooming in" on the noise field for small values, or "zooming out" for large values.
This control works only with a ![]() 3dNoise texture, only when
3dNoise texture, only when ![]() 3dNoise is the selected class can you alter its contents.
3dNoise is the selected class can you alter its contents.
§ 16.88.1.14 - Scroll Direction
If you so desire, the texture can scroll in one of 4 directions. The texture will always return to its original position in the noise field, putting the animation on a loop will give the illusion of constant movement or flow.
This control works only with a ![]() 3dNoise texture, only when
3dNoise texture, only when ![]() 3dNoise is the selected class can you alter its contents.
3dNoise is the selected class can you alter its contents.
§ 16.88.1.15 - Overwrite
✓ Overwrite allows you to choose if the source information will replace the area selection completely or if it will be blended in based on luminance. De-selecting ✓ Overwrite is best used for creating a fog, steam or smoke effect. This is done by choosing a greyscale ![]() 3dNoise texture. Raising the lo threshold will increase the density of the clouds. Lowering the hi threshold will decrease the density of the clouds.
3dNoise texture. Raising the lo threshold will increase the density of the clouds. Lowering the hi threshold will decrease the density of the clouds.
, Previous Page . Next Page t TOC i Index o Operators g Glossary
Copyright © 1992-2007 Black Belt Systems ALL RIGHTS RESERVED Under the Pan-American Conventions
WinImages F/x Manual Version 7, Revision 6, Level A
![]()