| This is a child page. You can use Parent in the quick nav bar at the top or the bottom of the page to navigate directly back to the parent of this page. Some child pages are more than one level deep, and in that case will require more than one Parent click to reach the outermost document level. |
§ 16.87 - Grid
| Quick Reference to Scripting Command |
| a=GRID(xwidth, ywidth, PRIORITY, lineweight, start, NUMBERPRIORITY, NEWIMAGE, NUMBER_EVERY_INTERSECTION, number r,g,b, grad r,g,b, background r,g,b, border r,g,b) |
| Items in CAPS are 0/1 or ranges with more options than just 0/1. Ranges other than 0/1 are indicated by brackets, such as [0-2]. |
This operator provides the convenience of a real grid for on-screen elements. This function is mainly intended to add functionality to layered images. Creating a new grid from a layer will give you the option of adding the grid as a new layer. This function gives you the option of writing over the image or creating a new image altogether.

§ 16.87.1 - Grid Controls
§ 16.87.1.1 - Line Weight
This determines the width of the lines that make up the grid. A line weight of 1 is the default, this creates gridlines 1 pixel in width.
§ 16.87.1.2 - Start
This number determines the number at the beginnings of the grid. From there, the grid will measure normally. Choosing 8 would set the beginning value to (8,8) the 1st intersection would be (58,58) if 50 was your chosen spacing, etc.
§ 16.87.1.3 - Spacing
- Priority: Choosing X Priority will set the spacing on both axes to the value in the X Spacing dialog. Choosing Y Priority will do the same with the Y Spacing dialog. Choosing XY priority will give you independent control over either axis.
- Spacing: X Spacing controls the width on the X or XY axis (depending on the priority chosen). Y spacing will do the same for the Y or XY axis.
§ 16.87.1.4 - New Image
This checkbox determines if the operator will create a new image or draw the grid over part of the image. Creating a new grid image inside of a layered image will give you the option of making the grid a new layer to the image. If the operation is working inside the TimeLine, no new image will be created, it will act as if ✓ New Image was not selected.
§ 16.87.1.5 - Number Every Intersection
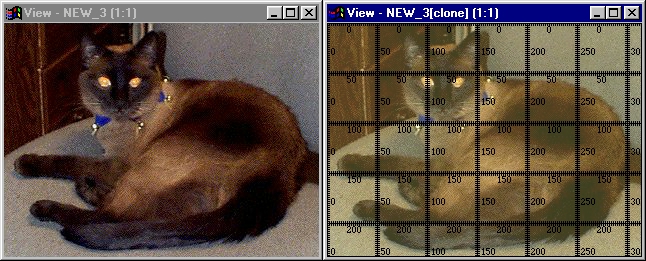
This controls the style of the grid as a whole. Selecting ✓ Number Every Intersection will create a grid where every intersection is numbered, much like the grid in the example above. This type of grid is ideal when work is done on small parts of the image at a time. De-selecting ✓ Number Every Intersection will number only the left and top edges of the grid. This removes clutter when working on the whole image at once.
§ 16.87.1.6 - Tick Marks
This gives you the option of turning the tick marks on the grid on and off. The above example was made with ✓ Tick Marks on. If ✓ Tick Marks is turned off, the only lines seen will be the main measured lines.
§ 16.87.1.7 - Number, Grid, Border and Background colors
This determines the color for any element of the ruler. You can choose any colors you want, the ruler defaults to a transparent background, black gradients numbers and outline. Values for each color channel range from 0 to 255.
Clicking From Grid will set the Border Color to the current Grid Color.
, Previous Page . Next Page t TOC i Index o Operators g Glossary
Copyright © 1992-2007 Black Belt Systems ALL RIGHTS RESERVED Under the Pan-American Conventions
WinImages F/x Manual Version 7, Revision 6, Level A
![]()