| This is a child page. You can use Parent in the quick nav bar at the top or the bottom of the page to navigate directly back to the parent of this page. Some child pages are more than one level deep, and in that case will require more than one Parent click to reach the outermost document level. |
§ 16.130 - Negative
| Quick Reference to Scripting Command |
| a=NEGATIVE(MODE[0-5], CHAN1(r/h/c), CHAN2(g/s/m), CHAN3(b/v/l/y), CHAN4(k)) |
| Items in CAPS are 0/1 or ranges with more options than just 0/1. Ranges other than 0/1 are indicated by brackets, such as [0-2]. |

This operator may be applied directly to a Warp Layer, resulting in a geometric effect that may be removed from the underlying sublayer composite by simply zeroing out the warp or disabling that layer. In addition, the effect may be moved over the underlying sublayer composite without limit.
A visual reminder that this operator is warp-compatible is the small green dot at the upper right of its ICON in the toolbar.
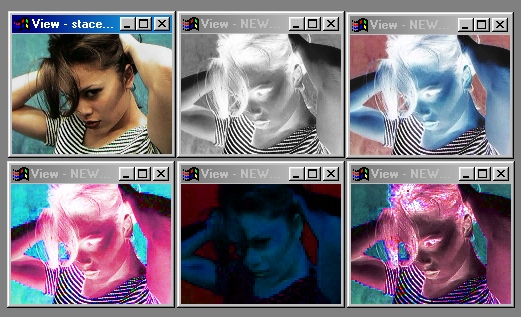
The Negative operation allows you to create a wide range of color and Black & White negatives. A negative, color or Black & White) is the process of reversing the brightness scale for each pixel, and then re-applying the reversed values as positive. This is done by subtracting 255 from each brightness value, and treating the new value as positive. This is carried out for each channel in the selected color space. So, a bright color component (value:255) will become dark (value:0), and a dark color component (value:0) will be come light (value:0).
You should notice that all of the color negatives can be used for each color channel separately. This gives you the ability to invert one channel and none of the others. For example, if you were producing an RGB negative you might select to apply the negative process to only the Red channel. This would cause the Negative Operation to invert only the Red channel and leave the other two channels (Green and Blue) un-altered. The channel controls will only be available for color spaces with more than one channel.
The Negative Operation can be used to create the following types of negatives: Monochrome, Luminance, RGB, CMYK, HSL, and HSV. Watch of these color spaces will produce a different type of negative based the specifications of that color space.
§ 16.130.1 - Negative Controls
§ 16.130.1.1 - Trends
Operator dialog controls that have a Trend button next to them offer animation functionality. Trend allows you to set that variable over a set of frames. Each frame of the animation can be thought of as a slice of time. The trends allow you to alter some, all, or none of the variables for a particular time slice. Variables that have multiple states can be set to any of a number of values in the trend. Variables that are either on or off can only have an on or off value in the trend. You will notice that the trend graphs have equidistantly spaced vertical lines. Each of these lines represents a frame in the animation. The number of frames can be altered using Sequence controls... in the TimeLine pull down menu. Animation lengths of 100 - 999 frames will be represented with a vertical bar being 10 frames, and animation length greater than 1000 frames will have a vertical bar for every 100 frames. Click here to view more information on Trends.
§ 16.130.1.2 - Color Space
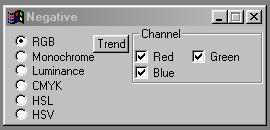
The left hand side of the dialog contains a bulleted list of all the different color spaces available.
Selecting one of these bullets will force the operation to evaluate and perform the negative using that color space only. If the color space contains multiple channels, a list of all the available channels for that color space will appear to the right of the Color Space bullets.
§ 16.130.1.3 - Color Space Channels
At this point you can select which channel or channels that you would like to apply the negative operation to. If the channel check box is selected for any of the color channels then the negative will be applied to that channel. If the check box is not selected, then that channel will remain unchanged.
, Previous Page . Next Page t TOC i Index o Operators g Glossary
Copyright © 1992-2007 Black Belt Systems ALL RIGHTS RESERVED Under the Pan-American Conventions
WinImages F/x Manual Version 7, Revision 6, Level A

