| This is a child page. You can use Parent in the quick nav bar at the top or the bottom of the page to navigate directly back to the parent of this page. Some child pages are more than one level deep, and in that case will require more than one Parent click to reach the outermost document level. |
§ 16.42 - Elevations
| Quick Reference to Scripting Command |
| a=ELEVATIONS(sealevel, shading percentage, USE LOADED PALETTE) |
| Items in CAPS are 0/1 or ranges with more options than just 0/1. Ranges other than 0/1 are indicated by brackets, such as [0-2]. |

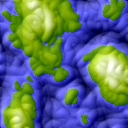
The Elevations operation creates an effect that is similar to the Relief operation, except the elevations are created using color instead of Black and White. There is also the additional feature of shading effect. You can control the Sea Level of the elevations and the amount of shading.

§ 16.42.1 - Elevations Controls
§ 16.42.1.1 - Trends
Operator dialog controls that have a Trend button next to them offer animation functionality. Trend allows you to set that variable over a set of frames. Each frame of the animation can be thought of as a slice of time. The trends allow you to alter some, all, or none of the variables for a particular time slice. Variables that have multiple states can be set to any of a number of values in the trend. Variables that are either on or off can only have an on or off value in the trend. You will notice that the trend graphs have equidistantly spaced vertical lines. Each of these lines represents a frame in the animation. The number of frames can be altered using Sequence controls... in the TimeLine pull down menu. Animation lengths of 100 - 999 frames will be represented with a vertical bar being 10 frames, and animation length greater than 1000 frames will have a vertical bar for every 100 frames. Click here to view more information on Trends.
§ 16.42.1.2 - Sea Level
The Sea Level control is used to specify the change in brightness value that is to represent Sea Level in the image. The Sea Level can range from 0 (black) to 255 (White). The control is set by using the slide gadget or by entering the desired value in the text entry field.
§ 16.42.1.3 - Shading %
This control is used to specify the amount of allowable shading in the selected region. The shading amount can range from 0% to 100%, with 100% being the greatest amount of shading. The shading will occur as if there were a light source in the top left-hand corner of the image. This control is set using the slide gadget or by entering the desired value.
§ 16.42.1.4 - Edit Palette
This button will access the palette controls. You can then use the wide range of spreads, sorts, and other palette manipulation tools to create a new palette for the Elevations operation. This new palette can be applied by selecting the Use Loaded Palette option, and then selecting an area on the image. F/x will then remap the image based on the original colors, and their "elevations". Click here to view more information on the palette controls.
§ 16.42.1.5 - Use Loaded Palette
This option, when selected, allows you to change the default elevations palette. This means that instead of remapping the image to the default blue and green palette, you can remap the image to any color spread or range that you like. The palette controls can be accessed by pressing the Edit Palette button in this dialog.
, Previous Page . Next Page t TOC i Index o Operators g Glossary
Copyright © 1992-2007 Black Belt Systems ALL RIGHTS RESERVED Under the Pan-American Conventions
WinImages F/x Manual Version 7, Revision 6, Level A
![]()