| This is a child page. You can use Parent in the quick nav bar at the top or the bottom of the page to navigate directly back to the parent of this page. Some child pages are more than one level deep, and in that case will require more than one Parent click to reach the outermost document level. |
§ 27.7.6 - Settings Menu
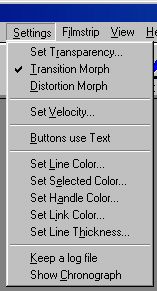
§ 27.7.6.1 - Set Transparency...
This opens the Transparency Curve control window. See the section describing Transparency Controls.
§ 27.7.6.2 - Transition Morph
This option tells Morph that you are creating a transition morph. This means that the start and the end image are separate images. If this option is selected, you can use both the velocity and transparency curves for the points and lines on the images.
§ 27.7.6.3 - Distortion Morph
This option tells Morph that you are creating a warp morph. Selecting this option will cause morph to automatically place the current start frame into the end frame. You can only use velocity curves for warp morphing.
§ 27.7.6.4 - Set Velocity...
This opens the Velocity Curve control window. See the section describing Velocity Controls.
§ 27.7.6.5 - Buttons use Text
This option, when selected, force the velocity and transparency graph dialog to use text based buttons instead of the default icons. If this option is not selected, the buttons will appear as icons.
§ 27.7.6.6 - Set Line Color...
Selecting this option will access the Color Selection dialog. This dialog can then be used to specify a color for non-selected lines. This can be any color that you like, but colors that are bright are suggested.
§ 27.7.6.7 - Set Selected Color...
Selecting this option will access the Color Selection dialog. This dialog can then be used to specify a color for selected or currently active lines. This can be any color that you like, but colors that are bright are suggested. This color should also be different from the normal line color setting.
§ 27.7.6.8 - Set Handle Color...
Selecting this option will access the Color Selection dialog. This dialog can then be used to specify a color for the handles used to move control objects. This can be any color that you like, but colors that are bright are suggested. This color should also be different from the normal line color setting.
§ 27.7.6.9 - Set Link Color...
Selecting this option will access the Color Selection dialog. This dialog can then be used to specify a color for links between control objects. This can be any color that you like, but colors that are bright are suggested. This color should also be different from the normal line color setting.
§ 27.7.6.10 - Set Line Thickness...
This dialog allows you to specify the thickness of the lines on the start and end images. This thickness can range between one and four pixels. The thickness is used for all lines on the images.
§ 27.7.6.11 - Show Chronograph
Selecting this option will bring Morph's operation chronograph to the front, opening it if needed. The chronograph will indicate the operation, start time, end time, and the elapsed time. The chronograph will only update these values when a new operation is performed. The chronograph can also be opened with c, and closed with Shift-C.
§ 27.7.6.12 - Keep a log file
For some problems, such as difficulty loading a type of image, or for a detailed record of the morph operation technically inclined users may find it useful to turn on the Keep a log file switch from the Settings menu. After the program is closed view the file MORPHLOG.txt that will be created in the WinImages program folder with a text editor.
, Previous Page . Next Page t TOC i Index o Operators g Glossary
Copyright © 1992-2007 Black Belt Systems ALL RIGHTS RESERVED Under the Pan-American Conventions
WinImages F/x Manual Version 7, Revision 6, Level A
![]()