| This is a child page. You can use Parent in the quick nav bar at the top or the bottom of the page to navigate directly back to the parent of this page. Some child pages are more than one level deep, and in that case will require more than one Parent click to reach the outermost document level. |
§ 14.8 - The TimeLine Menu
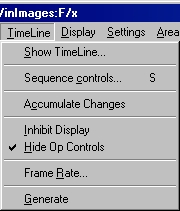
§ 14.8.1 - Show Timeline
The Show Timeline control will access F/x's powerful TimeLine dialog. This dialog can be used to create animation sequences by simply dragging and dropping the effects and area selections into the TimeLine. For example, if you wanted to do a Relief effect in a rectangular region, you would simply click on the Relief icon and drag it to the TimeLine. You can then place the area selection using the same method of clicking on the rectangle icon, and then placing it in the TimeLine.
Using the TimeLine can be as simple as that, but it doesn't end there. The TimeLine can also do some very powerful operations like changing the amount of an effect over time (this process is also known as tweening), processing multiple Action Image, Brush Image and Source Image, multiple effects in the same animation, area selection interpolation, and much more.
The documentation for the TimeLine is broken into four separate portions for each topic. The first section gives a brief explanation of the how the dialog, and its controls, are used. The next section is an interactive image of the actual dialog. You can access more information about a control by clicking on that control or option. Some dialogs have a sub dialog which allows you to specify a greater amount of detail. Each dialog will be documented in sequence of appearance. The third section takes you through a step by step tutorial designed to familiarize you with the dialog and its operations. The final section will answer some commonly asked questions about the dialog or its operation. There four main sections of the TimeLine documentation include the basic TimeLine operation and controls, the Area Selection dialogs, the Operation dialog, and the Source and Action Image dialogs.
It is important to review all of the sections related to the TimeLine to develop a good basis for using the TimeLine to its fullest. You will find them here:
The Area Selection Dialog — an Overview
The Timeline Area Selection Dialog
Timeline Area Selection Dialog Tutorial
Timeline Area Selection: How do I ...?
You should remember that these are probably the most important sections of the documentation. Our suggestion is to read these sections, and then read them again. If you still do not grasp the concepts presented here, review the Getting Started Tutorial and other tutorials in Appendix E. The Getting Started and Advanced Getting Started tutorials will give you more experience with the Timeline, and its interaction with the rest of the program.
§ 14.8.2 - Squence Controls
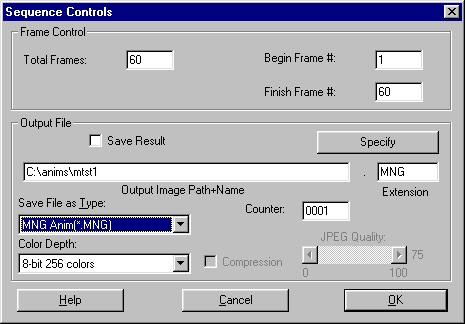
The Sequence Controls dialog allows you to specify the number of frames in an animation, filmstrip, Timeline and the output file type and path. The top portion of the dialog deals with the length of the animation filmstrip and Timeline. The length can be set by altering the Total Frames control. The length must be at least two frames. You also have control over which frames are the start and end frames, and which frame is the current frame. The current frame is used for the Place Updates in Current Frame selection in the Filmstrip menu.
The bottom portion of the dialog allows you to specify the Output File name, extension, file type, and path. The file type specified in this panel is completely independent of the setting in the Save File As Type: option in the Save Image As dialog. The Save Result check box must be selected to save the frames as they are generated by the Timeline. This allows you to create FLI/FLC and AVI animations while the sequence is generating. This method of creating the animation files is preferred over saving the filmstrip as an animation file because it saves time and memory.
See Also Save Image As...
§ 14.8.3 - Accumulate Changes
F/x applies effects in a sequence based on the original image. This means that after an operation is performed in a sequence generation, the operation is undone and the effect is applied on the original image. This control allows you to turn that aspect of the program off. Doing this will force the application of multiple effects to the same region in the altered image, not the original. For example, a sequence that does an increasing Dome effect would normally apply the increasing distortion to the original image for each frame. With this option selected, the Dome would be carried out on each successive altered frame. This will effectively increase the effect in the area, but the animation may not be as smooth.
§ 14.8.4 - Inhibit Display
The Inhibit Display mode will keep the TimeLine from rendering each image that is loaded during the sequence. This will also prevent the rendering of an image after an application has been applied, or after an Undo. This will generally increase the speed of the sequence generation. We suggest that you always use this control for large TimeLines to decrease the time needed for generation, or on any 386 based machine. This control will not prevent the rendering of the filmstrip, but this can be turned off by closing the Filmstrip controls.
§ 14.8.5 - Hide Op Controls
This option allows you to hide the operation control dialogs during a TimeLine generation. This means that when the TimeLine is generated, the operation dialogs will not be visible. If this option is not selected, then the operation dialogs will appear for each operation in the TimeLine. This control will default to on.
§ 14.8.6 - Animation (File) Frame Rate (FX)
This opens a dialog for setting the frame rate that is saved with animation files such as FLI or AVI animations. The playback speed for the Filmstrip is independent of this setting. This dialog shows the frame rate in three interdependent ways. Changing one of the setting will alter the others.
§ 14.8.6.1 - Millisconds per Frame
This is the way the frame rate is held inside the program. This is the number of 1/1000 seconds between frames. It is 1000 times the value of microseconds per frame that .AVI files use.
§ 14.8.6.2 - Frames per Second
A value of 10 f.p.s. would mean 100 milliseconds per frame.
§ 14.8.6.3 - Jiffies per Frame
A jiffy is 1/70 th of a second. So a value of seven (7) would represent 10 frames per second.
§ 14.8.7 - Generate
The Generate command will start the processing of the current TimeLine. The Time TimeLine will be created based on the current operations, area selections, and image files. Once you have started the generation of a TimeLine, you can pause or stop the operation by selecting the pause or stop button on the Status Bar. If a time line generation is paused, it can be restarted by pressing the pause button a second time. Once a TimeLine generation has been stopped, it will have to be regenerated from the beginning. This option has the same effect as pushing the Generate button on the TimeLine dialog.
, Previous Page . Next Page t TOC i Index o Operators g Glossary
Copyright © 1992-2007 Black Belt Systems ALL RIGHTS RESERVED Under the Pan-American Conventions
WinImages F/x Manual Version 7, Revision 6, Level A
![]()