| This is a child page. You can use Parent in the quick nav bar at the top or the bottom of the page to navigate directly back to the parent of this page. Some child pages are more than one level deep, and in that case will require more than one Parent click to reach the outermost document level. |
§ 16.39 - Outline Fill
| Quick Reference to Scripting Command |
| a=OUTFILL(width, generations, cycles, INSIDE, SMOOTH, REPEAT, CRYSTAL) |
| Items in CAPS are 0/1 or ranges with more options than just 0/1. Ranges other than 0/1 are indicated by brackets, such as [0-2]. |
The Outline Fill operation allows you to fill the outside or inside of an area select in the shape of the area selection.
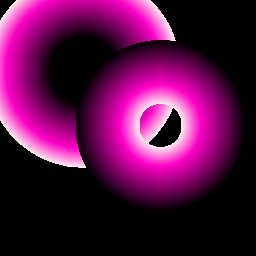
This allows you to create an "agate-like" effect around ellipses, text, and other area selects. The operation allows you to control the width of the outline, how many times the outline is generated, if the fill will be outside or inside the area, and if the palette will repeat. This fill mode also contains a cycle setting for creating animations with a cycling palette (like the example below). This operation also has a Crystal mode that will generate translucent crystals instead of filling with the current palette. For an example of this operation, see the animation below below.
This operator can use Pixel Transfer Modes to generate output image and layer data. These modes add a great deal of flexibility to what you can do with this operator. Only operators that create new image or layer data use pixel transfer modes. Also, plugins may use them if the plugin designer takes care to use the plugin masked write services.
This operator is designed to work on warp layers. In the context of use in a warp layer, the luma (brightness) of the pattern generated by this operator acts to control the amount of warp (technically, it multiplies the warp effect.)
If the luma of the pattern generated is 0, or black, then the warp effect existing in the warp layer at the locations where black is applied is reduced to zero.
If the luma of the pattern generated is 255, or white, then the warp effect existing in the warp layer at the locations where black is applied is not affected.
If the luma of the pattern generated is 128, or middle grey, then the warp effect existing in the warp layer at the locations where black is applied is reduced by one half.
In this way, the brightness proportionally reduces the warping effect, allowing you to use this operator to produce patterned gradients in the warp effect, no matter what that pattern is.

§ 16.39.1 - Outline Fill Controls
§ 16.39.1.1 - Trends
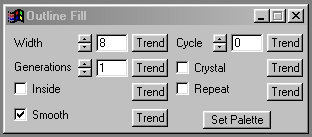
Operator dialog controls that have a Trend button next to them offer animation functionality. Trend allows you to set that variable over a set of frames. Each frame of the animation can be thought of as a slice of time. The trends allow you to alter some, all, or none of the variables for a particular time slice. Variables that have multiple states can be set to any of a number of values in the trend. Variables that are either on or off can only have an on or off value in the trend. You will notice that the trend graphs have equidistantly spaced vertical lines. Each of these lines represents a frame in the animation. The number of frames can be altered using Sequence controls... in the TimeLine pull down menu. Animation lengths of 100 - 999 frames will be represented with a vertical bar being 10 frames, and animation length greater than 1000 frames will have a vertical bar for every 100 frames. Click here to view more information on Trends.
§ 16.39.1.2 - Width
The Width control is used to set the actual width for each generation of the outline range. This width is measured in pixels, and can range from 0 (no effect) to 100 (maximum width). Increasing the width will also increase the computational time needed to complete the operation. You can decrease this time by setting a smaller width with more generations. Increasing the generations control will cause WinImages F/x to generate the range, using the same width setting, at the edge of the original generation. For example, you would like to generate an outline that is 30 pixels in width. You could do this by setting the width control to 30, and the generations control to 1. You could achieve the same effect faster by setting the width to 10, and the generations to 3. F/x will generate three outlines of the selected region, and then fill the generated area with the current palette. You can also have the option of having each generation repeat the palette. This will produce an effect similar to the example animation above.
§ 16.39.1.3 - Generations
The Generations control is used to specify how many times the outline, or inline, will be generated. This control can be extremely useful for generating large outlines quickly. For example, you would like to generate an outline that is 50 pixels. This could be done by setting the width to 50, and the generations to 1. This particular method would take a substantial amount of time to generate. A faster method of achieving the same results would be to set the width to 10, and the generations to 5. The same is true for the Crystal settings which will generate much faster with small widths and more generations. The generations control ranges between 0 (no effect) and 40 (maximum number of generations). You can also use the Repeat function to create multiple outlines of the same palette.
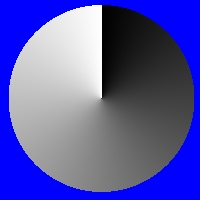
 Cycle of 0 |
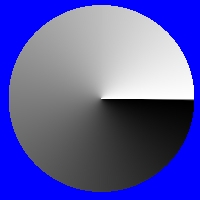
 Cycle of 1/4 palette size |
§ 16.39.1.4 - Cycle
The cycle control allows you to shift the palette to create a cycling effect for animations. This control ranges between 0 and 360 degrees, where 0 and 360 are the same value. Imagine that the palette is a wheel with all of the colors radiating from the center as spokes, like the image on the left. This image is a representation of the palette with the Cycle control set to 0 degrees, and using the default gray scale palette. Notice that Black (the initial color zero) is at the 12 o'clock position. The image at the right shows a shift in the palette to a Cycle of 90 degrees. Notice that the original color zero has shifted to the 3 o'clock position (90 degrees), and a new color zero is in the initial position. From these two examples it is clear that increasing the Cycle value will shift or rotate the palette. This will in turn set a new color zero for the fill. If you were to trend the cycle over an animation from 0 to 360 degrees, you would see the colors of the palette cycle as they did in the example animation.
§ 16.39.1.5 - Inside
The Inside control, when selected, will fill the object on the inside instead of the outside. The area will be filled from the edge inward, thus any generations or width that are larger than the remaining area will have no effect. For example, if you were to fill a 25x25 rectangle with a width setting of 5, a generations setting o 5, and inside selected, only the first three generations would be visible in the rectangle. This control can also be used to specify a Crystal effect inside the selected region instead of outside.
§ 16.39.1.6 - Crystal
The Crystal control, when selected, will generate a series of crystals based on the size and shape of the area selection, the with setting, and the number of generations. These crystals will be an average of the colors beneath them, thus causing crystalline effect. You can select to place the crystals inside or outside the selected region, and the Repeat control works exactly the same. If this control is not selected, F/x will use the current palette settings for the fill.
§ 16.39.1.7 - Repeat
The Repeat control, when selected, will repeat the current palette or crystal size for the next generation. This means that each generation of the outline fill will have the same palette colors. If this is not selected, the outline will occur only using multiple generations of the palette, but without repeating. The same holds true for the Crystal setting. The animation above uses multiple generations and the repeat control to place the same palette in multiple outlines.
§ 16.39.1.8 - Smooth
The Smooth control allows you to smooth colors in the palette. This control is most effective in low color palettes (palettes with less than 256 colors). This control, when activated, will examine the colors in the palette and then smooth them to create a nice color spread between palette colors. For example, a palette of two colors using the Smooth control will look much nicer than a two color palette without smoothing. This control defaults to on, but can be shut off at any time by simply clicking on the check box.
§ 16.39.1.9 - Set Palette
The Set Palette button allows you to access F/x custom palette controls. This allows you to make any necessary alteration to the current palette or to load a previously saved palette. Remember, any changes made to the palette will be reflected the next time a fill is applied. If you would like to learn more about the palette controls, Click Here.
When this operator is dragged into the TimeLine, palettes will automatically trend to the next palette, if another exists in the TimeLine.
, Previous Page . Next Page t TOC i Index o Operators g Glossary
Copyright © 1992-2007 Black Belt Systems ALL RIGHTS RESERVED Under the Pan-American Conventions
WinImages F/x Manual Version 7, Revision 6, Level A

