| This is a child page. You can use Parent in the quick nav bar at the top or the bottom of the page to navigate directly back to the parent of this page. Some child pages are more than one level deep, and in that case will require more than one Parent click to reach the outermost document level. |
§ 16.55 - Apply Canvas
| Quick Reference to Scripting Command |
| a=CANVAS(radius/10, amount, TILE, transparency, emboss, BWEMBOSS) |
| Items in CAPS are 0/1 or ranges with more options than just 0/1. Ranges other than 0/1 are indicated by brackets, such as [0-2]. |

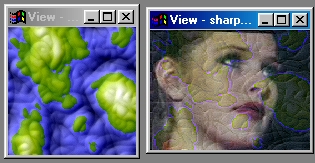
The Apply Canvas operation allows you to apply a "canvas" or texture to a region in the image. The overall effect is similar to a color emboss of the canvas into the selected region. You can control the transparency, amount of embossing, and how the texture is applied. There are three separate operations within this function; A color emboss, a transparency application, and a sharpening process. Each of these operation can be applied together or separately to create a wide range of effects. You can turn one of the components "off" by setting its control to 0. For example, if you wanted to only do an emboss, you would set the Transparency, Radius, and Amount controls to 0. You could then apply a simple emboss to the image. F/x comes with a wide range of textures, and you can use any other image as a texture.
§ 16.55.1 - Apply Canvas Controls
§ 16.55.1.1 - Trends
Operator dialog controls that have a Trend button next to them offer animation functionality. Trend allows you to set that variable over a set of frames. Each frame of the animation can be thought of as a slice of time. The trends allow you to alter some, all, or none of the variables for a particular time slice. Variables that have multiple states can be set to any of a number of values in the trend. Variables that are either on or off can only have an on or off value in the trend. You will notice that the trend graphs have equidistantly spaced vertical lines. Each of these lines represents a frame in the animation. The number of frames can be altered using Sequence controls... in the TimeLine pull down menu. Animation lengths of 100 - 999 frames will be represented with a vertical bar being 10 frames, and animation length greater than 1000 frames will have a vertical bar for every 100 frames. Click here to view more information on Trends.
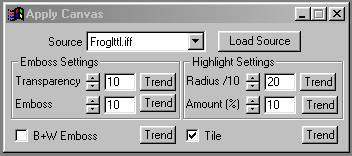
§ 16.55.1.2 - Transparency
The Transparency control is used to determine the amount that the source image will "show through" the current image's area select. The transparency is a percentage value ranging from 0 (transparent source) to 100 (opaque source). This control can be applied independent of the emboss and sharpening operation by setting their controls to 0, and then setting a transparency value. The transparency is turned off by setting it to 0. This control is similar to applying the Merge operation with a specific transparency setting.
§ 16.55.1.3 - Emboss
The Emboss control will set the amount that the source image will be "pushed through" the action image. This effect simulates an embossed paper look by texturing the action image with the source image. The control ranges from 0 (no effect) to 100 (maximum emboss). This control can be used with or without the transparency and sharpening effects. Those effects can be turned off by setting their sliders to 0. The emboss used in WinImages F/x is a color emboss. If you want to apply a gray scale emboss, you should first convert the source image to a gray scale.
§ 16.55.1.4 - Radius
The Radius control is used to set the actual pixel radius that will be used for feature detection inside the area selection. This radius can be used to sharpen the overall results from a canvas texture application. The actual radius is measured in tenths of a pixel. For example, a setting of 200 is actually 20 pixels. WinImages F/x will scan the selected region for gaussian surfaces that are within the specified radius. For example, with a radius of 180 (18 pixels), a surface that is 15 pixels would be sharpened, and a surface that is 19 pixels would not. Once all of the applicable surfaces have been detected, WinImages F/x will then enhance the light and dark regions of the surface. The overall effect is a sharpening of the selected region. The control ranges from 0 (no effect) to 200 (20 pixel radius). Increasing the radius will increase the time needed for generating the effect, as well as the overall sharpening effect. The sharpening filter can be turned off by setting this control and the Amount setting to 0. The control can be set using the provided slide gadget, or by entering the desired value in the text entry field.
§ 16.55.1.5 - Amount
The amount control allows you to specify how much any detected features will be sharpened. The amount ranges between 0 (no sharpening) and 100 (maximum sharpening) percent. A setting of 0 will result in a null operation, or no effect on the image. Increasing this amount will increase the overall sharpening effect. You can also reduce the sharpen effect by reducing the amount value. You can turn the sharpening process off by setting this and the radius control to 0. This control is set using the slide gadget, or by entering the appropriate value in the text entry field to the right of this control.
§ 16.55.1.6 - Canvas Source Image
This list box will display all of the currently loaded images. Remember, all images in WinImages F/x can be used as a canvas/texture. An image is selected as the source image by simply clicking on its file name. If you would like to load another image for canvas application, simply use the Load Source control, and select the desired image. The Load Source documentation contains a full listing of all of the provided canvases.
§ 16.55.1.7 - B+W Emboss
This option, when selected, will force the embossing portion of the apply canvas operation into a Black and White emboss instead of the regular color emboss. This means that the emboss will be a gray scale emboss only. You can adjust some color into the effect by increasing the transparency level. This selection is useful for embossing backgrounds or poorly scanned images into the current action image. This control will normally default off. If this control is off, the emboss will contain color information from the source image.
§ 16.55.1.8 - Tile
The Tile selection will turn the tiling of the source image on and off. When this option is selected, the source image will be tiled within the area selection if possible. The source will only be tiled if there is room for more than one complete source image. If a source is tiled, it is possible that only portions of some of the tiles will be visible (this will generally occur with odd area selections). If this control is not selected, the source image will be stretched to fit the area selection in the action image. This can cause some distortions of the original source in the action image.
§ 16.55.1.9 - Load Source
The Load Source button allows you to load another canvas source image. WinImages F/x comes with many source canvas images, but you can use any image as a canvas. Canvas texture creation is as simple as scanning an object or picture. Sometimes the most unlikely object can make a fantastic canvas. One thing to remember is that natural materials (rocks, barks, etc.) can be scanned. However, this does not mean you should place five or six bricks on your scanner (this can do some serious damage). With large heavy objects (like bricks) try using a photograph instead of the actual physical object. You will always want to stay away from scanning printed materials. Scanning printed materials will result in Moiré Patterns or waves and dot patterns in the image. Remember, the key to creating interesting canvases is creativity and imagination.
, Previous Page . Next Page t TOC i Index o Operators g Glossary
Copyright © 1992-2007 Black Belt Systems ALL RIGHTS RESERVED Under the Pan-American Conventions
WinImages F/x Manual Version 7, Revision 6, Level A
![]()