| This is a child page. You can use Parent in the quick nav bar at the top or the bottom of the page to navigate directly back to the parent of this page. Some child pages are more than one level deep, and in that case will require more than one Parent click to reach the outermost document level. |
§ 16.2 - Annular
| Quick Reference to Scripting Command |
| a=ANNULAR(red, green, blue, saturation, ADDITIVE) Check out this fully-blown animated camera flare effect that uses lots of annular rings. |
| Items in CAPS are 0/1 or ranges with more options than just 0/1. Ranges other than 0/1 are indicated by brackets, such as [0-2]. |

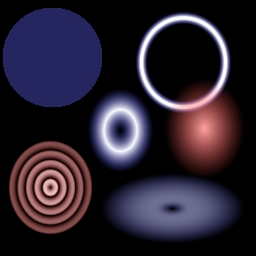
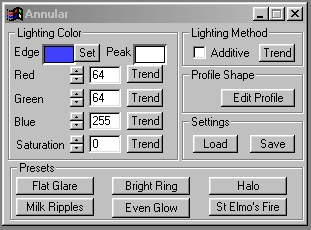
The Annular operation allows you to create concentric rings that follow a pattern determined by the Radial Profile. Using the Radial Profile, and other controls, you can create effects ranging from Milk Ripples to St. Elmo's Fire. The controls in the Annular dialog allow you to alter the color, saturation, and radial profile of each annular effect that you create. This operation is best suited for use with the ellipse area selection tool due to its circular nature.
Lighting operators are designed to be usable on flat images; they don't "place" the effect, they merge it into the image. Even when additive is selected, these effects work in areas that are not immediately obvious. That makes them difficult to work with in a transparent layer; you might even think that they're impossible to use in a layered image as an isolated, movable effect. This is not the case — you just have to approach them a little differently.
A very handy way to get around this is to place the effect in a black layer, then set that layer to add mode. This will allow you to create the effect, move it around and so forth, and it will act just as if it was an antialiased, transparent effect.
§ 16.2.1 - Annular Controls
§ 16.2.1.1 - Edit Profile
All profiles can be controlled via scripting. There are two general scripted mechanisms that allow reading and writing to individual profile entries.
These use a name that we have assigned to the profile, an index of zero to 200 to address the 201 entries in each profile, and a value, either read or written:
a=GETPROF("name", index[0-200])
(returns value in a)
a=SETPROF("name", index[0-200], value)
(returns previous value in a)
You will find the various profile names detailed here.
Examples of setting entire profiles with small script routines are detailed here.
The Edit Profile control allows you to alter the radial profile of the annular operation. The radial profile is the color and width of each ring in the annular effect. The graph is read from left (center of the annular rings) to right (edge of the annular rings). The vertical axis of the graph is the brightness or color of the ring, and the horizontal axis determines the number of rings and each rings width. You will notice that as the graph increases vertically the color of the ring is getting closer to the peak color, and as the graph decreases vertically the color of the ring is approaching the edge color. The profile is altered by simply drawing the desired profile using the left mouse button. There are several tools to aid in the creation of new profiles.
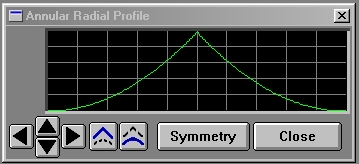
The directional arrows will move the curve the specified direction. This allows you to move the curve left, right, up, or down. Moving the curve up or down will flatten the top or bottom edge. Moving the curve left or right will simply shift the graph horizontally left or right. All changes to the arm profile can be saved using the Save option in the main annular dialog.
The enhance option (blue peak) will increase the peaks and valleys in the curve. If you click on the enhance option the graph will then be amplified at its low and high points.
The smooth option (blue curve) will smooth any rough edges that are detected in the graph. This option will create a smoother graph with fewer rough edges.
Symmetry will make the graph have reflective symmetry. This means that any changes made to the left side of the graph are reflected to the right side of the graph. This option simplifies creating "annularizations" that look smooth and even.
Close will close the radial profile. The newly created profile will then be used in the next annular operation, unless one of the preset annular operations is selected first. Selecting one of the presets will alter the profile to fit the preset's specifications. This dialog can also be closed by double clicking on the System Menu box or by pressing ALT F4.
When this operator is dragged into the TimeLine, profiles will automatically trend to the next profile, if another exists in the TimeLine.
§ 16.2.1.2 - Trend
Operator dialog controls that have a Trend button next to them offer animation functionality. Trend allows you to set that variable over a set of frames. Each frame of the animation can be thought of as a slice of time. The trends allow you to alter some, all, or none of the variables for a particular time slice. Variables that have multiple states can be set to any of a number of values in the trend. Variables that are either on or off can only have an on or off value in the trend. You will notice that the trend graphs have equidistantly spaced vertical lines. Each of these lines represents a frame in the animation. The number of frames can be altered using Sequence controls... in the TimeLine pull down menu. Animation lengths of 100 - 999 frames will be represented with a vertical bar being 10 frames, and animation length greater than 1000 frames will have a vertical bar for every 100 frames. Click here to view more information on Trends.
§ 16.2.1.3 - Edge Color Preview Window
The Edge color preview window allows you to view the color of the edge of the annular effect. This color will change as the Red, Green, and Blue values are altered. The edge color along with the saturation settings will determine the Peak color of the annularization. As the RGB controls are altered the Edge color preview will be updated to reflect the changes.
§ 16.2.1.4 - Red
This slide gadget allows you to specify the Red component of the RGB value for the Edge color. This value can be altered by adjusting the sliders or by entering the values. The values for any of the RGB components range from 0 to 255.
§ 16.2.1.5 - Green
This slide gadget allows you to specify the Green component of the RGB value for the Edge color. This value can be altered by adjusting the sliders or by entering the values. The values for any of the RGB components range from 0 to 255.
§ 16.2.1.6 - Blue
This slide gadget allows you to specify the Blue component of the RGB value for the Edge color. This value can be altered by adjusting the sliders or by entering the values. The values for any of the RGB components range from 0 to 255.
§ 16.2.1.7 - Saturation
The saturation control allows you to adjust the amount of saturation applied to the edge color. The value for saturation and the value for the edge color will determine the peak color. Saturation is the perception received as more white light is added to a pure color. At 0% saturation the peak color will be white, but as the saturation increases the peak color will become more and more similar to the edge color. Then, at 100% saturation the edge and peak colors are the same. The saturation value is set using the slide control or by entering the values. The saturation values can range from 0% to 100%.
§ 16.2.1.8 - Additive
The additive option, when selected, will place the annularization into the image using no blending. If the annular effect is applied to the same area with additive on, then the edge color will become less and less saturated with each application. If applied to the same area enough times the annularization would become white. A non-additive annular effect will be blended onto the image using the edge and peak colors and the colors in the image itself. This will give the annular effect a softer look.
§ 16.2.1.9 - Presets
Flat Glare: The Flat Glare preset creates an annular effect that has a flat radial arm profile, and a saturation value of 50%. These settings will produce an even toned glare in the selected area.
Milk Ripples: The Milk Ripples preset uses a multiple ringed profile that has a decreasing amount of saturation in each ring. This preset is similar to waves or ripples in a liquid medium.
Bright Ring: This preset will produce a bright ring that is almost entirely composed of the Peak color. The saturation is set to 0 to create the bright glare like effect in the ring.
Even Glow: This preset will produce a soft glowing effect that slowly gradients from the Peak to the Edge color. This preset has a linearly decreasing radial profile.
Halo: The Halo preset is similar to the Bright Ring preset, except that the edges of the halo are very smooth.
St. Elmo's Fire: This preset will give a soft glowing effect that is similar to the natural phenomena of St. Elmo's Fire.
§ 16.2.1.10 - Load
This tool allows you to load previously saved sets of annular settings. These settings are saved using the Save option on this dialog. All of the settings will be loaded when a file is selected.
§ 16.2.1.11 - Save
This tool allows you to save the current annular settings into an annular settings file. This file can then be loaded at a later time to reproduce the current annular effect. All of the settings in the annular dialog will be saved into the settings file.
, Previous Page . Next Page t TOC i Index o Operators g Glossary
Copyright © 1992-2007 Black Belt Systems ALL RIGHTS RESERVED Under the Pan-American Conventions
WinImages F/x Manual Version 7, Revision 6, Level A
![]()