§ 7 - Operating Modes
§ 7.1 - Modes / Normal - Menu Command
§ 7.1.1 - Single Keystroke Commands in Normal Mode
| Key | Operation |
|---|---|
| ← | Move image in 1:1, 2:1 & 4:1 (use OPT, SHIFT and CTRL to modify steps) |
| → | Move image in 1:1, 2:1 & 4:1 |
| ↑ | Move image in 1:1, 2:1 & 4:1 |
| ↓ | Move image in 1:1, 2:1 & 4:1 |
| Home | Image to top left when zoomed |
| End | Image to bottom right when zoomed |
| ⌘, | Open dTank (β) preferences |
| ⌘B | Select Badge from library |
| b | Black balance
|
| B | Reset black balance |
| c | Color matching
|
| C | Reset color balance |
| d | Open/Close library — ⌘L also works |
| ⌘F | Float active panels |
| f | Prefix keystroke to float panels (see here for details) |
| g | Grid |
| H | Help - Opens dTank (β) manual in the default web browser |
| h | Hot / Cold |
| ⌘L | Open/Close library — d also works |
| M | Marker placement |
| ⌘N | New version from current master |
| n | Next version or master |
| ⌘O | Open image from library |
| p | Previous version or master |
| ⌘R | Rename current library item |
| r | Vertical ruler |
| R | Horizontal ruler |
| ⌘S | Save current version in library (make new if none) |
| ⇧ ⌘S | Save as... new version in library |
| t | Take current sample as color reference
|
| w | White balance
|
| W | Reset white balance |
| x | Toggle effects on and off |
| z | Zoom one level |
| Z | Unzoom one level |
§ 7.2 - Modes / Stacking (astro) - Menu Command
§ 7.2.1 - General Information on Stacking
Photography of the night sky can be greatly improved using a technique called stacking.
Stacking consists of taking multiple photographs of the same subject and combining them algorithmically to reduce noise. Noise is a constant problem with astrophotography, and all the more so with fixed-mount astrophotography. This is because the images are light-poor; stars and nebulas and so forth can be very dim, and images from a fixed mount such as a camera tripod must be short exposures or the earth's rotation will cause the stars to become streaks.
In order to acquire astrophotos of dim objects, camera sensor amplification is set to very high values ("high ISO") so short exposures can acquire the objects in the sky. With those high sensitivities comes a great deal of noise. In addition, very low light levels (such as encountered with nebulas and distant stars) consist of such a low number of photons that they vary randomly, and largely, in proportion to the number that reach the camera sensor. All this random information results in very significant noise issues.
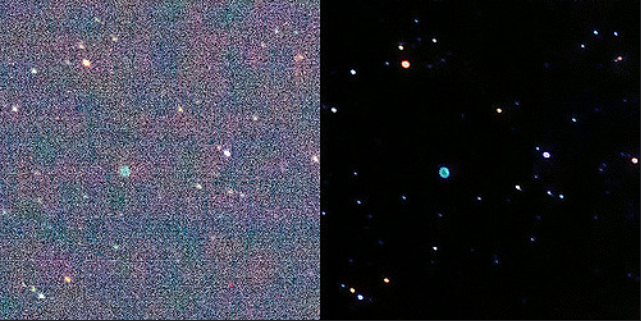
Comparison of one image with 36 images, stacked, black balanced, and stretched.
This is the Ring Nebula in Lyra, a magnitude 9 object. That's really dim.
Each of the individual images was taken at ISO 12800 using a Canon EOS 50D camera with
Canon's 200mm L lens, at f/2.8, 2 seconds exposure, on a fixed tripod (no tracking.)
There are a couple of problems to be addressed.
The first is how to combine the images; dTank (β) uses a single custom algorithm that has been found to result in high quality images. At present, there is only one combination mechanism, so this isn't something you need to worry about — the worrying here has been done for you. You can see how effective it is in the images above.
The second is image alignment. The problem comes from the fact that images taken at different moments from a camera on a fixed mount such as a standard tripod will contain different images because the earth is constantly rotating to a new position. This isn't generally a problem for a tracking mount, but those tend to be somewhat expensive. Providing precise alignment tools allows those of us with more common camera equipment to do some astrophotography at considerably less expense than if we had to purchase tracking mounts.
Image alignment in dTank (β) is done by selecting a reference image from a series of photographs, then aligning all the others in the series to that reference image by shifting and rotating the others as required to perfectly overlay the reference image.
Alignment is done one image at a time, and so only the reference image and the current image being aligned are loaded into memory at any one point; this means that an unlimited number of images may be stacked.
Once the alignment process has been completed, the stack now operation is performed, and dTank (β) creates a master image from the series.
Generally speaking, the amount of noise reduction is proportional to the square root of the number of images in the image stack. So for instance, if you have 16 images in the stack, the noise in the image will be reduced by a factor of four; four times less background noise and four times more stable light sources.
| # Images | Reduction |
|---|---|
| 1 | None |
| 4 | 2x |
| 9 | 3x |
| 16 | 4x |
| 25 | 5x |
| 36 | 6x |
| 49 | 7x |
| 64 | 8x |
| 81 | 9x |
| 100 | 10x |
So the next question is usually "Can I use a number of images other than the examples in the list above?"
Sure you can. You just get noise reduction that isn't a whole number. For instance, if you have two images, the noise reduction is 1.414x; if you use 55 images, the noise reduction is 7.41x. Any number you like is fine: to determine the general noise reduction level, just enter the number into a calculator and take its square root, and that's your answer. Likewise, you can use more than 100 images; however, as you go up, you can see from the list above that it takes more images as noise reduction increases to the next level, so that's something to definitely keep in mind.
Because for a natural noise source of almost any kind, the amplitude of the noise impulse is random. It increases as much as it decreases, and so for a portion of the camera sensor that's otherwise receiving a minimum of light, the highs and lows literally average out to a constant level near that minimum level of light. The more samples you have (in this context, that means images in the image stack), the smoother the average darkest value will be.
Compare that with noise that is encountered as a normal part of detection of an actual light source. In this case, the light randomly varies, but it varies not about the darkest light level, but about the average level of the light source. So stacking causes the intensity to settle down to the average intensity, rather than what you would see in just a single shot.
It doesn't matter where the noise is coming from; noise from the sensor itself, random photons coming from the universe at large, either way, these sources are random and so they will be reduced by the stacking process.
There's one exception to this, and that is banding noise, which is noise that is specific to a region of the image that is generated by the camera. Since there's a constant level of more noise in some areas than others, the average levels will settle down to different dark levels. Quality cameras very rarely exhibit significant banding noise, but from time to time people do run into it. In such a case, it may be appropriate to consider changing the camera model to one with better performance. Banding is very bad for astrophotography.
You can do this, but there's one critical caveat: nothing in any image in the stack can move relative to anything else in the other images in the stack. Examples of appropriate subject matter include images of buildings and other scenery that contain no motion. Examples of inappropriate subject matter include images with people, animals, leaves moving in the wind, flames, waves, etc.
§ 7.2.2 - Stacking Commands
| Key | Operation |
|---|---|
| e | Exit stacking mode |
| [ | Rotate image |
| ] | Rotate image |
| ← | Translate left (shift accelerates) |
| → | Translate right (shift accelerates) |
| ↑ | Translate up (shift accelerates) |
| ↓ | Translate down (shift accelerates) |
| a | Alignment phase entry |
| m | Marker placement for rotation center |
| n | Next stacked frame |
| p | Previous stacked frame |
| r | Set reference image |
| s | Stack now |
| u | Use (select) library image in current stack |
| z | Zero rotation adjustment |
| Z | Zero translation adjustment |
§ 7.2.3 - Stacking Procedure
Stacking is accomplished using a series of keyboard commands on a collection of masters from the Library. Here are the steps involved:
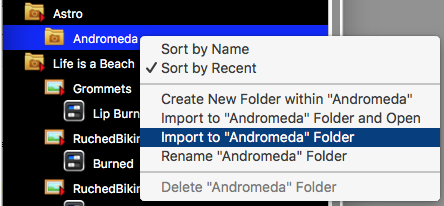
- (Recommended) Create a (sub)folder in the library to place the images within
-
Use Import (not Import and Open) at the library folder submenu to import all of the astro images in the collection as masters:
- Set ✓ Modes/Stacking (Astro) in the main application menu
- Use u repeatedly to add each of the images in the collection to the stack
- Find a star near the center of the image, left-click on it, and set rotation center with M
- Use a to begin the alignment phase; optimum alignment is indicated by a black result. Each image is subtracted from the reference image, so when they overlay perfectly, the result is zero brightness.
-
Repeat these steps for each image in the collection:
- Use ←, →, ↑, and ↓, to align this image with the first at the marked location
- Use [ and ] to align the image's rotation
- Use n to select the next image in the collection
- Use s to create the stacked result.
- Export the result — if you want to keep all the information in the stack, export as TIFF, which is a 48-bit image format.
Once you have actually exported the result, you can import it to the library for further operations such as black balance and/or contrast stretching.
§ 7.3 - Modes / Cascade - Menu Command
✓ Modes/Cascade ensures that all intermediate settings are calculated for every re-display. When Cascade is off, some effects are stored and not re-calculated. This speeds up display operations, but can result in images that are not quite what you expected.
§ 7.4 - Modes / Show Master - Menu Command
Modes/Show Master is under development — to be documented when stable.
§ 7.5 - Modes / Show Subset - Menu Command
Modes/Show Subset is under development — to be documented when stable.
, Previous Page . Next Page t TOC i Index o Operators g Glossary
on February 27th, 2026 at 17:36 MT
| Please consider supporting my dTank (β) development efforts via a small PayPal donation. |