| This is a child page. You can use Parent in the quick nav bar at the top or the bottom of the page to navigate directly back to the parent of this page. Some child pages are more than one level deep, and in that case will require more than one Parent click to reach the outermost document level. |
§ 16.70 - Tiler
| Quick Reference to Scripting Command |
| a=TILER(n, m, framex, framey, PRIORITY, scaling, ALIGN) |
| Items in CAPS are 0/1 or ranges with more options than just 0/1. Ranges other than 0/1 are indicated by brackets, such as [0-2]. |

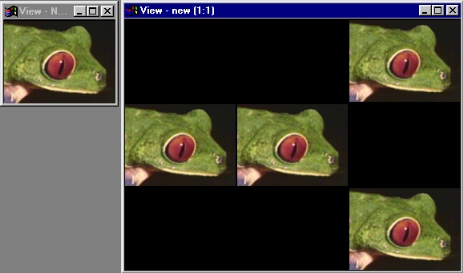
The Tiler operator functions in much the same way as Merge, with a few subtle functional differences. The action image is separated into cells, and the effect applies only to the cell chosen. This is ideal for "thumbnailing" images, or creating a comic strip look.
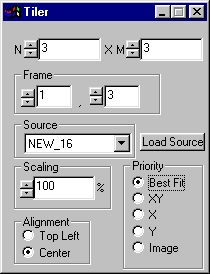
§ 16.70.1 - Tiler Controls
§ 16.70.1.1 - N & M
N and M are the # of cells across and down, respectively. So if you want an image separated 3 across by 4 down, N is 3 and M is 4.
§ 16.70.1.2 - Frame
This is the "cell" in which the operator is to be applied. This is in the form ACROSS,DOWN. In the above example, to apply the operator to the bottom right, you would choose 3,4 as the frame, for the upper left: 1,1.
In the timeline, the chosen cell number is not considered, only the timeline's frame number. The first frame, the operator will affect (1,1), then (1,2) all the way to (N,M) after which point it will restart.
§ 16.70.1.3 - Source
This chooses the source of the merge. To use a currently loaded image, use the drop-down box. To use an image not currently loaded, select "Load Source."
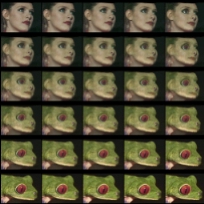
A quick way to thumbnail an animation is:
- Create a new blank image of sufficient size. Next specify enough cells to accommodate every frame.
- Choose the options you want, scaling, priority, etc.
- Drag the icon into the timeline, double click on the icon inside the timeline. Choose "specify source image", then "specify image file". There you choose your animation.
- Don't forget to specify the action image as the new blank image by double clicking on the image in the TimeLine, choosing "specify action image", then "use loaded image", and choosing the name of your blank image.
-
Be sure that accumulate changes is selected in the Timeline menu, then hit Generate.
As long as the timeline is of sufficient length (ideally, the number of cells in the animation), you should have your animation laid out on the new image left-to-right and top-to-bottom in thumbnails. The example below demonstrates this.
This operator can use Pixel Transfer Modes to generate output image and layer data. These modes add a great deal of flexibility to what you can do with this operator. Only operators that create new image or layer data use pixel transfer modes. Also, plugins may use them if the plugin designer takes care to use the plugin masked write services.
§ 16.70.1.4 - Scaling
This scales the effect between 1% of its size and 100%.
§ 16.70.1.5 - Alignment
Only if "Best Fit" priority is chosen (see below), can you select alignment. This will either align the effect to the top left of the cell or to the center.
§ 16.70.1.6 - Priority
Best Fit: This priority will scale the incoming image to the largest possible scale, while still fitting inside the cell and keeping the aspect of the original.
XY: This priority will scale the incoming image to the cell.
X: This priority will scale the x-width of the incoming image to the x-width of the cell.
Y: This priority will scale the y-width of the incoming image to the y-width of the cell.
Image: This priority will not scale the incoming image at all.
, Previous Page . Next Page t TOC i Index o Operators g Glossary
Copyright © 1992-2007 Black Belt Systems ALL RIGHTS RESERVED Under the Pan-American Conventions
WinImages F/x Manual Version 7, Revision 6, Level A
![]()