| This is a child page. You can use Parent in the quick nav bar at the top or the bottom of the page to navigate directly back to the parent of this page. Some child pages are more than one level deep, and in that case will require more than one Parent click to reach the outermost document level. |
§ 16.77 - Reduce
| Quick Reference to Scripting Command |
| This command has been superceded by the SPixel and SPercent operators. |
| Items in CAPS are 0/1 or ranges with more options than just 0/1. Ranges other than 0/1 are indicated by brackets, such as [0-2]. |

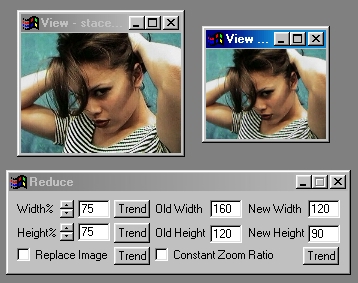
The Reduce operation allows you to decrease the size of a selected view by a percentage amount. For instance, this means that a 640 x 480 image could be reduced to a 320 x 240 image. It is important to remember that reducing an image, no matter what its resolution is, will lose image information. The loss of information can be minimized by only reducing an image by small amounts.
§ 16.77.1 - Reduce Controls
§ 16.77.1.1 - Trends
Operator dialog controls that have a Trend button next to them offer animation functionality. Trend allows you to set that variable over a set of frames. Each frame of the animation can be thought of as a slice of time. The trends allow you to alter some, all, or none of the variables for a particular time slice. Variables that have multiple states can be set to any of a number of values in the trend. Variables that are either on or off can only have an on or off value in the trend. You will notice that the trend graphs have equidistantly spaced vertical lines. Each of these lines represents a frame in the animation. The number of frames can be altered using Sequence controls... in the TimeLine pull down menu. Animation lengths of 100 - 999 frames will be represented with a vertical bar being 10 frames, and animation length greater than 1000 frames will have a vertical bar for every 100 frames. Click here to view more information on Trends.
§ 16.77.1.2 - Width %
This control allows you to control the percentage decrease in size for the width of the image. The percentage decrease can range from 1% to 100%, with 100% being no change in the resolution. All changes made to the percentage value will be reflected in the New Width control. The width can be altered by moving the slide gadget, entering the appropriate percentage value, or entering the desired pixel value in the New Width control. Altering the value in the Old Width control will have no effect.
§ 16.77.1.3 - Height %
This control allows you to control the percentage decrease in size for the height of the image. The percentage decrease can range from 1% to 100%, with 100% being no change in the resolution. All changes made to the percentage value will be reflected in the New Height control. The width can be altered by moving the slide gadget, entering the appropriate percentage value, or entering the desired pixel value in the New Height control. Altering the value in the Old Height control will have no effect.
The behavior of this operation can be surprising when you have more than one image loaded.
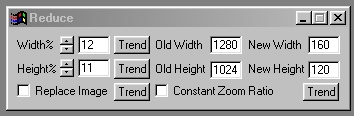
The operation itself, unlike most in F/x, depends upon the current size of the specific image it will be used on (most other operations use the scale-independant area selection, size isn't an issue). Although there are a number of elements in the dialog, the controlling elements are the new width and new height elements.
For instance, if you are intending to make an output image that is 50x50 from one that is 100x100, you can enter 50 in the New Width and New Height elements and that will work fine in all cases. When you click on the image you want to change to that size, that's what happens, because those dialog elements control the operation.
However, if you are thinking in terms of percentages and want to use the percentage dialog elements to control the reduction, you have to be careful. Here is why:
When the dialog is opened, all elements are set based upon the most recent image you performed an operation upon. Let's assume for a moment it was not the one you intend to resize, and that the image is not 100x100, either. Now, you enter 50 into the percentage controls, click the entire image tool and hit the image you want to reduce. Whoops! Not the result you wanted! That's because the dialog took the percentage values you entered and applied them to the size of the image it was set to at the time (which was not the one you were thinking of!), developed result X and Y sizes based on the image that was not 100x100, and those are what control the image reduction result when you click on the image, not the percentages.
So if you want to use percentages to control this operation, you have to ensure that the image you're working with is the one that the dialog knows about first. You can do that by manually entering the image size into the dialog, or by performing any operation upon your target image and then undoing the result.
§ 16.77.1.4 - Replace Image
This option, when selected, will automatically replace the image that was being reduced. This allows you to reduce the amount of memory needed by the program by opening fewer image views. If you select to Undo the reduce operation, F/x will be able to retrieve the unaltered image. If this option is not selected, then F/x will create a new image view with the reduced image. This setting is saved when you exit the program, and reloaded when you start again.
§ 16.77.1.5 - Constant Zoom
The Constant Zoom option allows you to select how a stream of images is reduced. If this option is selected, then the images will all be reduced by a constant enlargement factor. This value is the percentage value on the Width and Height controls. If this option is not selected, then all images will be reduced to the same dimensions.
, Previous Page . Next Page t TOC i Index o Operators g Glossary
Copyright © 1992-2007 Black Belt Systems ALL RIGHTS RESERVED Under the Pan-American Conventions
WinImages F/x Manual Version 7, Revision 6, Level A
![]()