| This is a child page. You can use Parent in the quick nav bar at the top or the bottom of the page to navigate directly back to the parent of this page. Some child pages are more than one level deep, and in that case will require more than one Parent click to reach the outermost document level. |
§ 16.111 - Make Alpha
| Quick Reference to Scripting Command |
| a=MAKEALPHA(MASK WITH SOURCE LUMA, MASK WITH EXISTING ALPHA, MODE[0-2], fill value) |
| Items in CAPS are 0/1 or ranges with more options than just 0/1. Ranges other than 0/1 are indicated by brackets, such as [0-2]. |

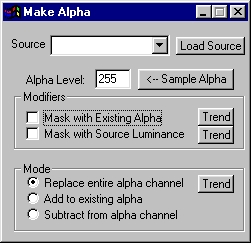
The Make Alpha operation will create an alpha channel based on current selections in this dialog and the alpha channel of the current image. This control allows you to create an alpha channel for the action image based on the source image luminance.
The Make Alpha operation is the most important operation in the program for handling basic alpha channels. You can use it to give an image an alpha channel if it does not already have one, and you can use it to make changes to an existing alpha channel. This capability, combined with the program's ability to show you alpha areas and to compose (merge) images using alpha channel information under the control of the powerful area selection modes, is the most powerful image composition tool imaginable.
You can also alter an existing alpha channel of an image by using the ✓ Mask with Existing Alpha control. An image's Alpha Channel is used in conjunction with the Mask with Alpha, controls to create smooth edge blending and digital masking. You may find it easier to work with this, and all other alpha channel tools, with an alpha view open. These views can be opened by selecting the Display Alpha option in the Open Another View dialog accessed via the View menu.
§ 16.111.1 - Make Alpha Controls
When an image does not already have an alpha channel, the Make Alpha, ✓ Replace Entire Alpha Channel operation won't do what you expect. The proper approach is as follows:
- Select the Make Alpha operation.
- Set it so that Replace Entire Alpha Channel is selected. Use the Entire Image tool and click on the image. No visible change will occur, because the alpha you have added is completely opaque. However, the image now has a correct alpha channel.
-
Now you can...
- Use subtract from alpha channel to remove some portions of the alpha, and...
- Use add to existing alpha to put alpha into areas where it has been removed, and...
- Use other alpha operators to "clean up" edges, spots and so on.
- As an example, change the alpha dialog so that Subtract from alpha channel is selected. Select ✓ Mask With Existing Alpha Now click on the ellipse in the Toolbox and pull out a medium size ellipse on the image and let go. Now pull out another. Those "holes" are transparent areas in the alpha channel. If you were now to use the merge operator with this image selected as the source image, the transparent areas would show the action image (underneath) and the opaque areas would show this image. If you use the transparency controls to modify the area selection, you can make partially transparent areas as well!
§ 16.111.1.1 - Trends
Operator dialog controls that have a Trend button next to them offer animation functionality. Trend allows you to set that variable over a set of frames. Each frame of the animation can be thought of as a slice of time. The trends allow you to alter some, all, or none of the variables for a particular time slice. Variables that have multiple states can be set to any of a number of values in the trend. Variables that are either on or off can only have an on or off value in the trend. You will notice that the trend graphs have equidistantly spaced vertical lines. Each of these lines represents a frame in the animation. The number of frames can be altered using Sequence controls... in the TimeLine pull down menu. Animation lengths of 100 - 999 frames will be represented with a vertical bar being 10 frames, and animation length greater than 1000 frames will have a vertical bar for every 100 frames. Click here to view more information on Trends.
§ 16.111.1.2 - Alpha Level
This is the level of the alpha that will be used for addition and subtraction of alpha. When set to 255, the operator performs the same actions as it did in R5 and earlier releases.
§ 16.111.1.3 - Sample Alpha
Pressing this control will set the Alpha Level from the value set by the last use of the Sample Alpha operator.
§ 16.111.1.4 - Mask with Existing Alpha
This control, when selected, will alter the current alpha channel of the image based on the area select. For example, an image with a circular alpha channel could be altered to have a square alpha channel by selecting a square within the original alpha channel. It is strongly suggested that you open a view to the alpha channel when working with it. This way all changes made to the alpha are visible. An Images Alpha is viewed by using the Open Another View option in the View pull down menu. If this control is used with the ✓ Mask with Source Luminance control selected, then the new alpha channel will be based on the selected region and the Luminance of the Source image.
§ 16.111.1.5 - Mask with Source Luminance
This control, when selected, will create an alpha channel for the current image based on the Source Image Luminance. The Source image is specified in the Generate pull down menu. This control can be used with the ✓ Mask with Existing Alpha control to create an alpha channel based on the original alpha channel and the source image luminance.
§ 16.111.1.6 - Methods
-
 Replace Entire Alpha Channel
This method creates an alpha channel that is built from a combination of the area selection method you choose and the settings of the transparency dialog. This new alpha information entirely replaces the previous alpha information in the image.
-
Add to current Alpha
This method creates an alpha channel that is built from a combination of the area selection method you choose and the settings of the transparency dialog. This new alpha information is then added to the alpha information that was already present for the image.
-
Subtract from current alpha
Make Alpha's Subtract method creates an alpha channel modification that is built from a combination of the area selection method you choose and the settings of the transparency dialog.
This new alpha information is then subtracted from the alpha information that was already present for the image, resulting in the complete transparency (or at least a reduction in opacity if the subtracted value is not 255) of the selected region in the image.
As with all of F/x's more powerful features, some experimenting is called for in order to learn how to handle alpha operations in the most effective and useful manner. Because Alpha channels have a number of useful roles within F/x, it is well worth the time it takes to understand how to generate, manipulate and utilize them.
, Previous Page . Next Page t TOC i Index o Operators g Glossary
Copyright © 1992-2007 Black Belt Systems ALL RIGHTS RESERVED Under the Pan-American Conventions
WinImages F/x Manual Version 7, Revision 6, Level A
![]()