| This is a child page. You can use Parent in the quick nav bar at the top or the bottom of the page to navigate directly back to the parent of this page. Some child pages are more than one level deep, and in that case will require more than one Parent click to reach the outermost document level. |
§ 16.72 - Key In
| Quick Reference to Scripting Command |
| a=KEYIN(red, green, blue, rdev, gdev, bdev, KEY ON SOURCE, INVERSE, SOFT) |
| Items in CAPS are 0/1 or ranges with more options than just 0/1. Ranges other than 0/1 are indicated by brackets, such as [0-2]. |

The Key In operation allows you to merge an image based on colors found in the action image. You can select the color to be used for keying, the source image to be merged, the keying method, and the variance in the key color. The merged image can be placed everywhere that the key color exists, or everywhere that the key color does not exist.
For example, you can select to merge a background into an image with an all blue background, or you can select to merge the source image everywhere that the blue background does not appear. The Key In operation is a color and decision based merge. This means that each pixel in the selected area is examined to determine if it is the key color or within the key color range.
This is more powerful than a standard merge because you have more control over which pixels will be replaced by the source image. This operation is best suited for use with all of the area selection tools, except Color Key and Color Wand. There are two methods you can use, normal and inverse.
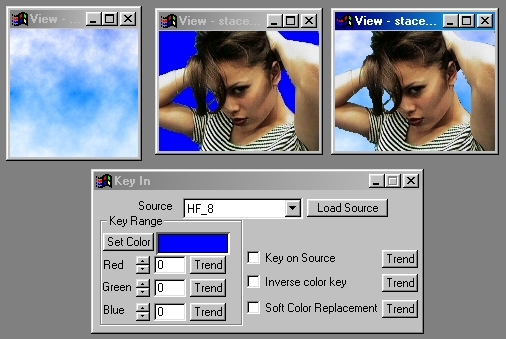
There is a very simple way to demonstrate these two methods of using the Key In operation.
Take two images, and designate one as the source using the Source Image drop down box. Now, use the Color Fill operation to fill one corner of the action image with a primary blue (R=0, G=0, and B=255). After you have filled the corner of the action image, return to the Key In dialog. You will now want to make sure that the key color matches the color that was used for the color fill. This can be done by selecting the Set Color option, and then entering the same RGB values that were used for the fill.
Once you have the proper key color, select the Ok button to exit the color selection dialog. Now, select the Entire area selection mode from the area selection tool box. Make sure that the Inverse Color Key control is not selected, and then click on the action image.
After this has generated, you should see the source image has been merged into the action image only where the key color existed. You can now select the Undo button to re-obtain the original action image. Next, select the Inverse Key Color option. This will now select all areas in the action image which are not the key color. Click on the action image to apply the effect.
You should see that the blue corner is all that is left of the original action image. The rest of the image has been filled with the source image.
As you can see the Key In operation is very simple to use, and has countless applications for altering an existing backgrounds, and bringing a background into blue screened shots.
§ 16.72.1 - Key In Controls
§ 16.72.1.1 - Trends
Operator dialog controls that have a Trend button next to them offer animation functionality. Trend allows you to set that variable over a set of frames. Each frame of the animation can be thought of as a slice of time. The trends allow you to alter some, all, or none of the variables for a particular time slice. Variables that have multiple states can be set to any of a number of values in the trend. Variables that are either on or off can only have an on or off value in the trend. You will notice that the trend graphs have equidistantly spaced vertical lines. Each of these lines represents a frame in the animation. The number of frames can be altered using Sequence controls... in the TimeLine pull down menu. Animation lengths of 100 - 999 frames will be represented with a vertical bar being 10 frames, and animation length greater than 1000 frames will have a vertical bar for every 100 frames. Click here to view more information on Trends.
§ 16.72.1.2 - Source Image Drop Down Box
The Source Image drop down box allows you to select a source image from all of the images currently loaded. The source image is the image that will be "keyed" into the specified color in the action image. This operation also allows you to load a new image as the source image. This is done by selecting the Load Source button. A source is selected by clicking on the name of the image to be used as the source. Remember, any image can be a source image, even the current action image.
§ 16.72.1.3 - Load Source
This control allows you to load a new image into F/x as the source image. Selecting this button will access a file dialog. You can then use this file dialog to specify the file to be loaded as the source image. Once the image is loaded you can execute the operation by selecting an area. The source image that is loaded will remain as the source until a new source is selected.
§ 16.72.1.4 - Inverse Color Key
This control allows you to toggle the way the Key In operation works. When this option is not selected (this is the default), the source image will be merged into the specified color. For example, if you had a action image with an all blue background, and the key color was the same blue, the source image would be placed everywhere that the blue was found inside the area select. If the control is not selected, the source image will be placed only where the key color does not exist. If we use the example above, the source image would be placed everywhere that the blue color is not found within the area selection.
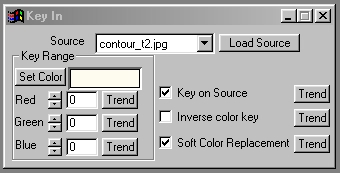
§ 16.72.1.5 - Soft Color Replacement
This control allows you to select how the source image will be merged into the specified key color. If this control is selected, then the source will be merged on a percentage basis across the range. This means that colors nearer to the key color will be replaced more than colors far away from the key color. The overall result is a softening of the merge giving it a blended look. If the control is not selected, then every color that is within the key color and its range will be filled with the source image data. This type of key in can be rougher, but is still quite effective.
§ 16.72.1.6 - Key Range
The Key Range controls are used to specify the specific Red, Green, and Blue components of the Key In color's variance. This variance determines which pixels inside the area selection will be replaced with the merge of the source image. For example, if the key color was blue (R=0, G=0, B=255) with no variance specified, then only the pixels in the area selection that exactly match the key color will be selected for the merge. If you were to use the same key color with a range setting of ten for each of the color components RGB, then pixels which are plus or minus ten the key color, and all colors within that range will be selected for the merge. This allows you to key in backgrounds into areas that may contain a gradient or variation in color. Using the range controls can produce a more accurate key in operation.
§ 16.72.1.7 - Set Color
The Set Color button will access the Color Selection dialog, and allow you to select a color as the key color from the palette. The final color that is visible in the color selection preview will be the color used as the key color for the operation. Remember, the color that is selected will be the color that is used for merging the source into the action image. If you are having difficulties selecting the correct colors, you should use the Color Sample tool to define the key color, and then use the Key In operation to place the source image into the action image. If you would like to view more information on the Color Selection dialog, Click Here.
§ 16.72.1.8 - Key on Source
This option allows you to color key based on colors in the source (actor) image. This allows you to composite actors into a background based on the colors in the source or actor image. If this toggle is not selected, then the images will be keyed using the color information from the background image only.
, Previous Page . Next Page t TOC i Index o Operators g Glossary
Copyright © 1992-2007 Black Belt Systems ALL RIGHTS RESERVED Under the Pan-American Conventions
WinImages F/x Manual Version 7, Revision 6, Level A
![]()