| This is a child page. You can use Parent in the quick nav bar at the top or the bottom of the page to navigate directly back to the parent of this page. Some child pages are more than one level deep, and in that case will require more than one Parent click to reach the outermost document level. |
§ 16.105 - Balance
| Quick Reference to Scripting Command |
| a=BALANCE(red, green, blue, FORCE DYNAMIC) |
| Items in CAPS are 0/1 or ranges with more options than just 0/1. Ranges other than 0/1 are indicated by brackets, such as [0-2]. |


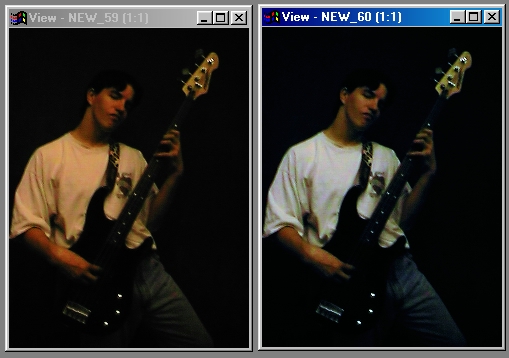
Operation Example - sampled "white" shirt, then Balance to Gray + 100% Gamma
Note jeans are now blue, shirt is white, skin tone improved.
The Balance operation allows you to sample a color, and then specify a new color as the original color. This means that you could take the brightest portion of the image and specify it as white. The Balance operation will then adjust the entire image with the new values. The Balance operation can be used to simulate tinting, eliminate a yellowish tinge to old photographs, or even to bring out greater image detail in a dark image. You have the option of balancing the sampled color to white, black, gray, or any other color that you like. The Balance operation works like this:
-
Select the Color Sample tool from the Standard Adjustments group. Sample the color that you wish to use as the balance color. This color is generally the lightest or darkest portion of the image, but can be any color you like.
-
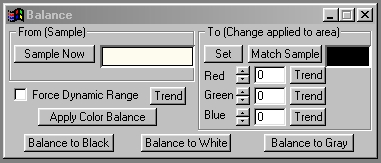
Now, select the Balance operation. The Balance controls allow you to specify the new color that will become the sample color. There are three preset controls (White, Black, and Gray Balance), or you may select to change the color to another color. You also have the option of using the Pick Color control to select a color from the palette.
 Note:
Note:
Selecting the Key Color as the Balance Color will result in a null operation.
-
The Balance operation is completed once an area selection is made. The same Color Balancing can be performed in other areas, or you may select a new Sample Color and then balance the new color.
§ 16.105.1 - Balance Controls
§ 16.105.1.1 - Trends
Operator dialog controls that have a Trend button next to them offer animation functionality. Trend allows you to set that variable over a set of frames. Each frame of the animation can be thought of as a slice of time. The trends allow you to alter some, all, or none of the variables for a particular time slice. Variables that have multiple states can be set to any of a number of values in the trend. Variables that are either on or off can only have an on or off value in the trend. You will notice that the trend graphs have equidistantly spaced vertical lines. Each of these lines represents a frame in the animation. The number of frames can be altered using Sequence controls... in the TimeLine pull down menu. Animation lengths of 100 - 999 frames will be represented with a vertical bar being 10 frames, and animation length greater than 1000 frames will have a vertical bar for every 100 frames. Click here to view more information on Trends.
§ 16.105.1.2 - Pick Color
Pressing this button will access the Color Selection dialog. You may then select a color from the palette or any of the preset colors as Balance Color. You may not select the Sample Color. Selecting the sample color will result in a null operation. If you would like to view more information on the Color Selection dialog, Press Here.
§ 16.105.1.3 - Red
This control allows you to adjust the amount of Red in the Balance Color. This control can be set using the slide gadget or by entering the appropriate value in the provided text entry field.
§ 16.105.1.4 - Green
This control allows you to adjust the amount of Green in the Balance Color. This control can be set using the slide gadget or by entering the appropriate value in the provided text entry field.
§ 16.105.1.5 - Blue
This control allows you to adjust the amount of Blue in the Balance Color. This control can be set using the slide gadget or by entering the appropriate value in the provided text entry field.
§ 16.105.1.6 - Force Dynamic Range
This control, when selected, will force a dynamic range based on the Sampled Color. A dynamic range goes from maximum brightness to minimum brightness in the same selected area. This selection will stretch the Sampled Color into a dynamic range in the specified area.
Force Dynamic Range is essentially a specialized type of contrast operation that is amazingly useful. One common use is to ensure that an image has the maximum possible contrast without color distortion. To achieve this, use the Sample operation with the Entire Image tool first. That gathers the information that Force Dynamic needs to work. Then use the Balance operation (again with the Entire Image area tool) with Force Dynamic checked. The resulting image will receive a contrast enhancement consistent with the maximum possible non-distorting contrast setting.
Another really nice capability is to use this tool to adjust an image to a contrast setting that provides maximum contrast for a particular region of interest. To do this, sample the region only using one of the local area select tools such as ellipse or freehand. Then, using the Entire Image area tool, Force Dynamic on the entire image. If a face was in the shadows, and you sample only the face, the image's contrast will be pushed to give you the maximum contrast for the area of the face. The rest of the image may suffer, but you'll get the best possible view of the face itself (in terms of contrast.) This is one of the "tricks" security professionals like to use because they instantly recover maximum information without having to guess and test with standard contrast operations.
Presets:
§ 16.105.1.7 - Balance to Black
This will make the specified Sample Color black. The rest of the image will then be adjusted based on the new black value. This process is useful in removing the yellow tint from old photographs. If the Sample Color is not the darkest region in the selected area, then any other regions that are darker will also be pushed to black. This can result in loss of image information.
§ 16.105.1.8 - Balance to White
This will make the specified Sample Color white. The rest of the image will then be adjusted based on the new white value. This process is useful in removing the yellow tint from old photographs. If the Sample Color is not the brightest region in the selected area, then any other regions that are brighter will also be pushed to white. This can result in loss of image information.
§ 16.105.1.9 - Balance to Gray
This will make the specified Sample Color gray. The rest of the image will then be adjusted based on the new gray value. This process is useful in removing the yellow tint from old photographs. This operation produces a smoother balance than the Black and White Balance presets.
, Previous Page . Next Page t TOC i Index o Operators g Glossary
Copyright © 1992-2007 Black Belt Systems ALL RIGHTS RESERVED Under the Pan-American Conventions
WinImages F/x Manual Version 7, Revision 6, Level A
