| This is a child page. You can use Parent in the quick nav bar at the top or the bottom of the page to navigate directly back to the parent of this page. Some child pages are more than one level deep, and in that case will require more than one Parent click to reach the outermost document level. |
§ 27.18.6 - Transition Morphing - The Basics
Dual image morphing is also available in Morph. In order to create a transition morph, you will need to have two separate images loaded, one as the start frame and one as the end frame. To work through this tour with us, you'll need two images, each of a different face. They can be similar, like brothers, or they can be quite different, like a cow and a dog — just so they are faces viewed from the front. We will be using the girl and frog images that are supplied on the original installation diskettes.
This tutorial assumes that you have already worked through the warp morphing tour — if you have not, please go back and do that first.
Once you've loaded two images of a face (or the girl and frog images), one as Start Image and one as End Image, you will be ready to begin Transition Morphing. Looking at the image display area, you will see two color image Views, one of your start image and one of your end image. These two image Views act like any other window — they can be re-sized and re-positioned to best suit your needs. These images are used to guide you in placing your Objects.
Begin by selecting the Sequence Controls option in the Generate menu. When the dialog opens, you'll see a text entry field marked Total Frames. If it does not read 15, then click in this field with your left mouse button and replace whatever was there with 15. Now click Done. For the best results when testing a dual image morph, you should always have an odd number of frames; this is so that there is a frame number that is exactly in the middle of the sequence. For instance, an 8-frame morph has frames 4 and 5, neither of which is in the middle; there is no middle frame.
Let's Zoom in on the area where we'll be working, the left eye. To Zoom, first click on the Zoom button located in the top right-hand corner of the morphing panel. You will notice that the normal pointer will change into the shape of a magnifying glass. You should now point the Zoom pointer about 1/2 inch above and to the left of the left eye (start image), click and hold the left mouse button and drag the mouse down and to the right. A box will appear; keep pulling until the box entirely encloses the eye (about 1/2 inch below and right) and then let go of the mouse button. The Box can be repositioned by pressing the right mouse button in addition to the left. The image will now be Zoomed in. If the result is not to your liking, click on the De-Zoom button and the Zoom will be turned off. Repeat these steps, beginning with re-selecting the Zoom button, to get a better Zoom around the eye. When you have the eye nicely centered in a Zoomed image, continue. Here's basically how your Views should look at this point:

Now, because you are working with two completely different images, the image in the right (end) View will need to be Zoomed before we proceed. Follow the steps from above to Zoom around the left eye in the end image View.
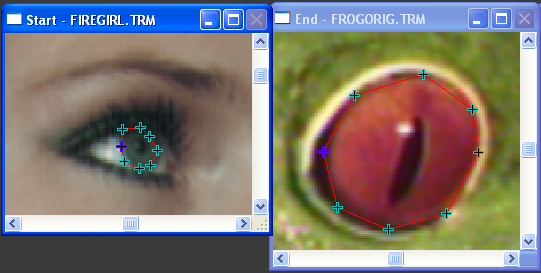
Select the Point tool from the Toolbox. Now, point at the start image's eye and drop Points all around the edge of the eye, just as we did in the warp morph tour. And again, about 8 points should be just fine When we do this, we place the Points as follows; one at each corner of the eye; one directly above, and one directly below the pupil; and the final four, one at a time between the corners of the eye and the points by the pupil;
Looking at the end image, the same Points will be visible, but they won't be correctly arranged around the end image's eye — that's because these are different eyes, unlike the warp morph, and Morph can't know exactly what you're trying to do. So, it's your job to get those Points arranged in just the same manner around this other eye. It should be very obvious what needs to be done — the Points should be in the same relative positions as they are in the left frame. You can move the Points in the right frame now by right clicking on a Point and then moving them into position. If you need to adjust any of the Points in the start image View, right click on the desired Point and move it to its new position. When you have the Points arranged around both left eyes to your satisfaction, continue. Here's what we ended up with:

Now we're going to add Links, again, just as we did for the warp morph tour. Click on the button in tool bar that reads Links. In the left image, beginning with any Point you like, click on each Point in turn all the way around the eye. As you go, you'll see colored Links appear between each point. Continue until the eye is completely surrounded by Links. When you get to the last Point, click on it a second time to de-select it. Looking over at the end frame, you'll see the Links are there as well. Now, turn the Linking tool off by clicking on its icon.
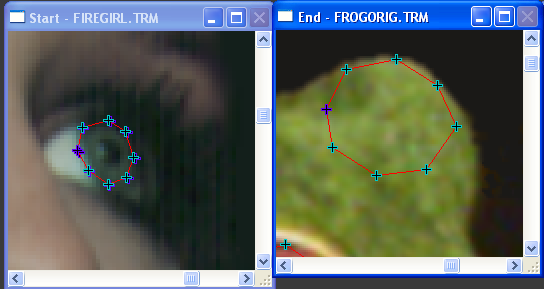
When you've got the entire group of Points connected with Links, click on the De-Zoom button to turn off the Zoom in each image View, and then click on the Zoom button and Zoom in a new area. This time, Zoom the right eye of the start image. (Note: If you selected to do this tutorial with the girl and frog images, choose another feature to outline like the ear or mouth.) Now, simply repeat the process of adding Points to the start image's eye, moving the Points on the end image's eye (which will be a little weird... the frog's eye is facing away, but... go with it) to match up, and then adding Links.
By now, you should be familiar with the methods needed to do this; if you have problems, refer to the preceding paragraphs for more detail on what controls to select, and when. When you have the right eye set up, continue. Here's what we ended up with:
Enter the Sequence Controls dialog, and change the current frame value to 8. Now in the Generate menu, select the Do One Frame option. Morph will now generate the morph using the information that you specified. When the preview completes, you should have an image of the two faces mixed together, with the eyes (or another feature) tied perfectly together. You'll note that the rest of the face(s) are not perfectly matched up; that's because you don't have Control Points specified for the various matching features. The more features you tie together, the better the overall morph will look. Here's what we ended up with:
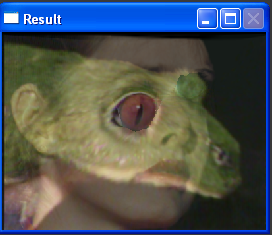
If you open the FilmStrip, you can generate the whole sequence, and play it back. This is what we got:

You can very easily generate a longer sequence; just go to Generate / Sequence Controls... and set the length to 30 or so, close the dialog, and select Generate / Sequence Generate... with the FilmStrip open.
More complex morphs are usually made up of several regions such as the ones you just created around the eyes. As is the case with many things, even the most complex morph is the sum of a series of simpler operations.
To continue learning, we suggest that you work to make the rest of the features match up. You may also want to try the above tutorial using the lines and curves instead of points and Links. You should be able to get the morph completely matched just using the techniques we've gone over — have fun!
Have any Problems?
If you didn't get the results described here, we suggest you go back and go through the tour again. Most likely, you've missed a step somewhere.
, Previous Page . Next Page t TOC i Index o Operators g Glossary
Copyright © 1992-2007 Black Belt Systems ALL RIGHTS RESERVED Under the Pan-American Conventions
WinImages F/x Manual Version 7, Revision 6, Level A
![]()