| This is a child page. You can use Parent in the quick nav bar at the top or the bottom of the page to navigate directly back to the parent of this page. Some child pages are more than one level deep, and in that case will require more than one Parent click to reach the outermost document level. |
§ 13.4 - Operations Toolbar Structure
Verse Bar Chapter Bar |
The operations toolbar is divided up into two regions:
§ 13.4.1 - Chapter Bar
The chapter bar, on the bottom, where you can quickly select an area of the toolbar you want to use, and...
§ 13.4.2 - Verse Bar
The verse bar, where you actually select the operations you need.
You can also use the arrows available at the rightmost end of the toolbar to step through the verse bar one operation at a time.
§ 13.5 - Operations on Pre-existing Images
§ 13.5.1 - Stills
§ 13.5.1.1 - Operations on Still Images with Static Results
§ 13.5.1.2 - Layered Image Manipulations
Still images may contain more than one layer. When more than one layer is present, it is possible to create a number of interesting and useful effects without actually changing the pixel content of the image subject. This is an ideal way to work with images, and should be pursued whenever possible. Many types of manipulations are possible, including geometric effects. See the section on layers for more details.
§ 13.5.1.3 - Effect Applications
You may also apply effects directly to an image or an image layer using the Operations Toolbar and the Area Selection Toolbox. And finally, you can (of course!) mix the two techniques.
§ 13.5.2 - Animations
F/x can animate almost every aspect of effect applications that come from a combination of the operations toolbar and the area selection toolbox. This capability is implemented using F/x's powerful TimeLine. You can learn more about the TimeLine here.
§ 13.5.2.1 - Area Selection Animation and Morphing
F/x can animate the size, shape and position of an area selection over time as an animated output sequence is generated. F/x can also morph one area selection into another; so that it is entirely reasonable for a small trangular area selection in the top left of an image to wander down to the bottom right of the image, while it smoothly changes into a large elliptical selection.
§ 13.5.2.2 - Linear Interpolation
When area selections move and change, they are, by default, linear. This means that in a sequence of area selections, any one area selection would move in a straight line to the next area selection in the sequence. If you imagined a seriers of selections that worked across an image from left to right while alternating top and bottom locations, a linear interpolation results in a triangular waveshape.
§ 13.5.2.3 - Splined Interpolation
If you turn on splined interpolation, which is available in the area selection dialog that pops up when you double-click on any area selection in the TimeLine, then the pattern just described no longer results in a triangular waveshape; instead, you get a curved path from one location to the next. This is useful for an "organic" look and feel.
§ 13.5.2.4 - Effect Parameter Animation
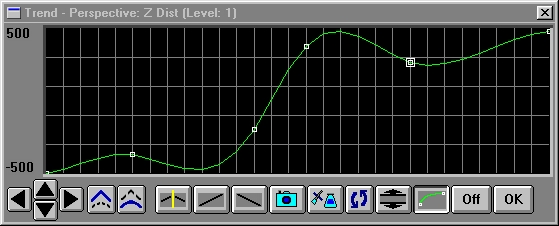
Most effects use F/x's trending system. This is a uniform graphical interface that allows you to set the value of an effect parameter for every frame using a graph that spans the entire frame sequence:

§ 13.5.2.5 - Linear
Trends are, by default, interpolated linearly. This means that operations parameters will vary in a straight line from one setting to the next in the graph.
§ 13.5.2.6 - Splined
Each trend contains a control that allows you to select splined interpolation. This allows you to have parameter values vary in a smooth, curved fashion and like area selections, this can give a more organic "feel" to you work.
§ 13.5.2.7 - Operations on Still Images with Animated Results
F/x can take a single still frame, and by animating an effect on that frame, turn it into an animated result.
§ 13.5.2.8 - Operations on Animated images with Static Results
F/x can also apply an effect precisely the same way to a series of frames; for instance, you might want to adjust the brightness or contrast of a group of frames. This is similar to the typical "batch processing" capability you find in some software.
§ 13.5.2.9 - Animated images with Animated Results
F/x really flexes its muscles when you feed it a series of animated frames, to which you apply animated effects that move appropriately to match the subject of the orignal animation. This allows you to do things like shoot lightning from someone's fingertips — while they're waving their arms and walking down the street — into someone else's head, while they are running down the street away from the one shooting the lightning. The possibilities are limitless!
§ 13.5.3 - Operations (Processes, Effects or Filters) Available
§ 13.5.3.1 - Toolbar Based
There are well over one hundred separate types of effects available from the operations toolbar. Each is fully documented, including an example of the operation. These are indexed here.
§ 13.5.3.2 - Layer Based
Operations on images using layers are accomplished by inserting additional image layers, and by adjusting the layer blend modes and the parameters for those modes. You can even create geometric effects using layers; see the warp layer mode for details.
§ 13.5.3.3 - Image Creation Based
These types of effects are found in the texture generator. You can create a wide range of interesting new images using this feature.
§ 13.5.3.4 - Image Conversion Based
F/x can convert from one image format to another as an operation. When it does, there can be a number of effects and side-effects, some desirable, some not. For instance, an RGB image can be converted to a B&W image, or a B&W image can be converted into a Duotone or Tritone.
§ 13.5.3.5 - Data Export Based
When saving images, there are many cases where the output image file format is incapabable of retaining an accurate representation of the image you have inside F/x. In this case, the number of colors must be reduced. This is an inherently destructive effect, but it may at times be precisely what you want. Additionally, saving in JPEG format not only loses transparency information, but generally degrades the accuracy of each pixel, even though the format is nominally a 24 bit format. Caution is advised when using JPEG as an output format.
§ 13.5.4 - Operation Parameter Controls
F/x's operations have a number of different types of controls. Each operation uses controls that are appropriate for what it does, so you won't see all types of controls for every operator. In fact, some operations have no controls at all!
§ 13.5.4.1 - Numeric and Boolean
Numeric controls fall into two categories; integer and floating point. Integer controls may be trended using graphs as described above; however, floating point values must be set in the operation dialog itself, as graphs are not accurate enough to set these values.
Boolean controls are represented as standard windows checkmarks. When checked, the control is "on."
§ 13.5.4.2 - Graphical Profiles

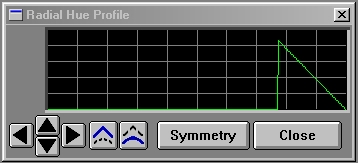
Graphical profile controls are used to set values that change over different regions of the area selection that applies an effect. A good example of this would be the hue, or coloration, of a rainbow. An elliptical area selection would change its color gently as the selection region varies from the center to the edge. In this way, a rainbow can be generated. By adjusting the profile, you can control what hue or hues are applied based on position. Here is a sample profile control:
When operators are dragged into the TimeLine, profiles will automatically trend to the next profile, if another exists in the TimeLine.
§ 13.5.4.2.1 - Profile Controls
The Profile dialog contains several tools to aid in the manipulation of Profile graphs:
§ 13.5.4.2.1.1 - Directional Arrows
The directional arrows will move the curve the specified direction. This allows you to move the curve left, right, up, or down. Moving the curve up or down will flatten the top or bottom edge. Moving the curve left or right will simply shift the graph horizontally left or right.
§ 13.5.4.2.1.2 - Enhance
The enhance option will increase the peaks and valleys in the curve. If you click on the enhance option the graph will then be amplified at its low and high points.
§ 13.5.4.2.1.3 - Smooth
The smooth option will smooth any rough edges that are detected in the graph. This option will create a smoother graph with fewer rough edges.
§ 13.5.4.2.1.4 - Symmetry
SymmetryThis will cause the profile sides to mirror each other. Changes on the left side of the graph are duplicated to the right side of the graph.
§ 13.5.4.2.1.5 - Close
CloseThis closes the Profile.
§ 13.5.4.3 - Scripted
Other operations, such as the ray trace operator, use scripts to control their parameters. In the case of this operator, the number of possible control settings is so large that it is grossly impractical to attempt to build a dialog to control all of the scene parameters. However, a scripting language not only lets you get directly to every controllable element, it also provides a huge degree of flexibility unavailable even using the TimeLine.
§ 13.5.4.4 - Trended
Trends provide a way to set a numeric or boolean parameter over time, within the timeline. We're already talked about them right here.
§ 13.5.4.5 - Global Presets
You can save almost the entire state of every operator and what images are loaded by using F/x's Save Project and Load Project commands, available from the File menu.
§ 13.5.4.6 - Saving and Loading Individual Operation Presets
§ 13.5.4.7 - Saving and Loading Entire Projects
, Previous Page . Next Page t TOC i Index o Operators g Glossary
Copyright © 1992-2007 Black Belt Systems ALL RIGHTS RESERVED Under the Pan-American Conventions
WinImages F/x Manual Version 7, Revision 6, Level A
