§ 35 - Matte Techniques
§ 35.1 - Blue Screens
Green screens are just like blue screens — except they're green. They came into vogue for several reasons, and are now more commonly used than blue screens. However, all of the following material, unless marked otherwise, applies just as much to green screens as it does to blue ones; just think "green" whenever you read "blue."
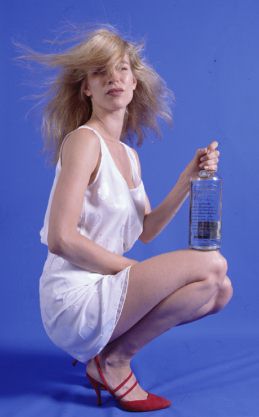
Blue screens are a classic method used to film or photograph objects so that they may later be composited with other scene elements. To do this, the object is placed in front of what is literally a blue screen, and recorded. F/x is then used to create a matte (alpha channel) that isolates just the object of interest, while rendering the area where only the blue screen itself appears, transparent.
If you're going to be creating blue screens yourself, here are the key ideas:- Make sure there is as little blue as possible in the object to be keyed.
- Try to create as uniform a screen blue as you can — try matte deep blue paint.
- Light the screen evenly and completely.
- Place the subject well in front of the screen so reflected blue light from the screen doesn't "spill" on the subject and the subject's interaction with its own lighting doesn't create shadows on the blue screen.
- If you are getting significant blue spill, try backlighting the subject with a yellow light source on the problem area.
- Front-light the subject using a different light than the blue screen.
- Try to use depth of field as an aid to keep the blue screen out-of-focus.
- Try to have blue visible entirely around the subject, head, feet, arms, etc.
The above tips are really the key to good blue screening. If you've got a reasonable blue screen, then the following steps can produce a good matte from the screen:
- Promote the blue screen to a layered image
- Rename the single layer now in the image to object
- Duplicate the object layer and move the duplicate above the image to be keyed (above the original object layer)
- Rename the new, upper layer to key
- Set the key layer mode to "Inverted RGB Key (soft)" (the layered master image will clear at this point)
- Set the key layer's "Factor" to 200
- Select the Freehand or Polygon area tool
- Select the Remove operator
- On the key layer, make an area selection that surrounds the object loosely. This will remove the object and rebuild an approximation of the bluescreen where the object was. The master will now show the object, keyed with variable transparency. You might want to play with the key layer's "Factor" setting at this point.
- In the master image's local menu, select Quick Ops / Clone Image. This will produce an editable copy of the keyed result.
- Blue screens only, not green screens: Select the Entire Image areatool.
- Blue screens only, not green screens: Run the "Standard/Plugin/Defringe" plugin on the clone. As long as the object didn't have blue in it in the first place, this will generally improve the matte considerably if there was any spill at all. If there is blue content in the image, you may have to do some additional hand-editing of the alpha channel to get an acceptable matte.
After following the above steps, you should have a quality matted image.

, Previous Page . Next Page t TOC i Index o Operators g Glossary
Copyright © 1992-2007 Black Belt Systems ALL RIGHTS RESERVED Under the Pan-American Conventions
WinImages F/x Manual Version 7, Revision 6, Level A
![]()