| This is a child page. You can use Parent in the quick nav bar at the top or the bottom of the page to navigate directly back to the parent of this page. Some child pages are more than one level deep, and in that case will require more than one Parent click to reach the outermost document level. |
§ 17.8.3 - Timeline Controls - Action, Source and Brush Image Dialogs - Tutorial
In the following information, you can substiture "brush" for "source" in any location, as long as the operation you're considering requires a brush (e.g. the Stroke operation.)
The Action, Brush and Source image tutorial is designed to introduce you to the action, brush and source image specification dialogs. This tutorial will rely heavily on information presented in earlier sections. If you have not already completed the previous tutorials, do so at this time. This tutorial will do a merge operation using a single action image, and a video sequence as the source images.
-
If you have not already done so, start F/x by clicking on its icon, or use the system's Run startmenu command with the FX.EXE file selected. If F/x is already running, please close all existing images and TimeLines. Once the program is running, you may wish to open the F/x documentation to this section, and resize both the program and documentation to fit on the same screen. This way you can perform the operations and view the tutorial at the same time. In some cases you may need to use Alt+Tab to flip between F/x and the F/x documentation.
-
Open the TimeLine dialog, and delete its contents using Erase Timeline. Now, load the atiger.jpg image into F/x using the Load Image option in the File pull down menu. This image will be used as the action or target image for the sequence. Enter the Sequence Controls dialog and set the Total Frames control to ten. After you have made this change, select OK to confirm the changes and exit the dialog.
-
The next step is to specify the operation and the area selection that will be used for the animation sequence. This example will use the Merge operation, and the Rectangle area selection. Drag a Merge operation icon into frame one of the TimeLine. Now, place a Rectangle area selection icon into frame one of the same level. Enter the Area Selection Object dialog by double clicking on the Rectangle area selection icon in frame one. Select Make the area selection now and place a Rectangle in the atiger.jpg image. The area selection should be near the center, and should take up about one quarter of the total image size.
-
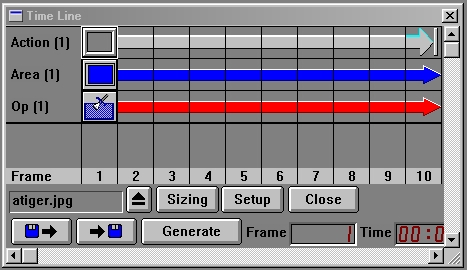
Now, we will specify the action image to be used for this sequence. Enter the TimeLine Operation dialog by double clicking on the merge operation icon in frame one. Select Specify Action Image The dialog that appears allows you to specify an action image file, file sequence, loaded images, or an animation file. In this case we will be using an already loaded image as the action image. This means that we will need to select Use Loaded Image This dialog allows you to specify an image which has already been loaded into memory, or the result off a previous levels operation. Select Use image currently in memory, and the atiger.jpg image from the available images. Press OK to confirm the file selection and to close the dialog. At this time your TimeLine should look something like this:
-
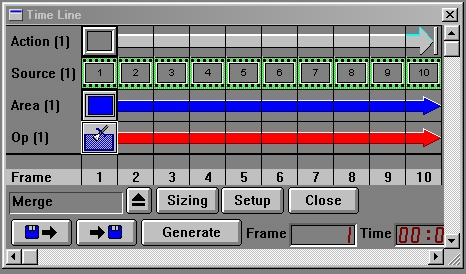
The final step to preparing our animation is to specify a sequence of source images. Enter the TimeLine Operation dialog for the merge operation using the method described in step 4. Now, select Specify Source Image The dialog that appears is extremely similar to the action image dialog. In this case you will want to select Specify Image File Use the provided file dialog to load the ladyfrog.flc animation. This file should be located in the directory where you installed the default image sets.
After the animation has been selected, press OK to confirm the file selection and close the file dialog. This will take you back to the TimeLine Source Image dialog. You should notice that the ✓ This is a video sequence check box is now selected. This means that the Start Frame and Frame Increment controls are now active as well. We will not need to adjust these for this animation. View the definitions above for more details on these controls. Select OK to close this dialog. Now your TimeLine should look like this:
-
Select Generate on the TimeLine dialog to create the animation. This is only one example of using action and source image files in the TimeLine. It is possible to set up complex TimeLines that use multiple levels to create intricate animation sequences. If you have further questions on the TimeLine, please review the TimeLine documentation sections. You should also complete all of the available tutorials.
, Previous Page . Next Page t TOC i Index o Operators g Glossary
Copyright © 1992-2007 Black Belt Systems ALL RIGHTS RESERVED Under the Pan-American Conventions
WinImages F/x Manual Version 7, Revision 6, Level A
![]()