| This is a child page. You can use Parent in the quick nav bar at the top or the bottom of the page to navigate directly back to the parent of this page. Some child pages are more than one level deep, and in that case will require more than one Parent click to reach the outermost document level. |
§ 13.13 - Advanced Getting Started Tutorial
The Advanced Getting Started Tutorial is designed to reinforce concepts presented in the basic tutorial, and to also present more advanced TimeLine and program topics. This tutorial relies heavily on information presented in the basic tutorial. If you have not completed that tutorial, please do so at this time.
-
If you have not already done so, start F/x by clicking on its icon, or use the Start Button's Run command with the FX.EXE file selected.
If F/x is already running, please close all existing images and the TimeLine. Once the program is running, you may wish to open the F/x documentation to this section, and resize both the program and help file to fit on the same screen. This way you can perform the operations and view the tutorial at the same time. In some cases you may need to use the Alt+TAB key combination to flip between F/x and this document.
 Note: This tutorial was designed for use with the Immediate Painting Working Method. If your working Method is set to the Draw First mode, you should change it to Immediate Painting at this time. You'll find the control for this at the top of the Settings Menu, it's called Change Working Method
 -
The animation that we will be creating contains two separate effects. The first effect is the perspective placement of an AVI animation file into a still image (the "action" image). The second operation is a radial wave in the static Action Image that starts at a point, and then ripples outward. The overall effect will be an image rotating backwards into the Action Image, and then "hitting" the image to create a wave.
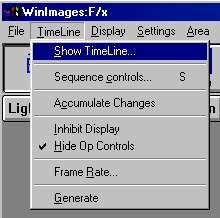
The first thing that we will need to do is open the TimeLine. The Timeline is opened by selecting the Timeline icon from the tool bar, or by selecting the Show Timeline option from the TimeLine pull down menu.
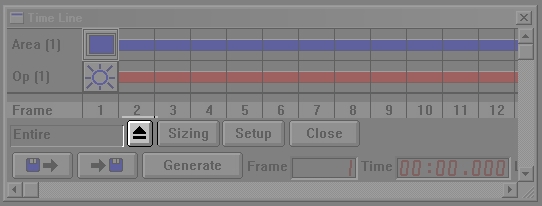
At this time you will want to clear out the TimeLine, and also close all of the image views that are currently open. To do this, simply press the eject button in the TimeLine as shown below...
...now that we have a fresh TimeLine, let's load the two image files that we will be using. The first file is called ATIGER.jpg, and should be located in the...
C:\IMAGES ...directory. If you do not remember how to load a file, please review the previous tutorial. The second image we will need is the first frame from the FLC animation sequence that will be placed into the tiger image. This file is called ladyfrog.avi, and is located in the...
C:\WINIMAGE ...directory. You will be asked which frame of the sequence you wish to load. For this example select frame 1.
-
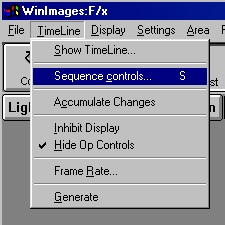
Now that we have the images loaded, let's set up the length of the TimeLine, output file type, and frame rate. The Sequence Controls dialog allows you to specify the animation length and output format. This dialog is accessed by selecting the Sequence Controls option from the TimeLine pull down menu...
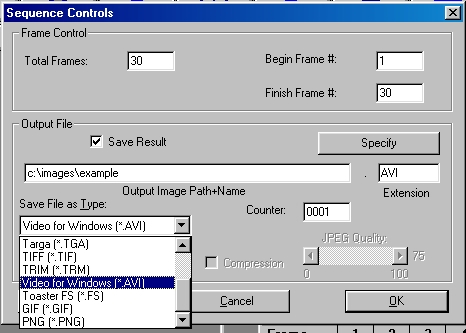
...The first thing that we will want to change is the Total Frames control. This numeric entry filed displays the current number of frames in the TimeLine and filmstrip. This value can be changed by simply entering the desired frame number, and then pressing the Tab button to confirm the change. For this animation, you will want to set the number of frames to 30. After you have done this, select the Save File as Type: drop down box. This box contains a list of all of the available file and animation formats in F/x. You can select a file format by clicking on its name. For this sequence you should select the Video for Windows AVI option. You will now want to set the type of AVI that you want to create. This is done by selecting Color Depth option, and setting it to 24-bit (16 million) colors. The next control to set is the output path and file name...
...For this example you should set this to...
C:\IMAGES\EXAMPLE ...(You do not have to select this as your output directory and file name. You may select any valid directory and file name.) The final step is to select the Save Results check box. Do not select this option if you do not want to generate a AVI animation. Press the Ok button to confirm the changes and exit the dialog.
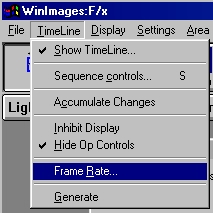
The next step is to set the animation's Frame Rate. The frame rate sets the speed that the animation is displayed on screen. This frame rate is set using the Frame Rate option in the TimeLine pull down menu...
...this dialog contains three interrelated controls that set the frame rate for the animation. You can set the frame rate in milliseconds per frame, frames per second, or jiffies. For this example let's set the frame rate to 10 frames per second. This will reset the other controls to the appropriate values. After you have set the proper frame rate, select the Ok button to confirm the change and close the dialog.
-
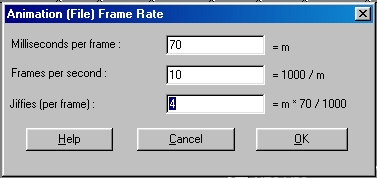
The next step is to set up the perspective placement section of the animation. The perspective operation will place the current Source Image into the Action Image in a "3-D" manner. This operation also allows you to rotate the image based on its X, Y, and Z axes. The perspective operation can be accessed by pressing the Geometric button, and then selecting the Perspective icon...
...You can also select this operation through the Operation menu's Geometric option. We will want to set the perspective dialog to some particular settings before we place the operation in the TimeLine. The X, Y, and Z rotation values should all be set to zero, X and Y position should be zero, Z position should be 100, and the H and V zoom level should be at 200. Once you have made any necessary changes to the perspective settings, place the perspective icon in frame one of the TimeLine using the drag and drop method. (If you do not know how to use the drag and drop method for placing objects in the TimeLine, please review the basic tutorial.)
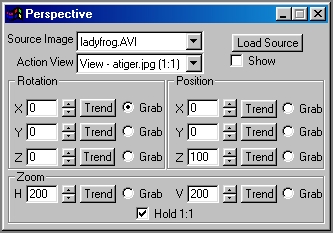
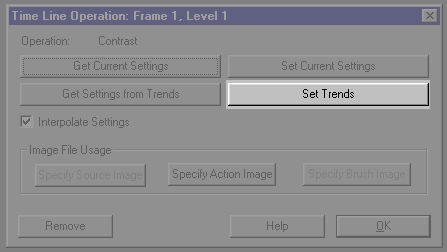
The perspective portion of the animation has two separate parameters to be adjusted. The X Rotation parameter will allow us to create a vertically rotating object, and the Z Position allows us to move the Source Image from the "front" of the Action Image to the "back". We will use trends for these parameters to simplify the creation of the animated effect. Trends are a graph showing a parameter's setting over the sequence of frames. Each frame in the sequence is represented with a vertical line. A control point or key frame value can be placed for some or all of the frames in the sequence. F/x will automatically specify a control point for the first and the last frame of the sequence. The trend curves can be accessed through the TimeLine Operation dialog. You can select this dialog by double clicking on the perspective icon in the first frame of the TimeLine.
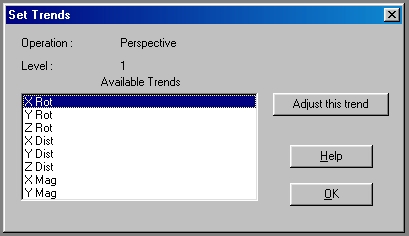
The dialog that appears allows you to specify operation parameter and trend settings, as well as the source and Action Images for a sequence. Select the Set Trends option to specify the parameters that we want to trend. This will open a dialog with a list of all of the available trends...
...click on the X Rot option, and then press the Adjust this trend button. You should notice that a trend has opened for that parameter. Now select the Z Dist parameter, and press the Adjust this trend option to open the Z distance trend for manipulation. After you have opened both of these trends, select the Ok button to close the dialog.
-
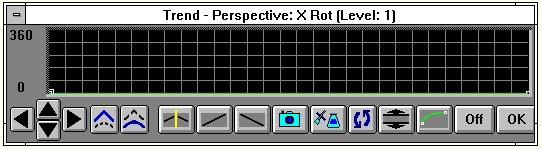
The next step is to set the rotation trend. The initial trend should look something like this:
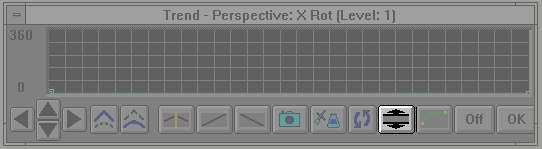
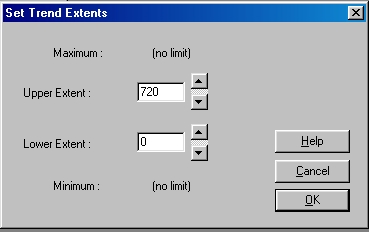
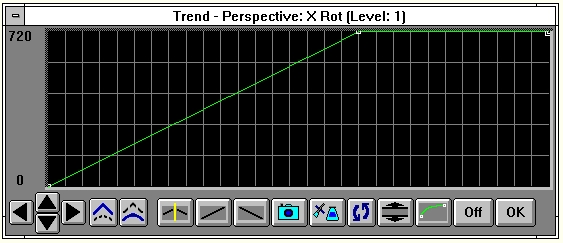
We want to create an animation which flips vertically twice. This can be done by changing the Extents of the rotation value. Rotation is measured in degrees ranging from 0 to 360, where 0 and 360 are the same value. Rotation is considered to be a cyclic or repeating operation. This means that after a certain value, the operation will repeat itself. For example, a setting of 180 degrees is the same as a setting of 540 degrees. Since this is true, we can create a larger range of values between the maximum and minimum extent, and still have the operation repeat. ( If this concept is still not clear, don't worry about it. After the trend is set up it will become clearer.) We will want to change the maximum value for the X rotation from 360 to 720 (twice 360). This is done by clicking on the extents button located in the trend dialog...
...this will open a screen describing the maximum and minimum values possible for the parameter, and its current settings. You will want to change the Upper Extent control to 720, and leave the Lower Extent at its current value...
...press the Ok button to confirm the changes and close the dialog. You should notice that the maximum value marker on the left has changed from 360 to 720, and the original trend graph has changed position to reflect the change in scale.
We are now ready to draw the trend graph for the X rotation. Press the Rising Slope button in the trend dialog. This will create a diagonal line going from the minimum value of 0 in frame one to the maximum value of 720 in frame 30. This is close to what we want, but the perspective portion of the animation only takes place in frames one through nineteen. This means that we should specify a third control point in frame nineteen, so that the X rotation will reach 720 in frame nineteen. This can be done by placing the pointer over the trend, and then finding frame nineteen with the At control in the Status Bar. Now click on frame nineteen with the left mouse button. Drag the control point to the top of the trend graph, until the At display reads: F:19; Y:720. Release the left mouse button to drop the control point. The final X rotation trend should look like this:
Now that you have done this you can close the X rotation trend by selecting OK.
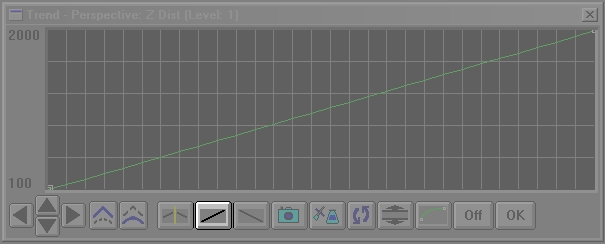
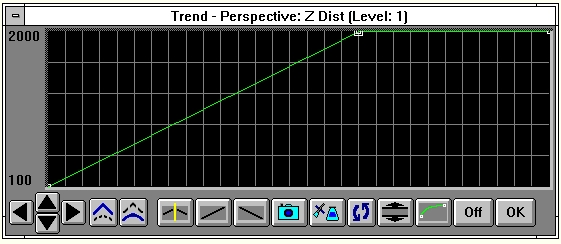
You can set the Z Position trend using the same steps. First, change the extents to 2000 for the Upper extent, and 100 for the lower extent. Now, press the Rising Slope button...
...to create a line between the minimum and the maximum extents. The final step is to specify another control point in frame 19 that is at the maximum value of 2000 (F:19; Y:2000). The resulting trend should look like this:
Select OK to close the dialog.

continued on next page...
, Previous Page . Next Page t TOC i Index o Operators g Glossary
Copyright © 1992-2007 Black Belt Systems ALL RIGHTS RESERVED Under the Pan-American Conventions
WinImages F/x Manual Version 7, Revision 6, Level A
![]()