§ 12.9 - Crop
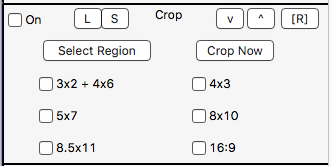
The crop tool offers white "Rule of Thirds" markings, a red center target and bisection markings, and a red 1:1 diagonal guide.
In addition, by clicking a check box, you can add guides for a number of common image formats, such as 3x2 (this is what a DSLR typically uses), 5x7 and so on. You can turn on any or all of the extra guides you like.
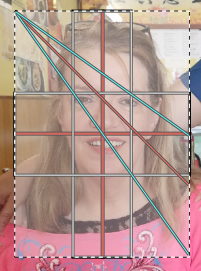
To the right, an image is shown with ✓ 5x7 cropping guides turned on (these optional guides are shown in aqua within the actual cropping rectangle.) All you have to do to create a 5x7 aspect ratio crop is see to it that the lower right corner of the crop is intersected by one of the blue lines. The upper blue line guide is for a landscape crop; the lower blue line is for a portrait crop, which is what the crop shown here is adjusted for. Multiple guides allow for trying out different crop formats during one cropping action.
When ready to select the region to be cropped, click Select Region and you can drag out a crop rectangle by pressing the left mouse button, and then dragging the mouse. You can do this multiple times. Also, while you're holding the left mouse button down, if you also press the right mouse button at the same time, then the crop rectangle will stop sizing and you can move it around; this is very handy, make sure you give it a try.
Using the guides is very easy; in order to ensure that your crop meets the aspect ratio described by the guide, simply make sure the lower right hand corner of the crop rectangle rests on the guide.
When you're done, release the left mouse button (or both mouse buttons, if you were moving the crop), and click the right mouse button once to exit crop mode. At this point, you can left-click Crop Now button, and the crop rectangle you created will form the new boundaries of the image.
, Previous Page . Next Page t TOC i Index o Operators g Glossary
on February 27th, 2026 at 17:36 MT
| Please consider supporting my dTank (β) development efforts via a small PayPal donation. |